概念
封装、继承和多态
进程与线程的一个简单解释
进程之间有哪些通信方式?
- 管道
- 消息队列
- 共享内存
- 信号量
- Socket
Python并发编程之谈谈线程中的“锁机制”
COOKIE和SESSION有什么区别?
- Session是在服务端保存的一个数据结构,用来跟踪用户的状态,这个数据可以保存在集群、数据库、文件中;
- Cookie是客户端保存用户信息的一种机制,用来记录用户的一些信息,也是实现Session的一种方式。
分页和分段有什么区别?
页是信息的物理单位,分页是为实现离散分配方式,以消减内存的外零头,提高内存的利用率,是为了管理主存的方便而划分的,对用户是透明的。段则是信息的逻辑单位,它含有一组其意义相对完整的信息。分段的目的是为了能更好地满足用户的需要,因此段对用户是可见的。
页的大小固定且由系统决定;而段的长度却不固定,决定于用户所编写的程序。
分页的地址空间是一维的,程序员只需利用一个记忆符,即可表示一个地址;而分段的作业地址空间是二维的,程序员在标识一个地址时,既需给出段名,又需给出段内地址。
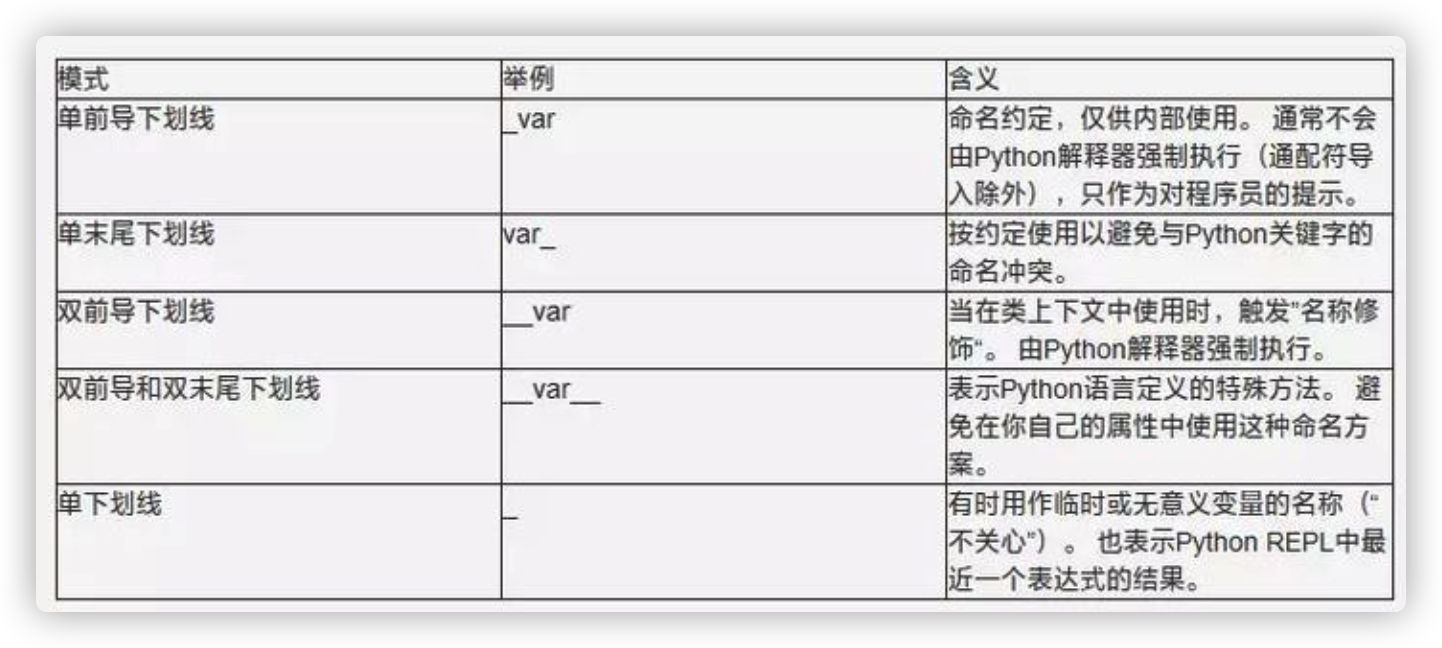
成员保护和访问限制
- 在Python中,如果要让内部成员不被外部访问,可以在成员的名字前加上两个下划线
__,这个成员就变成了一个私有成员(private)。私有成员只能在类的内部访问,外部无法访问。 - 类的成员与下划线总结:
_name、_name_、_name__:建议性的私有成员,不要在外部访问。__name、 __name_:强制的私有成员,但是你依然可以蛮横地在外部危险访问。__name__:特殊成员,与私有性质无关,例如__doc__。name_、name__:没有任何特殊性,普通的标识符,但最好不要这么起名。
Python的垃圾回收机制
Python中的垃圾回收是以引用计数为主,标记-清除和分代收集为辅
- 引用计数:Python在内存中存储每个对象的引用计数,如果计数变成0,该对象就会消失,分配给该对象的内存就会释放出来。
- 标记-清除:一些容器对象,比如list、dict、tuple,instance等可能会出现引用循环,对于这些循环,垃圾回收器会定时回收这些循环(对象之间通过引用(指针)连在一起,构成一个有向图,对象构成这个有向图的节点,而引用关系构成这个有向图的边)。
- 注意,只有容器对象才会产生循环引用的情况,比如列表、字典、用户自定义类的对象、元组等。而像数字,字符串这类简单类型不会出现循环引用。作为一种优化策略,对于只包含简单类型的元组也不在标记清除算法的考虑之列
- 分代收集:对于程序,存在一定比例的内存块的生存周期比较短;而剩下的内存块,生存周期会比较长,甚至会从程序开始一直持续到程序结束。生存期较短对象的比例通常在 80%~90% 之间,这种思想简单点说就是:对象存在时间越长,越可能不是垃圾,应该越少去收集。这样在执行标记-清除算法时可以有效减小遍历的对象数,从而提高垃圾回收的速度。
应用
实现Python单例模式(Singleton)
- 单例是一种设计模式,应用该模式的类只会生成一个实例。单例模式保证了在程序的不同位置都可以且仅可以取到同一个对象实例:如果实例不存在,会创建一个实例;如果已存在就会返回这个实例。
通过类实现:
class Singleton():
    def __init__(self,cls):
        self._cls=cls
        self._instance={}
    def __call__(self, *args, **kwargs):
        if cls not in self._instance:
            self._instance[cls]=cls()
        return self._instance[cls]

@Singleton
class Solution(object):
    def __init__(self):
        pass
solution1=Solution
solution2=Solution
print(id(solution1) == id(solution2))
通过函数实现:
def singleton(cls):
    _instance={}

    def wrapper():
        if cls not in _instance:
            _instance[cls]=cls()
        return _instance[cls]
    return wrapper

@singleton
class Solution(object):
    def __init__(self):
        pass
Solution1=Solution()
Solution2=Solution()
print(id(Solution1) == id(Solution2))
浅拷贝和深拷贝
Python中对象之间的赋值是按引用传递的,如果要拷贝对象需要使用标准模板中的copy
- 直接赋值:其实就是对象的引用(别名)。
- copy.copy:浅拷贝,只拷贝父对象,不拷贝父对象的子对象。
- copy.deepcopy:深拷贝,拷贝父对象和子对象。
import copy
a = [1, 2, 3, 4, ['a', 'b']] #原始对象

b = a                       #赋值,传对象的引用
c = copy.copy(a)            #对象拷贝,浅拷贝
d = copy.deepcopy(a)        #对象拷贝,深拷贝

a.append(5)                 #修改对象a
a[4].append('c')            #修改对象a中的['a', 'b']数组对象

print( 'a = ', a )
print( 'b = ', b )
print( 'c = ', c )
print( 'd = ', d )
输出结果:
('a = ', [1, 2, 3, 4, ['a', 'b', 'c'], 5])
('b = ', [1, 2, 3, 4, ['a', 'b', 'c'], 5])
('c = ', [1, 2, 3, 4, ['a', 'b', 'c']])
('d = ', [1, 2, 3, 4, ['a', 'b']])
__new__和__init__的区别, __call__() 方法
__init__是当实例对象创建完成后被调用的,然后设置对象属性的一些初始值。__new__是在实例创建之前被调用的,因为它的任务就是创建实例然后返回该实例,是个静态方法。
也就是:__new__在__init__之前被调用,__new__的返回值(实例)将传递给__init__方法的第一个参数,然后__init__给这个实例设置一些参数
class Solution(object):
    def __new__(cls, *args, **kwargs):
        print('This is new')
        return super().__new__(cls, *args, **kwargs) ## super() equals to object


    def __init__(self):
        print('This is init')

obj=Solution()    # This is new     This is init
print(obj)    # <__main__.c01 object at 0x00000000024E7910>
如果为一个类编写了__call__() 方法,那么在该类的实例后面加括号,就会调用这个方法
class Foo:
    def __init__(self):
        print("__init__")
    def __call__(self, *args, **kwargs):
        print('__call__')

obj = Foo()     # 输出 __init__
obj()       # 输出 __call__
Other Notes
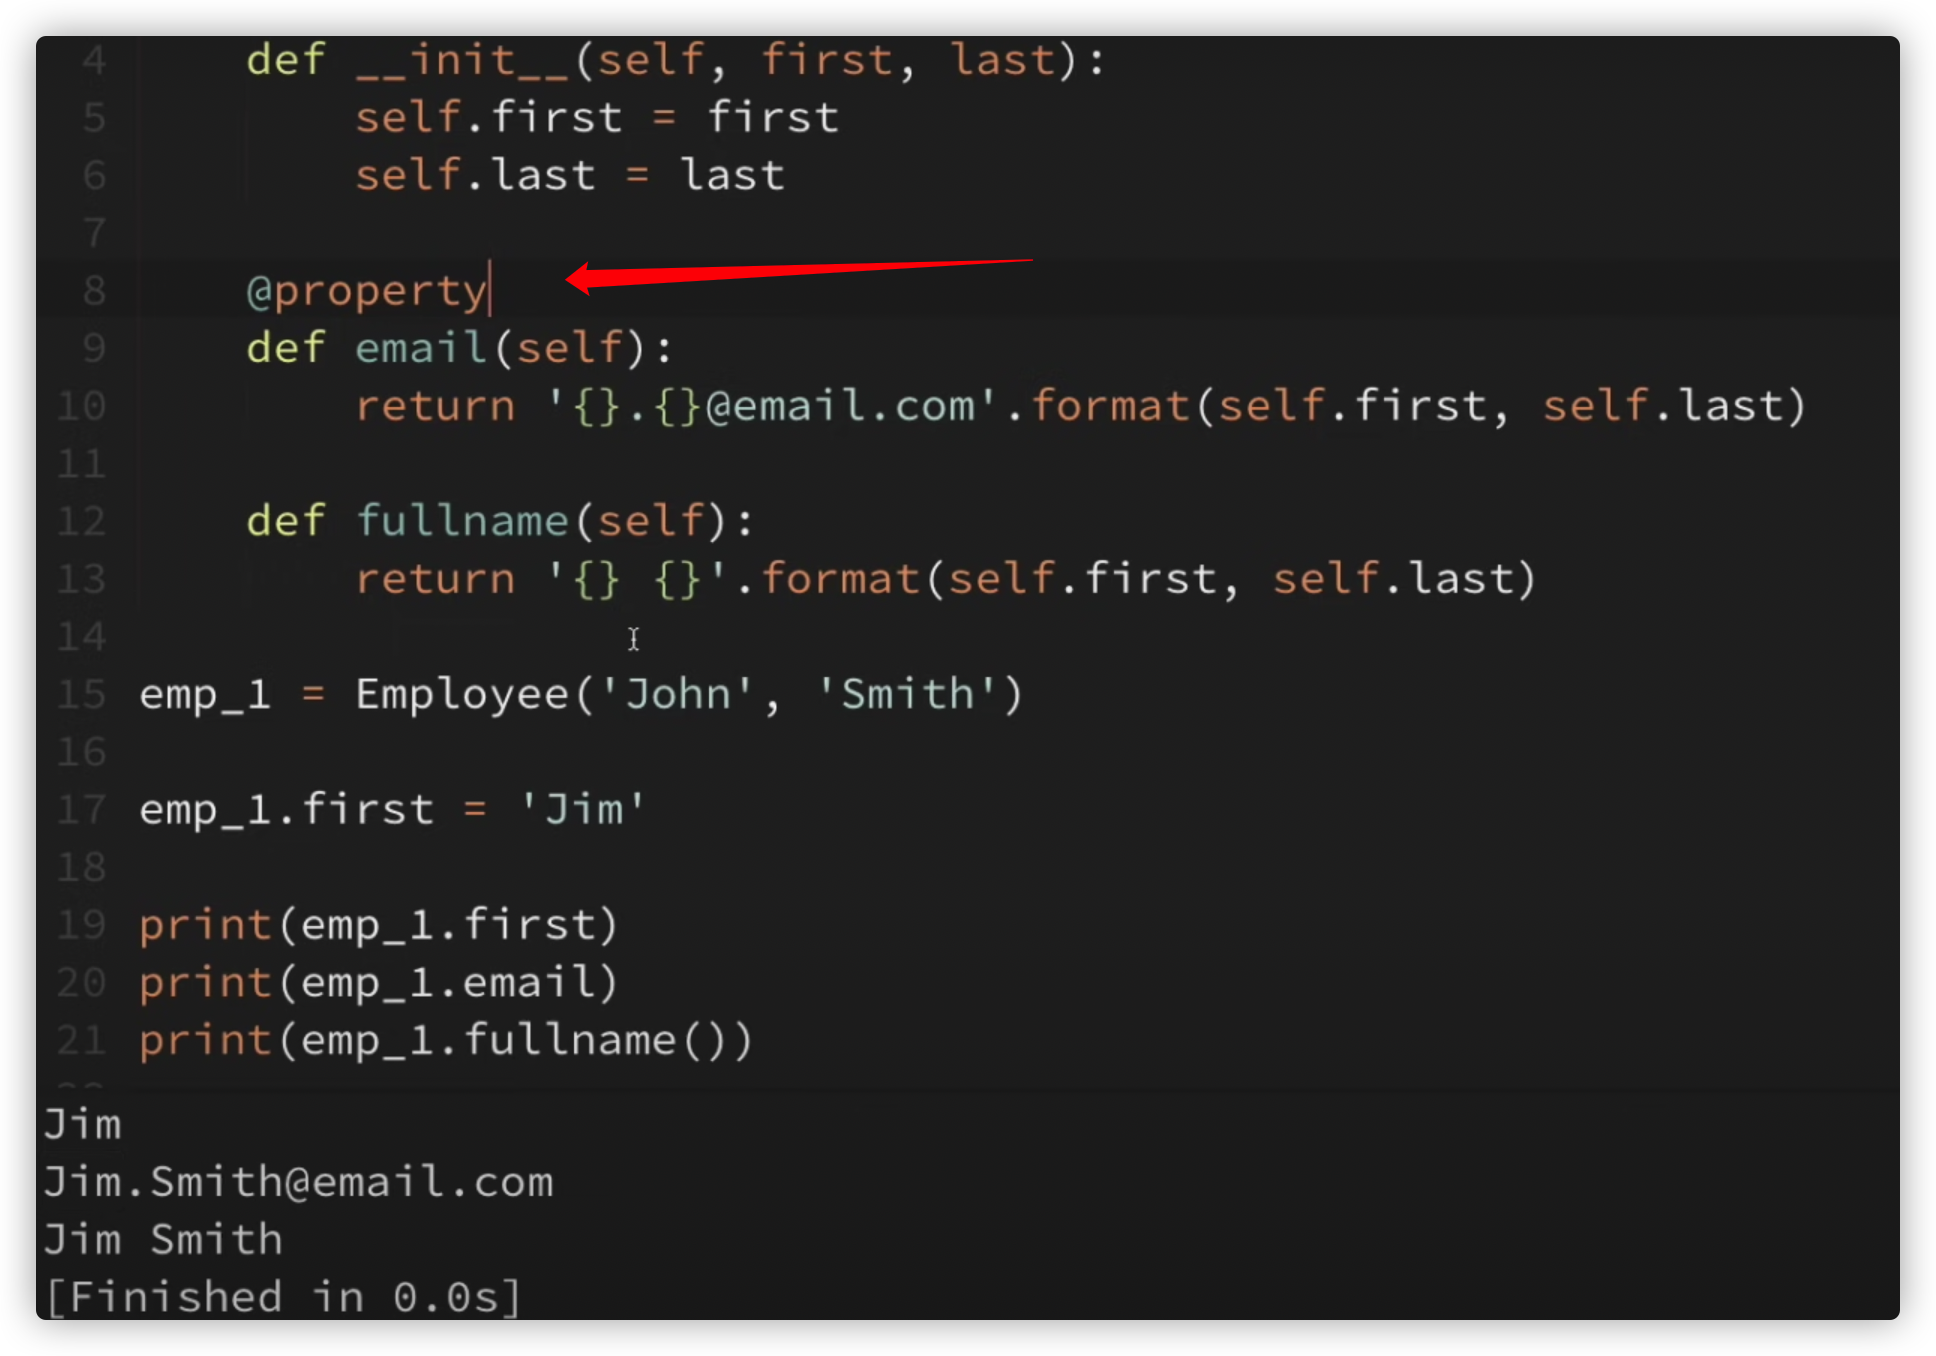
- @property 属性


装饰器
- Python Tutorial: Decorators - Dynamically Alter The Functionality Of Your Functions
- Python Decorators in 15 Minutes


- python深度图转点云
import numpy as np
import matplotlib.pyplot as plt
import cv2
def depth2xyz(depth_map,depth_cam_matrix,flatten=False,depth_scale=1000):
    fx,fy = depth_cam_matrix[0,0],depth_cam_matrix[1,1]
    cx,cy = depth_cam_matrix[0,2],depth_cam_matrix[1,2]
    h,w=np.mgrid[0:depth_map.shape[0],0:depth_map.shape[1]]
    z=depth_map/depth_scale
    x=(w-cx)*z/fx
    y=(h-cy)*z/fy
    xyz=np.dstack((x,y,z)) if flatten==False else np.dstack((x,y,z)).reshape(-1,3)

    fig = plt.figure(dpi=120)
    ax = fig.add_subplot(111, projection='3d')
    plt.title('point cloud')
    ax.scatter(x, y, z, c='b', marker='.', s=2, linewidth=0, alpha=1, cmap='spectral')
    plt.show()


    # xyz=cv2.rgbd.depthTo3d(depth_map,depth_cam_matrix)

    return xyz

if __name__ == '__main__':
    # 随便生成一个 分辨率为(1280, 720)的深度图, 注意深度图shape为(1280, 720)即深度图为单通道, 维度为2
    #而不是类似于shape为(1280, 720, 3)维度为3的这种
    depth_map = np.random.randint(0,10000,(1280, 720))
    plt.matshow(depth_map,cmap=plt.cm.Blues)

    depth_cam_matrix = np.array([[220, 0,  320],
                                 [0,   220,320],
                                 [0,   0,    1]])
depth2xyz(depth_map, depth_cam_matrix)- rgb+深度图转点云,用到open3d ,配套YT视频
- rgb+深度图转点云,用focal_length和scaling factor生成并保存点云
- rgb+深度图转点云,用scaling factor和视角(可设置)
How To Use argparse to Write Command-Line Programs in Python
pandas中[data[[0]]](https://stackoverflow.com/questions/45379597/python-0-meaning) 里面的括号产生一个列表,外面的括号用列表中的元素提取内容
numpy中,data[:,0]与data[:,[0]]的区别:维度不同。示例
import numpy as np data=np.array([[1,2,3],[3,4,6]]) print(data) print("==") print(data[:,0]) print(data[:,0].shape) print("==") print(data[:,[0]]) print(data[:,[0]].shape) # output: # [[1 2 3] # [3 4 6]] # == # [1 3] # (2,) # == # [[1] # [3]] # (2, 1)导入package和module
I personally always use
from package.subpackage.subsubpackage import module(注:这时package中的init.py 函数可以为空))
and then access everything asmodule.functionmodule.modulevar
etc. The reason is that at the same time you have short invocation, and you clearly define the module namespace of each routine, something that is very useful if you have to search for usage of a given module in your source.
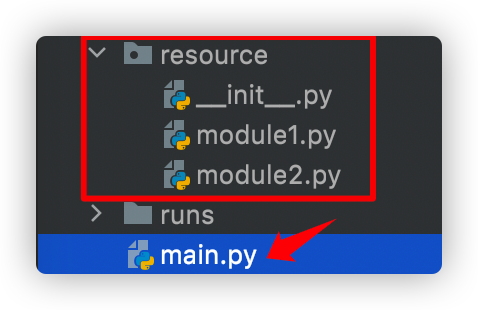
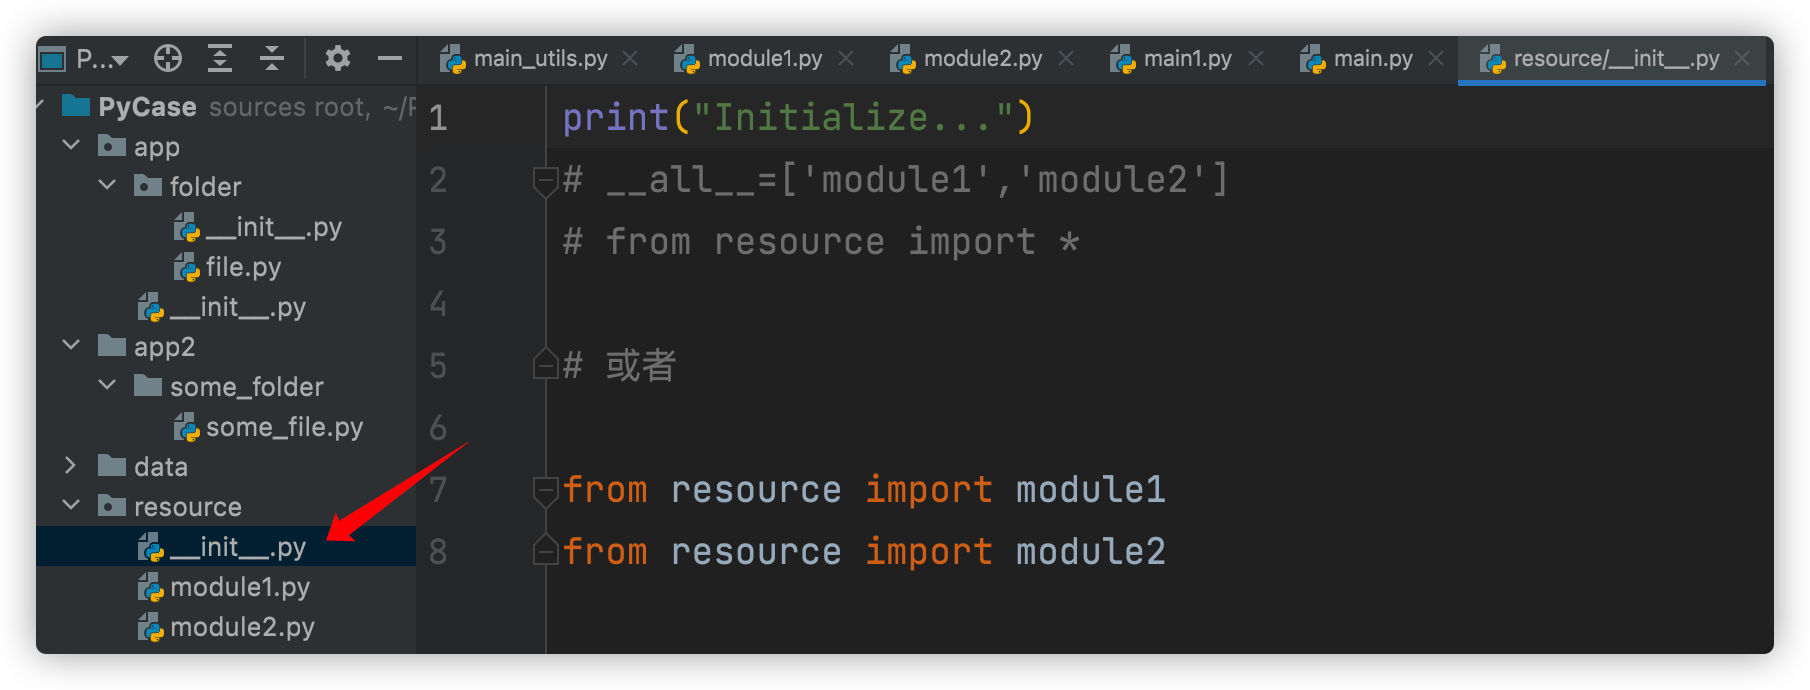
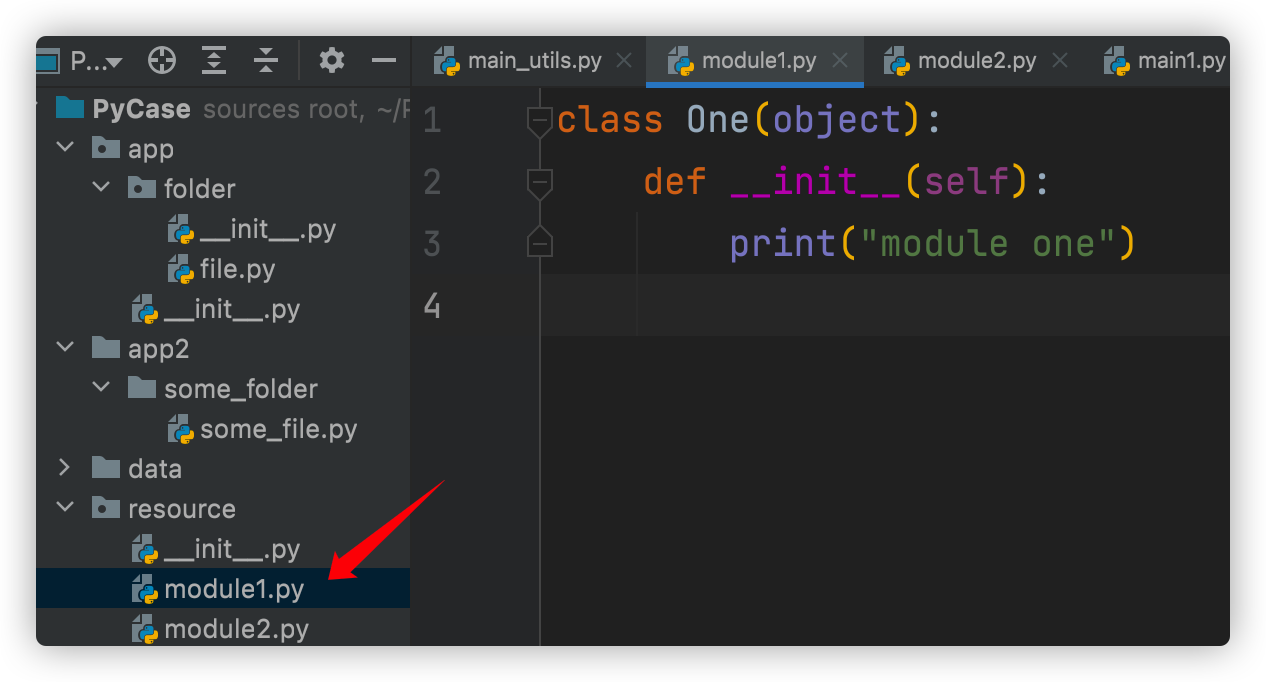
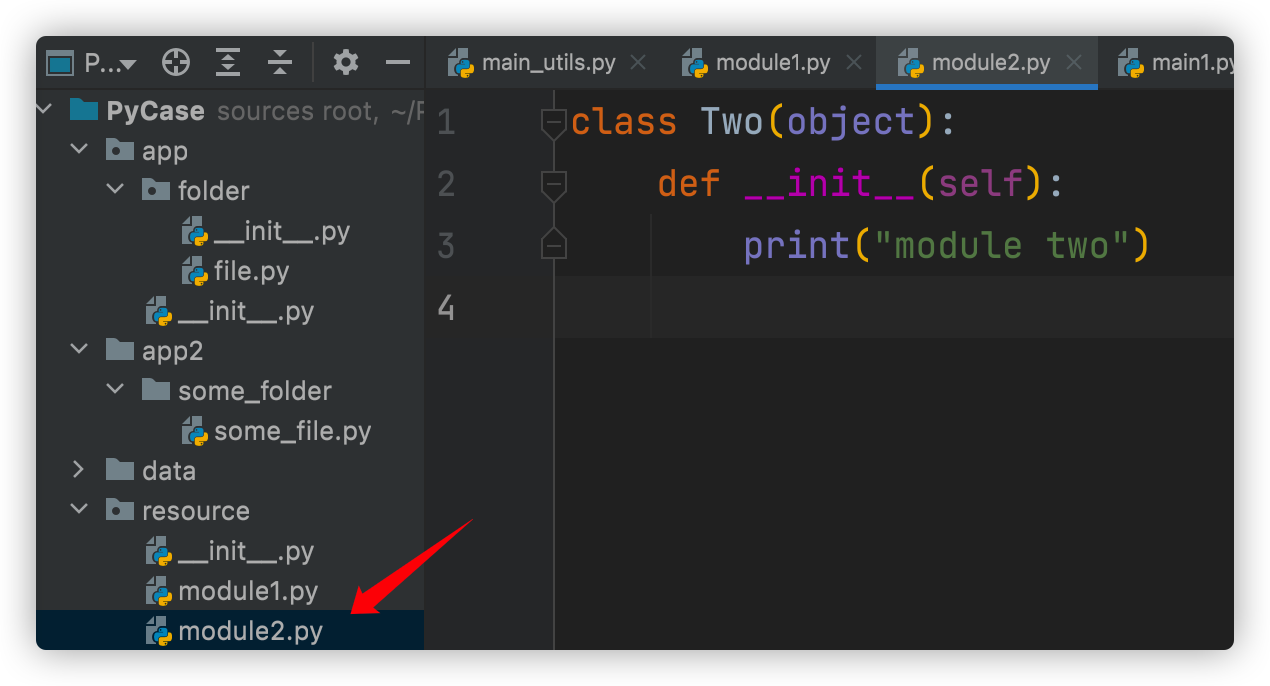
对应的main.py :
# 方式1:因为有resource中的__init__.py,所以可以直接导入package resource
import resource
one=resource.module1.One()

# 方式2:从package中导入module
from resource import module2
two=module2.Two()
# 或者直接导入类,但是google标准不建议这样写
# from resource.module2 import Two
# two=Two()


# 输出:
# Initialize...
# module one
# module two- 在pycharm和命令行中导入的路径是不同的
- pycharm自动将整个工程的绝对路径加入sys.path,而命令行中需要手动导入。搞清楚搜索路径才能避免很多import问题。不清楚时可以用
print(sys.path)检查一下
- pycharm自动将整个工程的绝对路径加入sys.path,而命令行中需要手动导入。搞清楚搜索路径才能避免很多import问题。不清楚时可以用
import sys
import os
CUR_DIR=os.path.dirname(__file__) # 当前可执行文件所在的directory
BASE_DIR=sys.path.append(CUR_DIR) # 对应的父文件夹
# 可以用 os.path.dirname 一直往上写,写到项目的根目录,并添加该目录。如:
sys.path.append(os.path.dirname(os.path.dirname(__file__)))
#可以添加当前文件夹的父文件夹
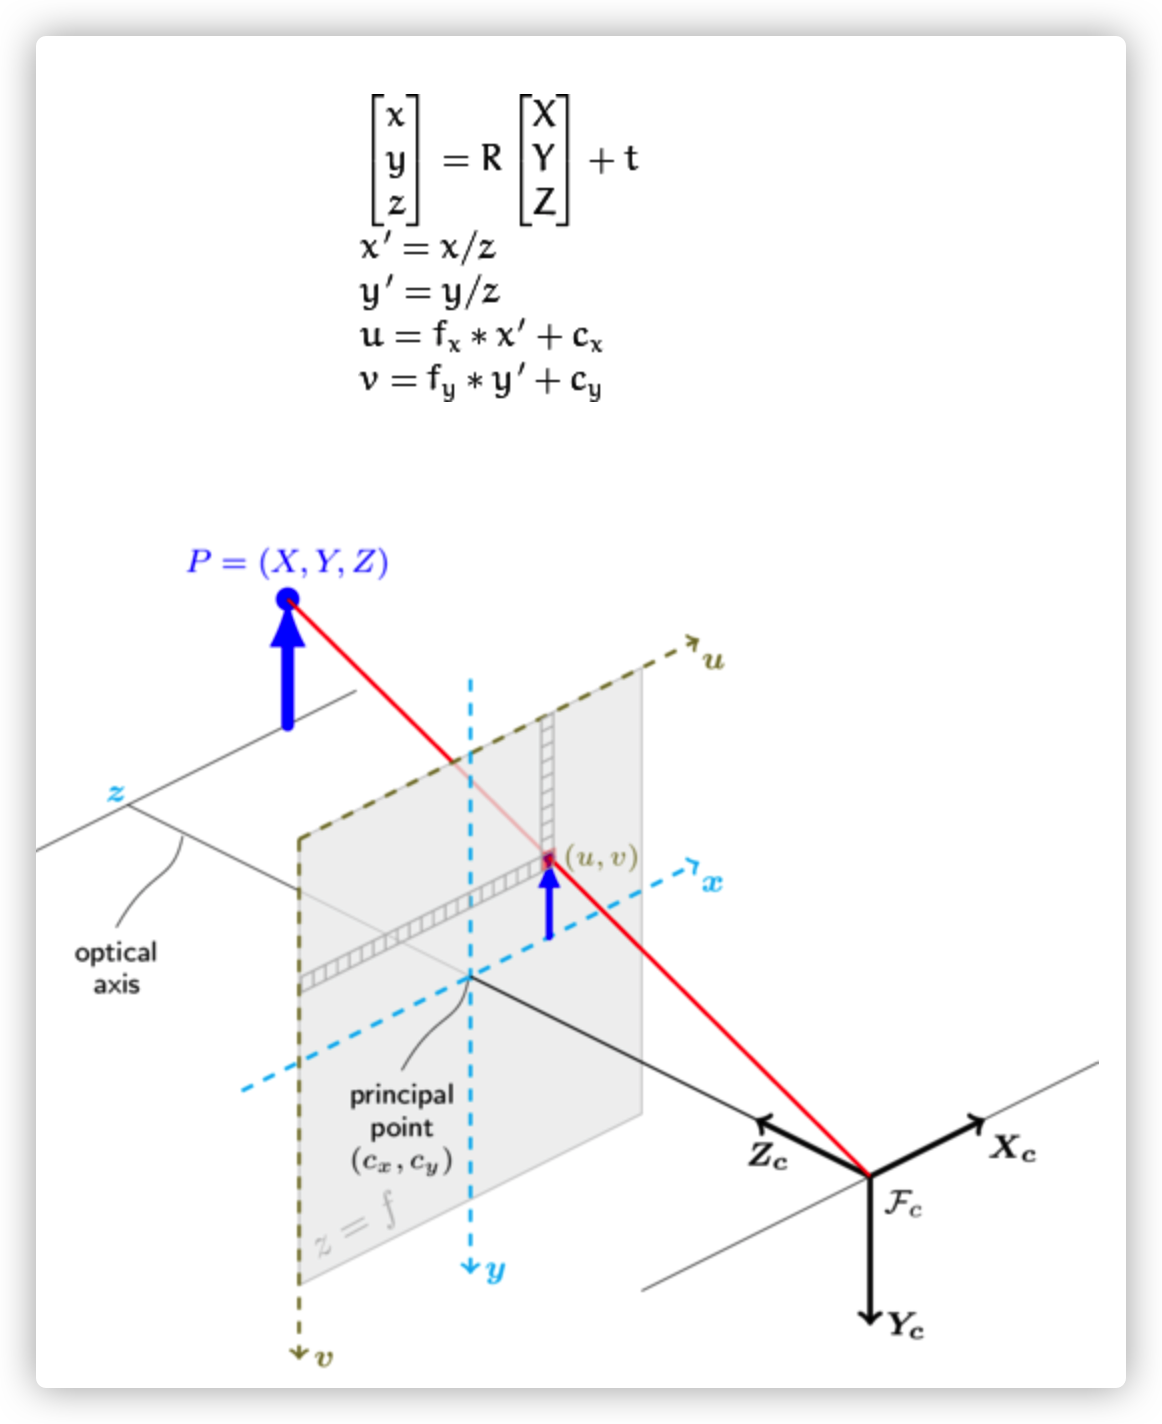
sys.path.append("..")相机标定(PnP计算出的平移向量的z可表示为相机到世界坐标系的距离)
import cv2
import numpy as np

extrinsic = np.array([[0.05812254, 0.9969995, 0.05112498, 0.043909],
                    [-0.02821786, -0.04955038, 0.99837293, -0.026862],
                    [0.99791058, -0.05947061, 0.02525319, -0.006717],
                    [0., 0., 0., 1.]])
rot_mat = extrinsic[:3, :3]
print(f"rot_mat:\n {rot_mat}")

# 把旋转矩阵转化为旋转向量
rvec, _ = cv2.Rodrigues(rot_mat)
print(f"rvec:\n {rvec}")

# 把旋转向量转换为旋转矩阵
rot_mat, _ = cv2.Rodrigues(rvec)
print(f"rot_mat:\n {rot_mat}")
- 批量修改文件或文件夹
import sys
import os

CUR_DIR=os.path.dirname(__file__)
BASE_DIR=sys.path.append(CUR_DIR)

CUR_DIR=os.path.join(CUR_DIR,"subfolder")
files=os.listdir(CUR_DIR)
num="100"
for i in files:
    old_name=os.path.join(CUR_DIR,i)
    new_name=os.path.join(CUR_DIR,"%06d"%int(num)+"suffix.txt") # 补齐6位,不足6位前面加0
os.rename(old_name,new_name) # 可以修改文件名称或者文件夹名称- 把数据转成多(单)通道的图片
- 彩色图:jpg中,超过255的数据会被置为255.彩色图每个通道最大为255,所以用jpg/png都可以。
- 深度图:png中,可以保存大于255的数,深度图可能有比较大的值,所以用png
- 单通道示例
- read_img=cv2.imread(‘depth1.png’,-1) :-1 表示按照原来格式,若不写-1,则会自动将单通道转化为3通道
import matplotlib.pyplot as plt
import numpy as np
import cv2
# import sys
# print(sys.path)

img=np.array([[1,2,3],[4,5,6],[7,8,9]],dtype='uint16')
cv2.imwrite('depth1.png',img)
read_img=cv2.imread('depth1.png',-1)
print(read_img.shape) # (3, 3)


plt.imshow(read_img)
plt.show()
彩色图
- 如果是3通道的彩色图(每个通道的范围是0-255),则保存为jpg或png格式
- jpg: 若通道中的值超过255,则截断到255
- png:若通道中的值超过255,则报错:
Clipping input data to the valid range for imshow with RGB data ([0..1] for floats or [0..255] for integers).单通道深度图
- 把数据保存成png的格式。即便超过255的范围也OK
- 若保存为jpg,则超过255的数据会被置为255
import matplotlib.pyplot as plt
import numpy as np
import cv2
# import sys
# print(sys.path)


# 如果是3通道的,则保存为 jpg/png 格式
img= np.random.randint(0, 255, (100,300,3), dtype=np.uint16)
print(img.shape)#(100, 300, 3)
cv2.imwrite('depth1.png',img)
read_img=cv2.imread('depth1.png',-1)
print(read_img.shape) #(100, 300, 3)
print(np.max(read_img[0])) # 254
plt.imshow(read_img)
plt.show()

# 如果是单通道的,则保存为png格式
img= np.random.randint(0, 1000, (100,300), dtype=np.uint16)
print(img.shape) # (100, 300)
cv2.imwrite('depth1.png',img)
read_img=cv2.imread('depth1.png',-1)
print(read_img.shape) # (100, 300)
print(np.max(read_img)) # 999
plt.imshow(read_img)
plt.show()
- Python中使用subprocess,并实现多任务并行
- 程序运行subprocess.Popen()类,父进程创建子进程后,不会等待子进程执行完成。如果需要等待子进程,需要加入wait()方法阻塞父进程
示例1
child = subprocess.Popen(‘ping www.baidu.com')
print(‘End’)示例2
child = subprocess.Popen(‘ping www.baidu.com')
child.wait()
print(‘End’)以上示例1没有等child 执行完就print,示例2父进程先阻塞,等待child执行完再print。
# 耗时最久,没有任何并行
import subprocess
import time
start_time = time.time()

for i in range(2):
    for j in range(3):
        child=subprocess.Popen('sleep 4', shell=True)
        child.wait()
end_time = time.time()
print("耗时: {:.2f}秒".format(end_time - start_time)) #耗时: 24.24秒


# 里面的for循环并行
import subprocess
import time
start_time = time.time()

for i in range(2):
    for j in range(3):
        child=subprocess.Popen('sleep 4', shell=True)
    child.wait()
end_time = time.time()
print("耗时: {:.2f}秒".format(end_time - start_time)) #耗时: 耗时: 8.08秒
