8. PyTorch Tensors Explained - Neural Network Programming
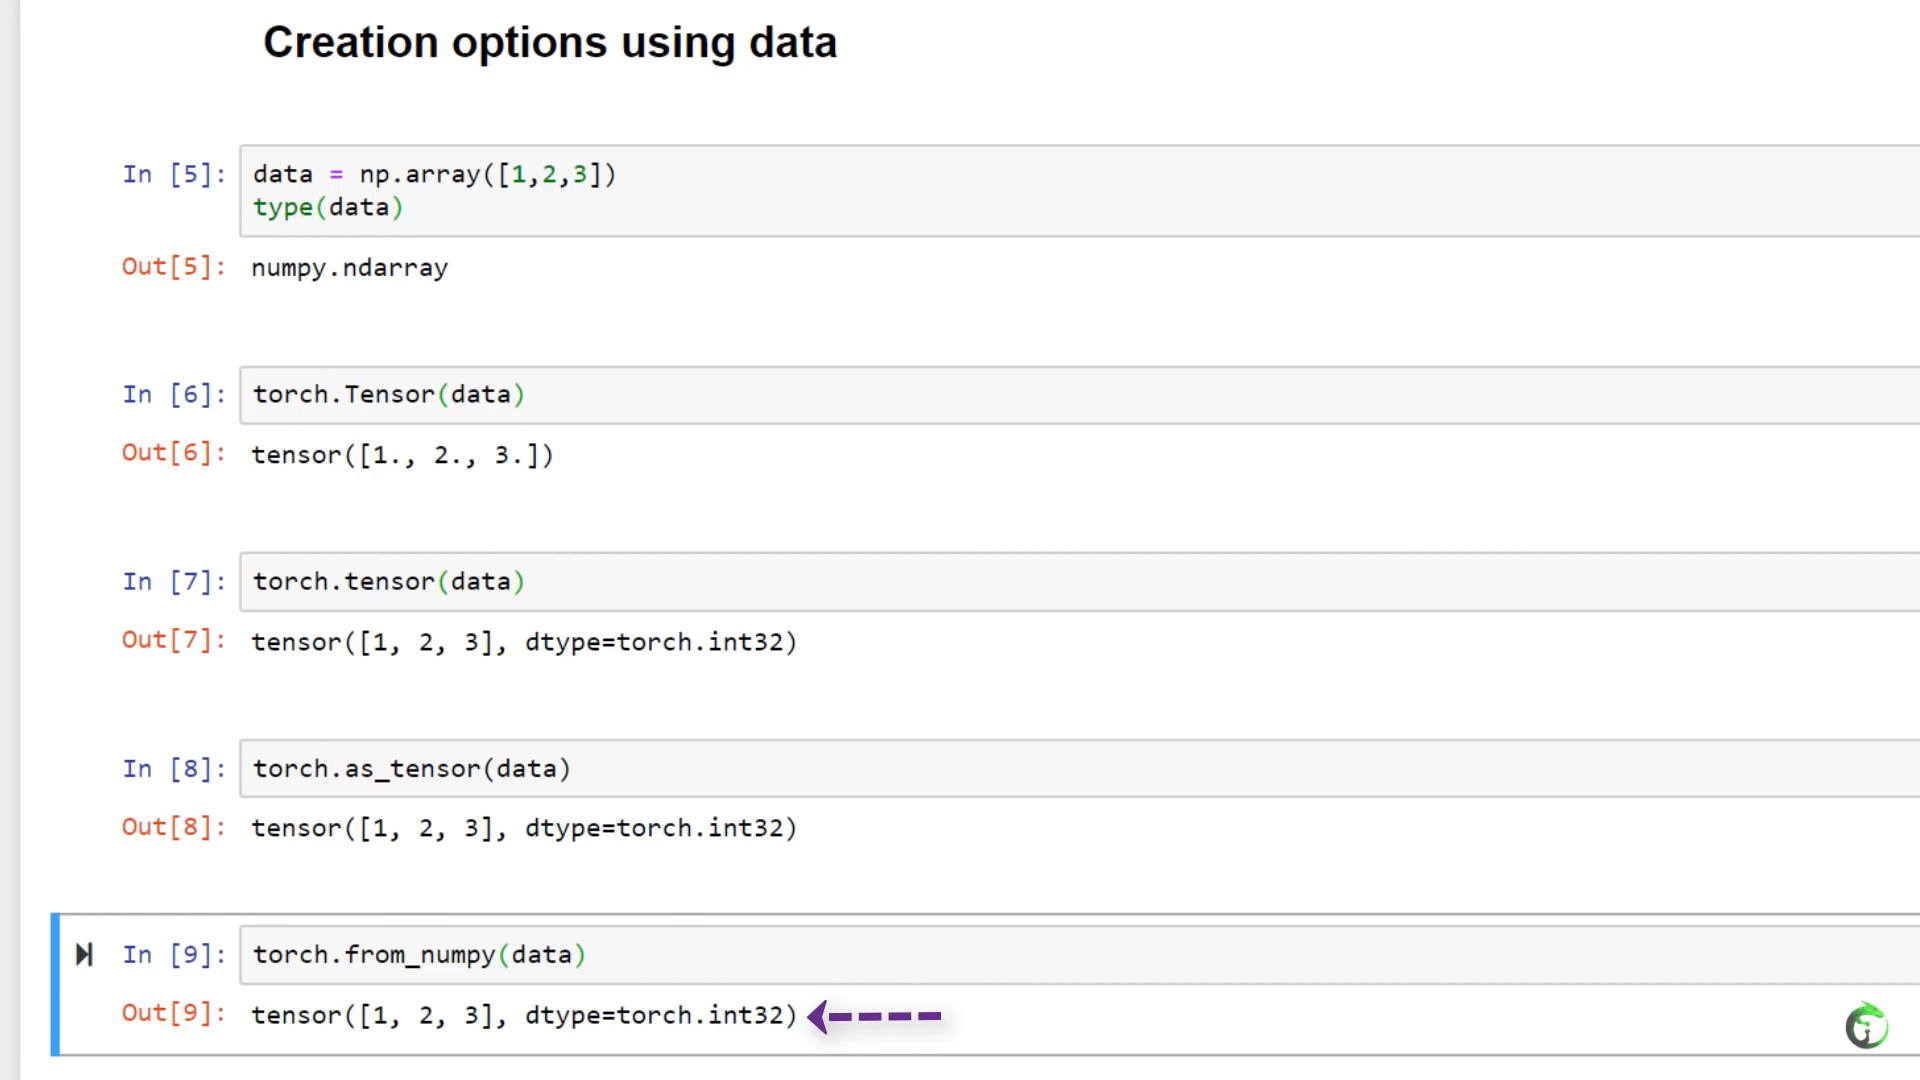
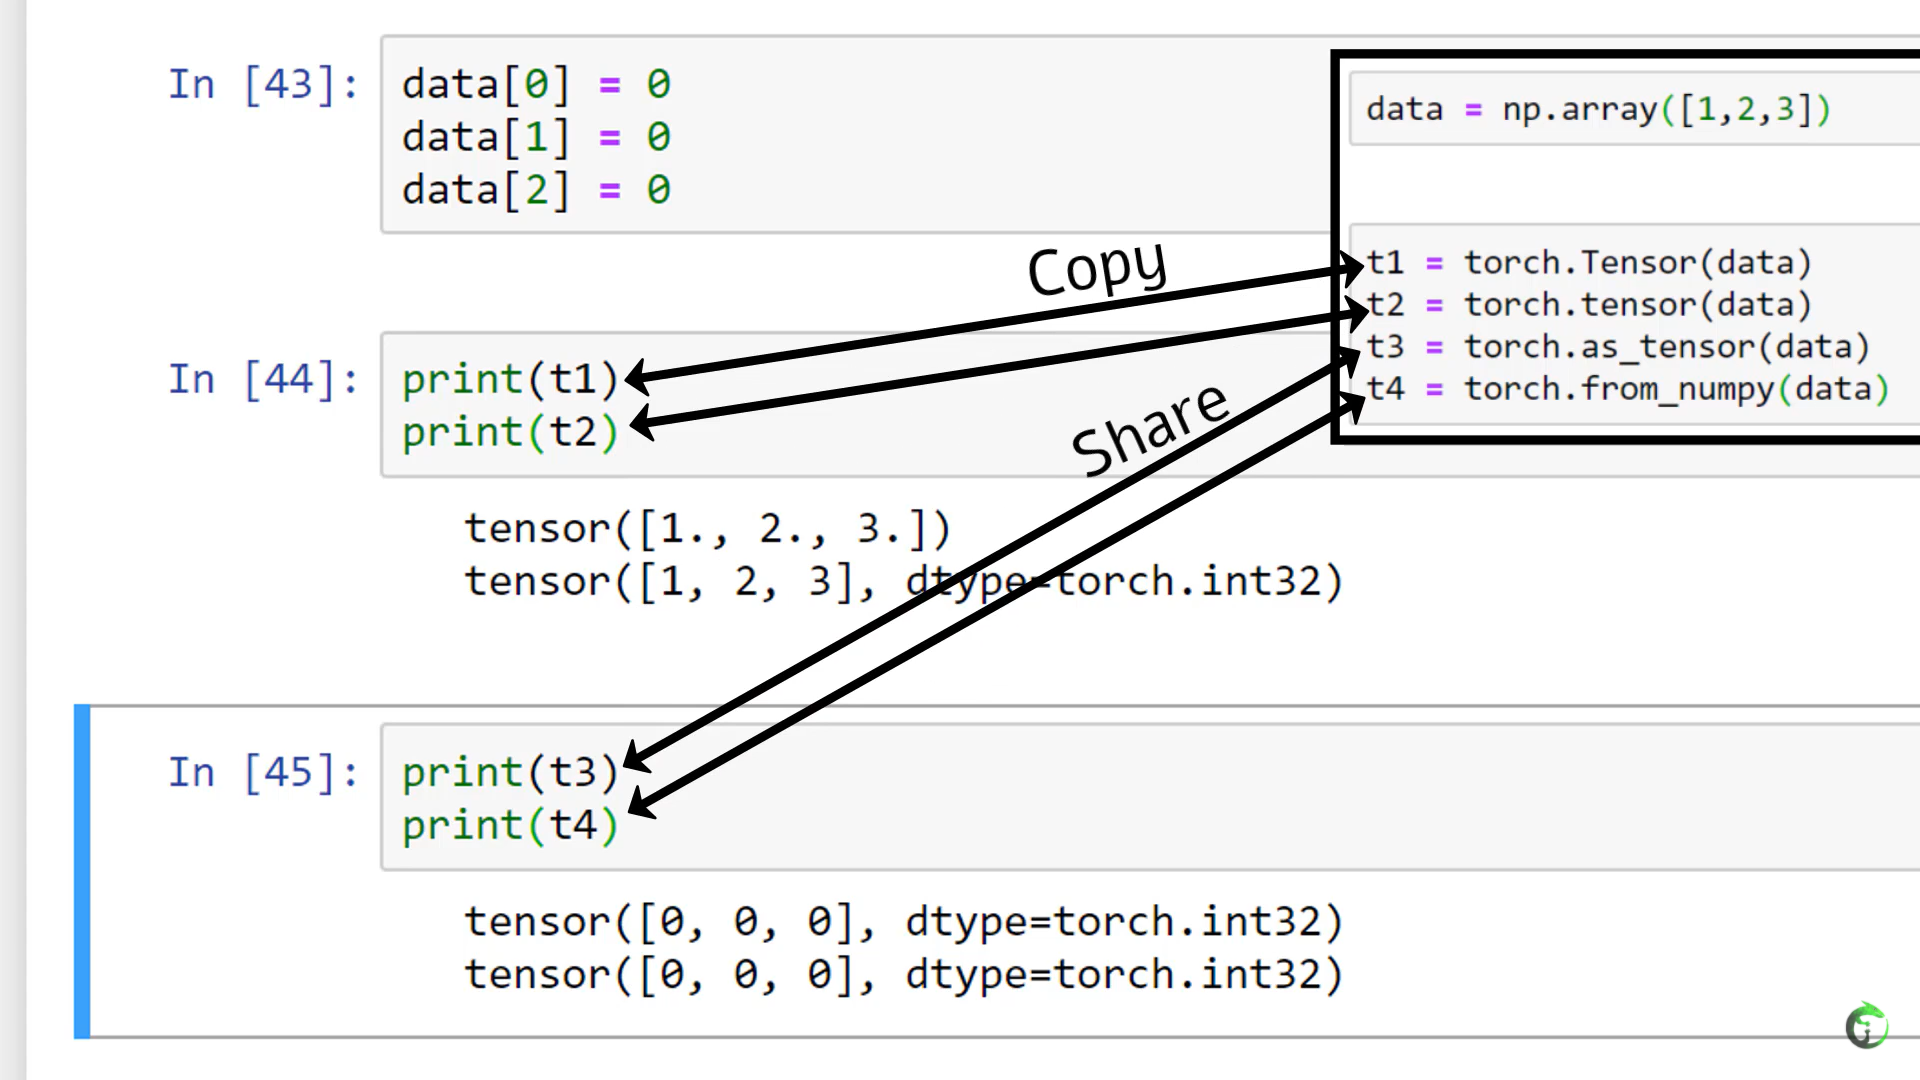
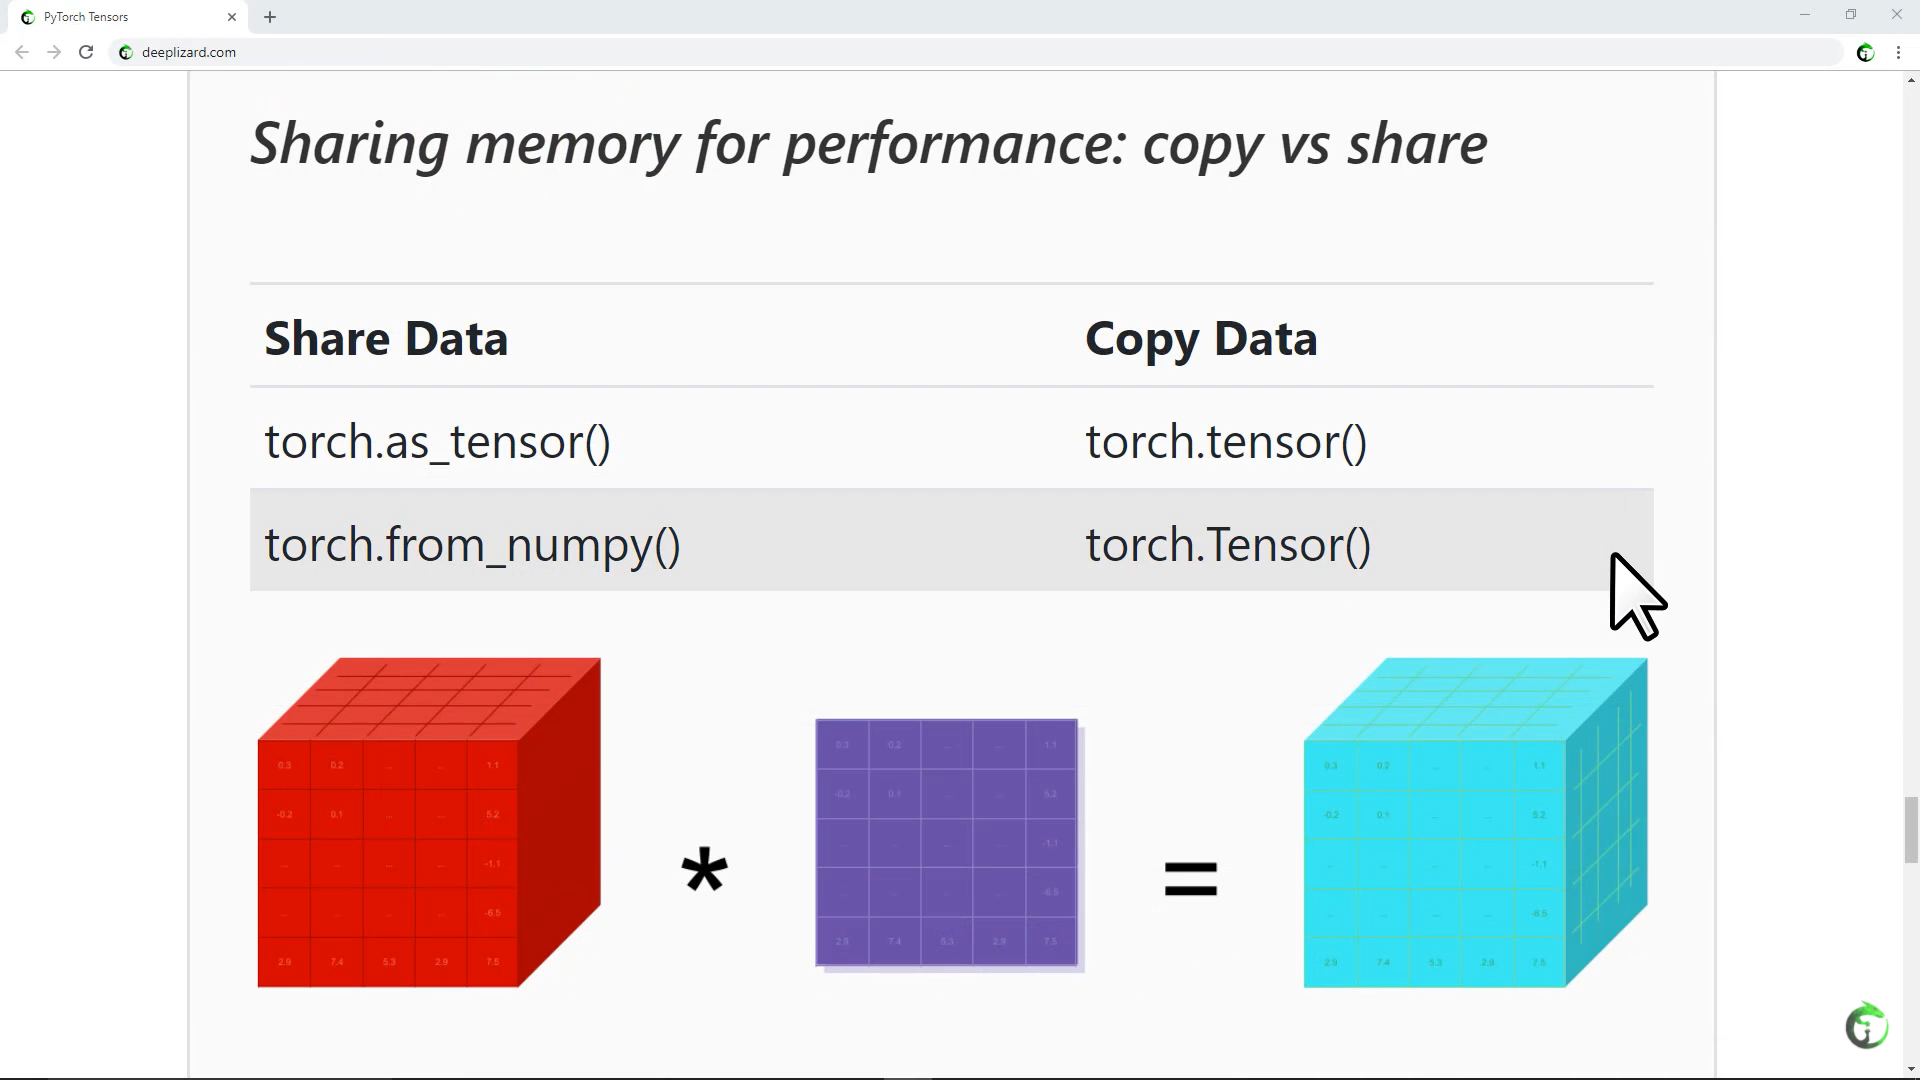
9. Creating PyTorch Tensors for Deep Learning - Best Options
10. Flatten, Reshape, and Squeeze Explained
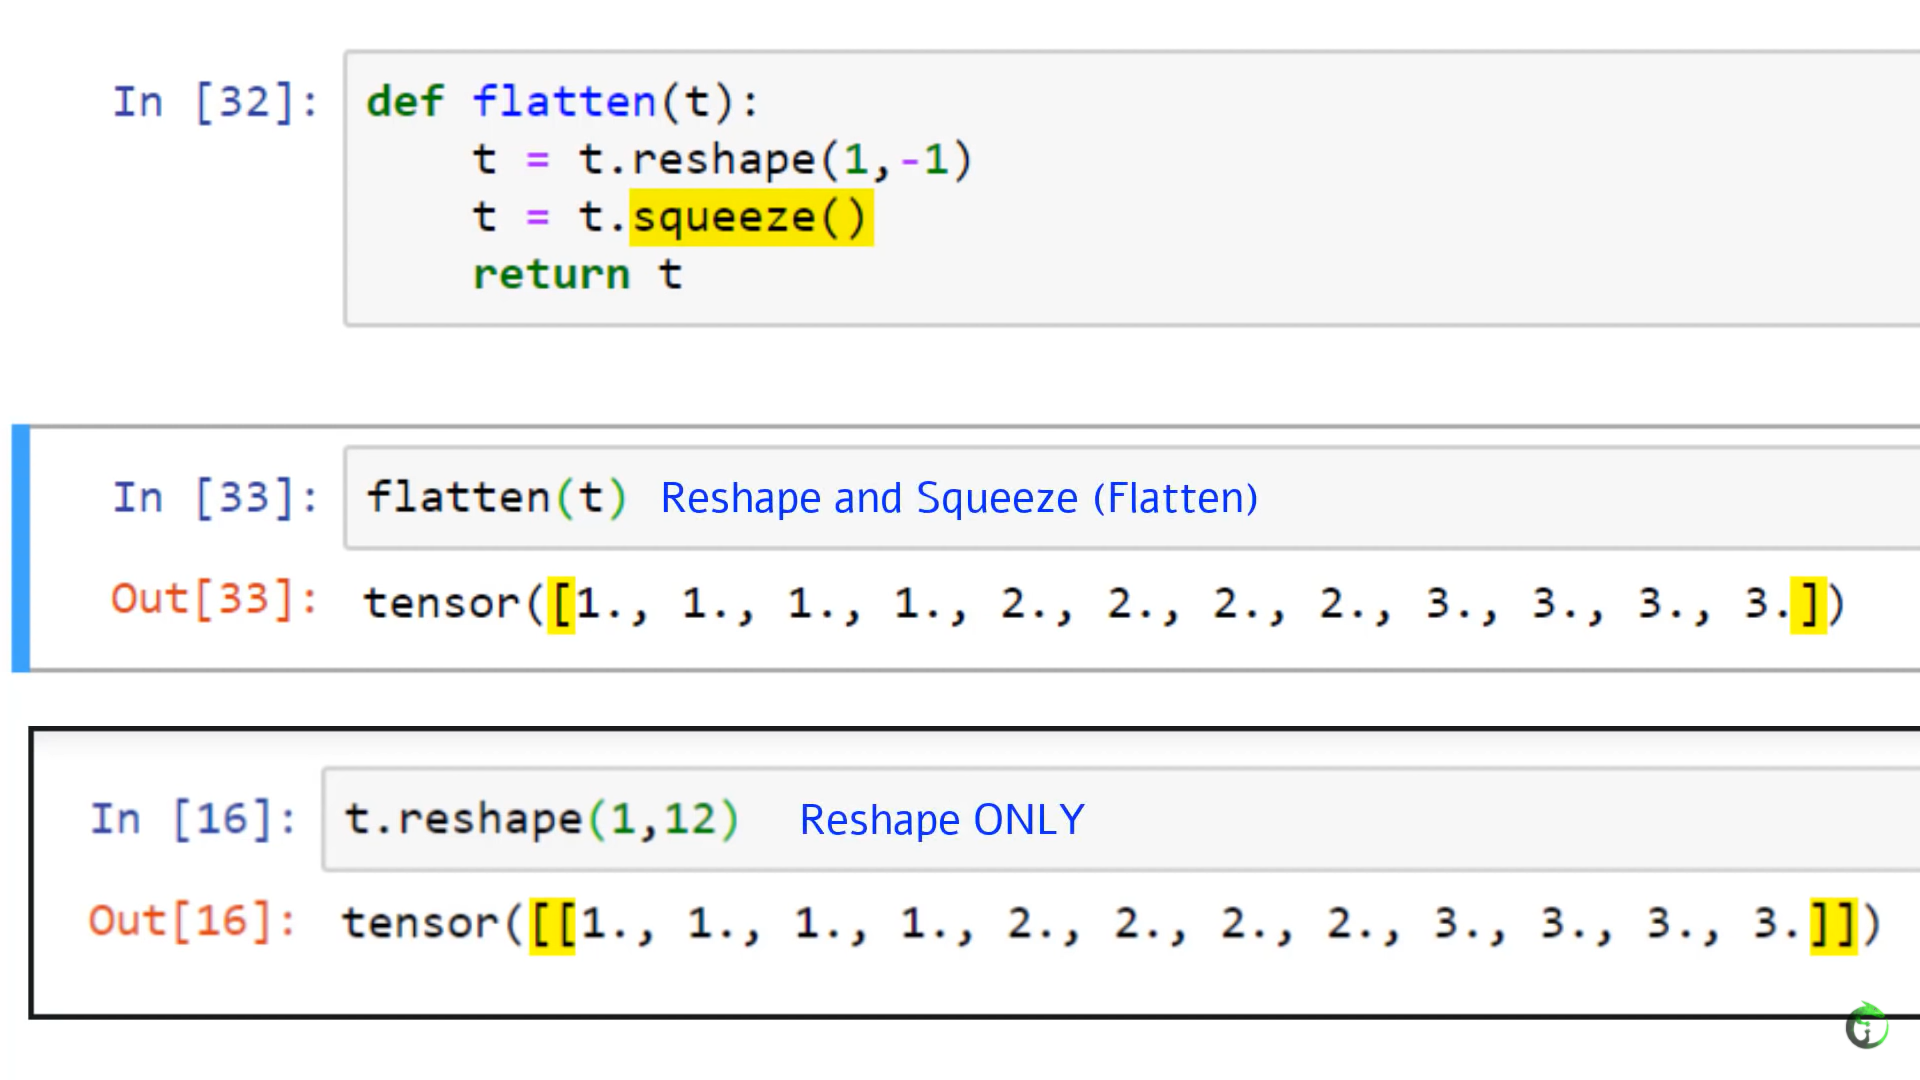
11. CNN Flatten Operation Visualized - Tensor Batch Processing for Deep Learning
- Flattening Specific Axes Of A Tensor
In the post on CNN input tensor shape, we learned how tensor inputs to a convolutional neural network typically have 4 axes, one for batch size, one for color channels, and one each for height and width.
Notice in the call how we specified the start_dim parameter. This tells the flatten() method which axis it should start the flatten operation. The one here is an index, so it’s the second axis which is the color channel axis. We skip over the batch axis so to speak, leaving it intact.
19. CNN Weights - Learnable Parameters in PyTorch Neural Networks
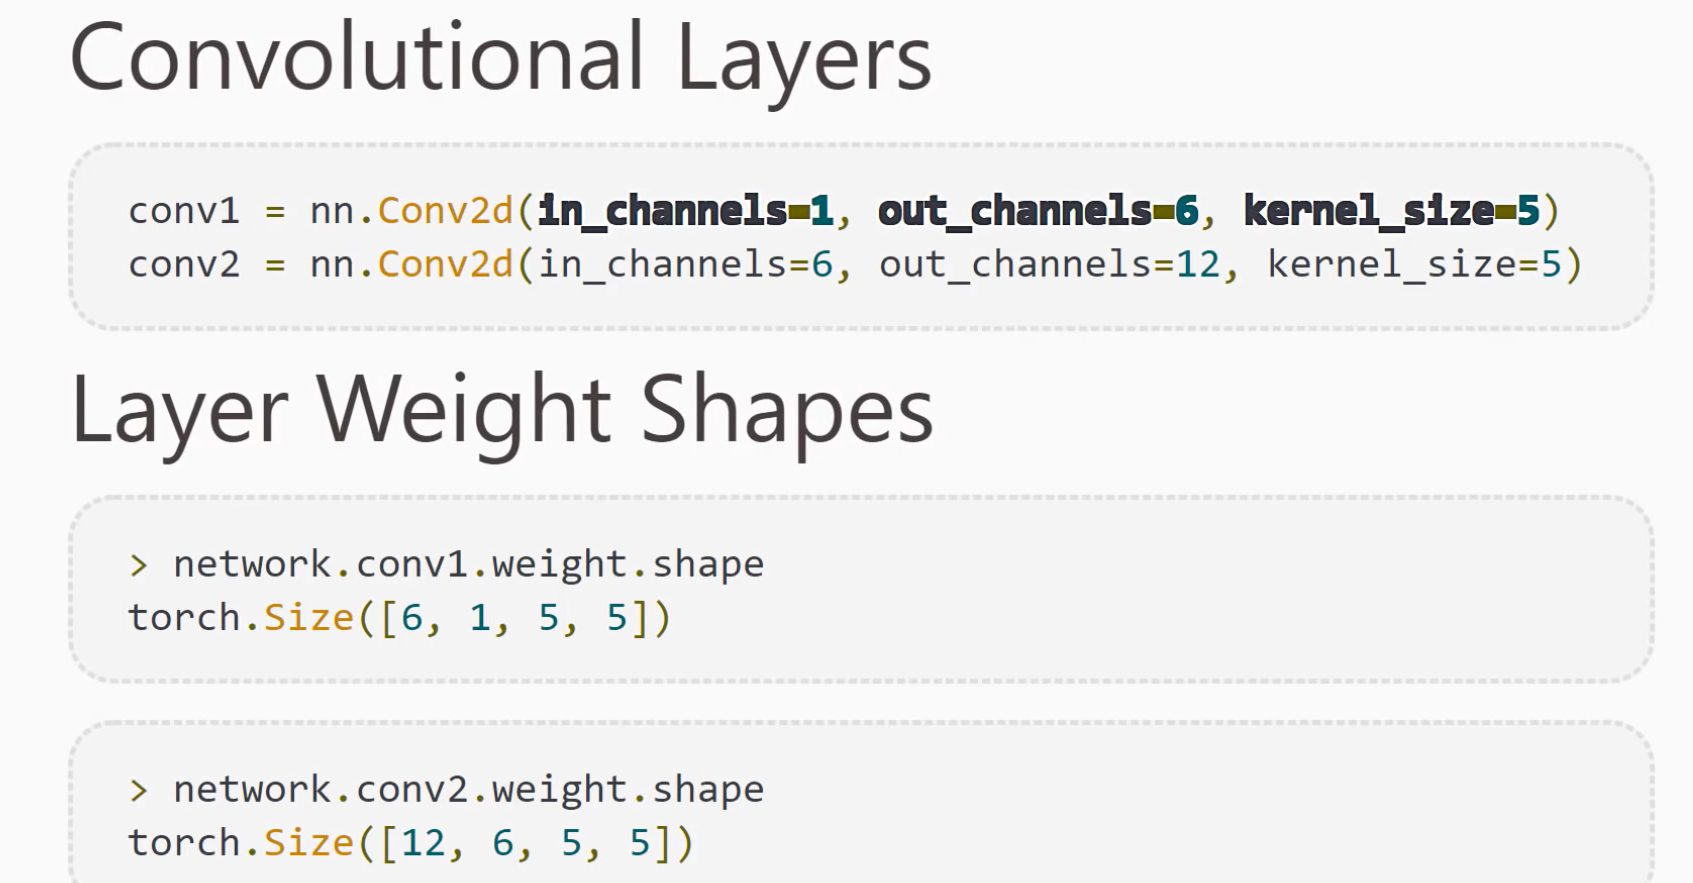
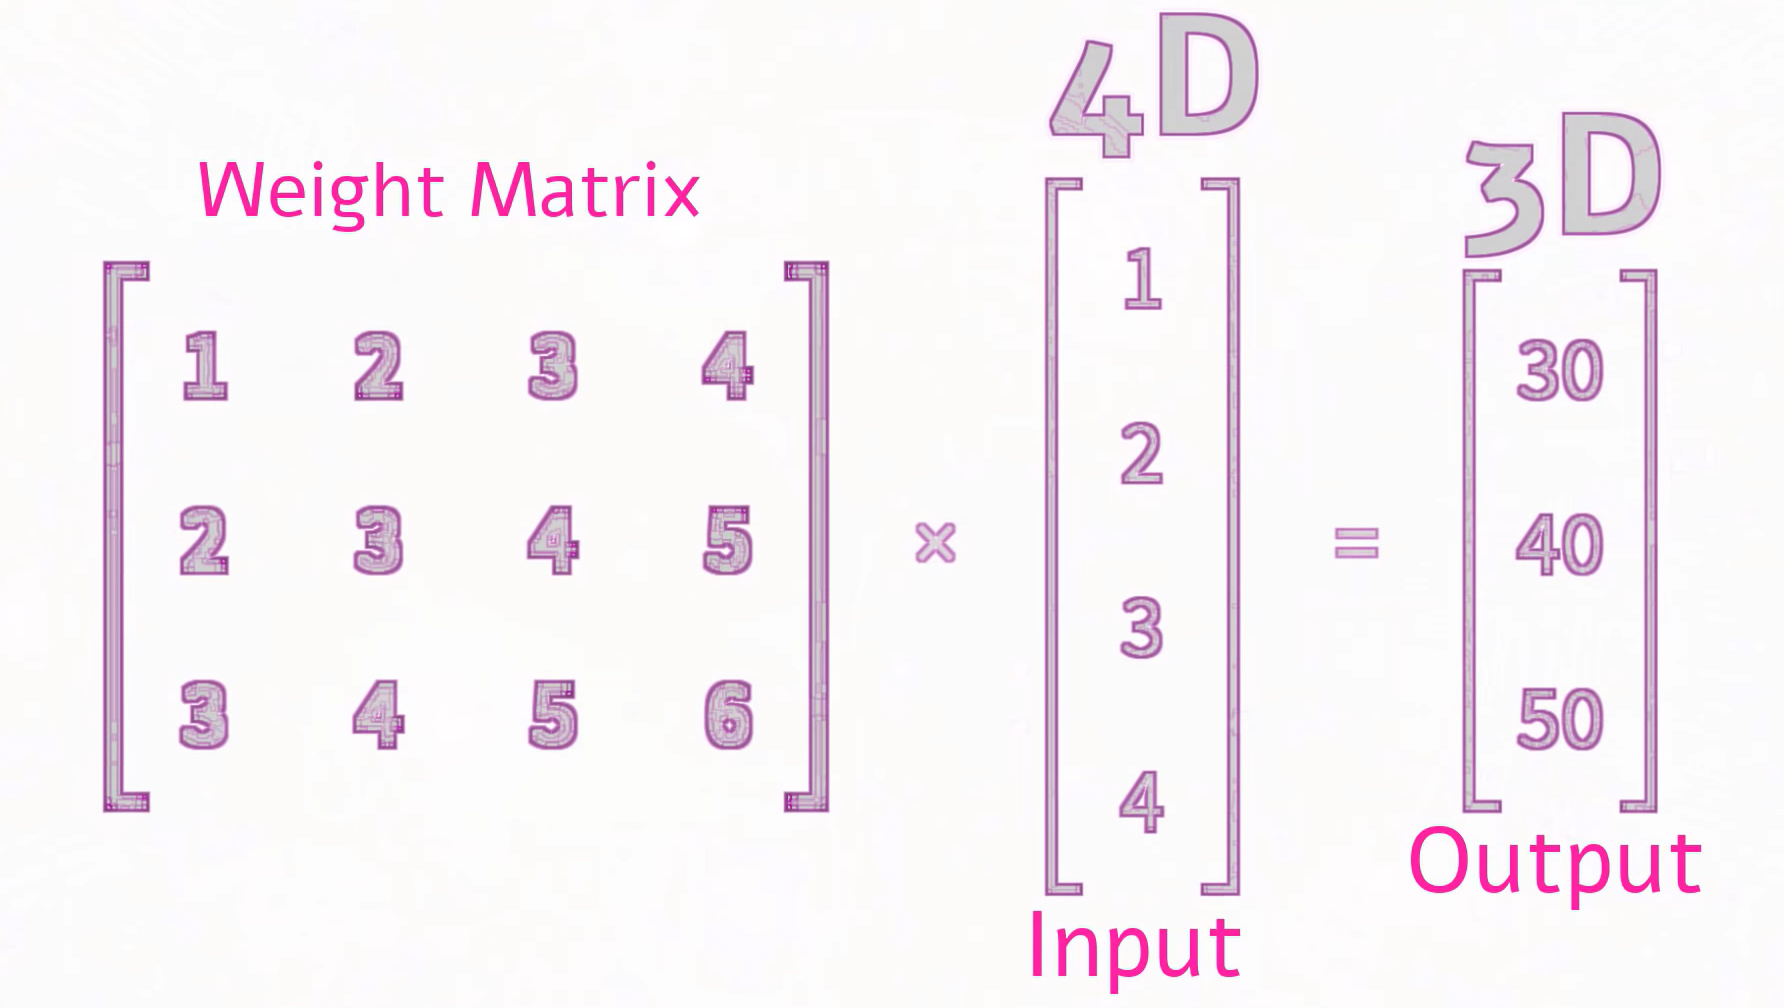
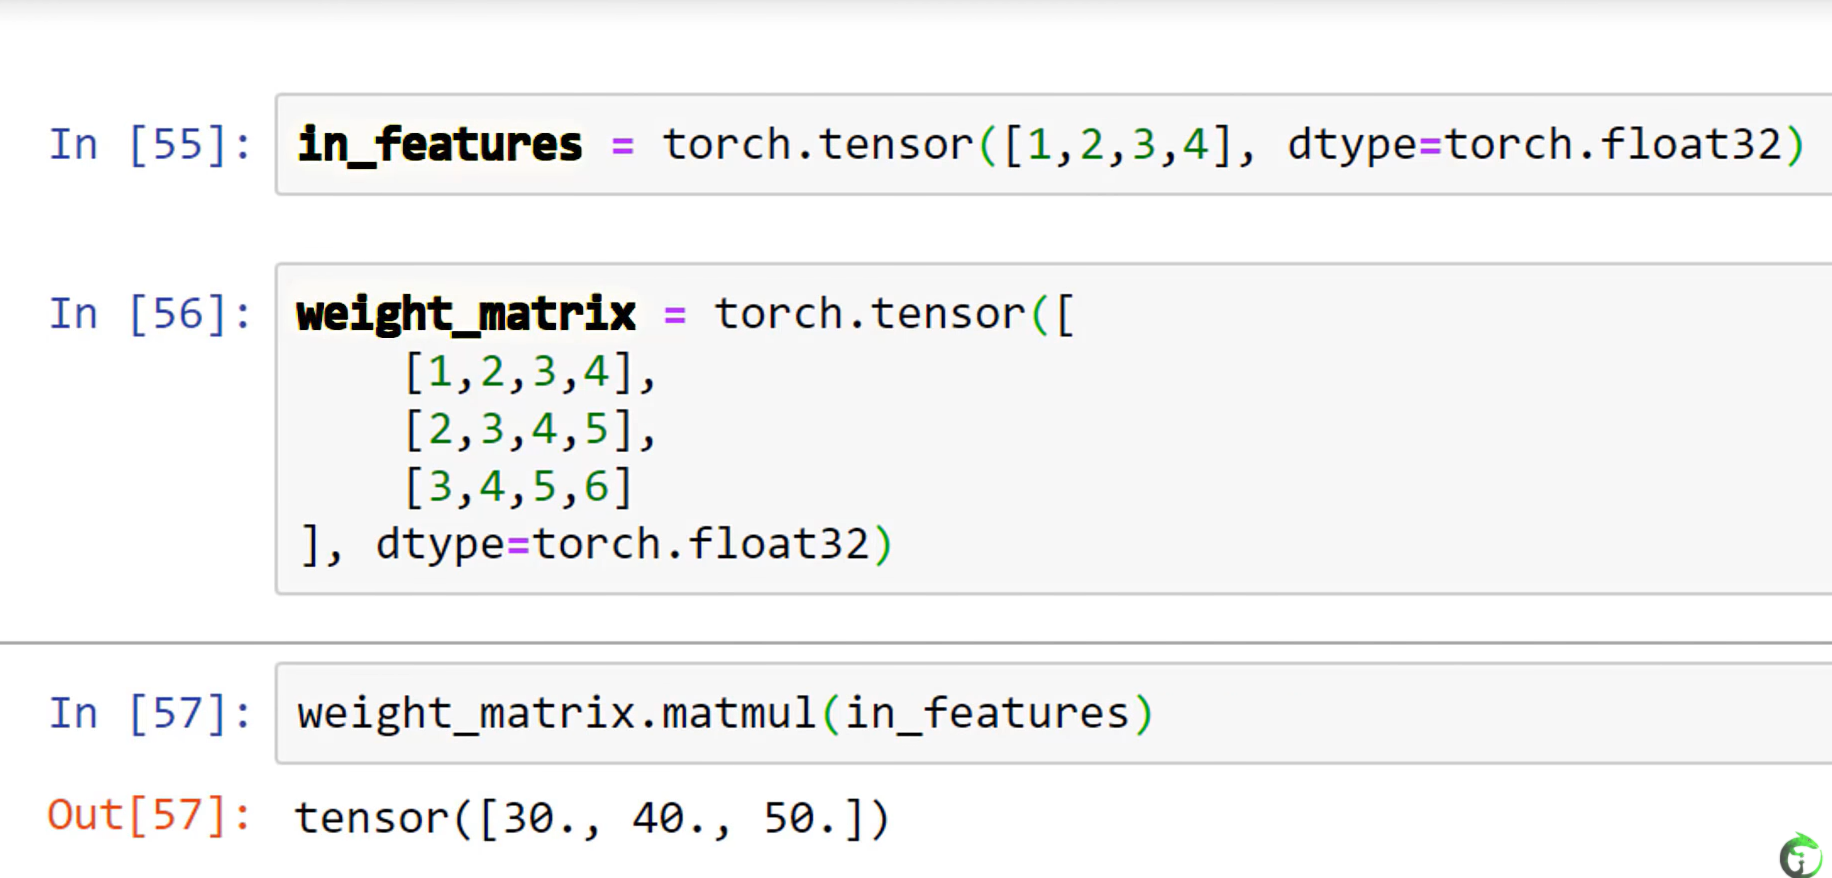
- input is 4-dimension, output is 3-dimension, the shape of weight is 3*4.
25. CNN Output Size Formula - Bonus Neural Network Debugging Session
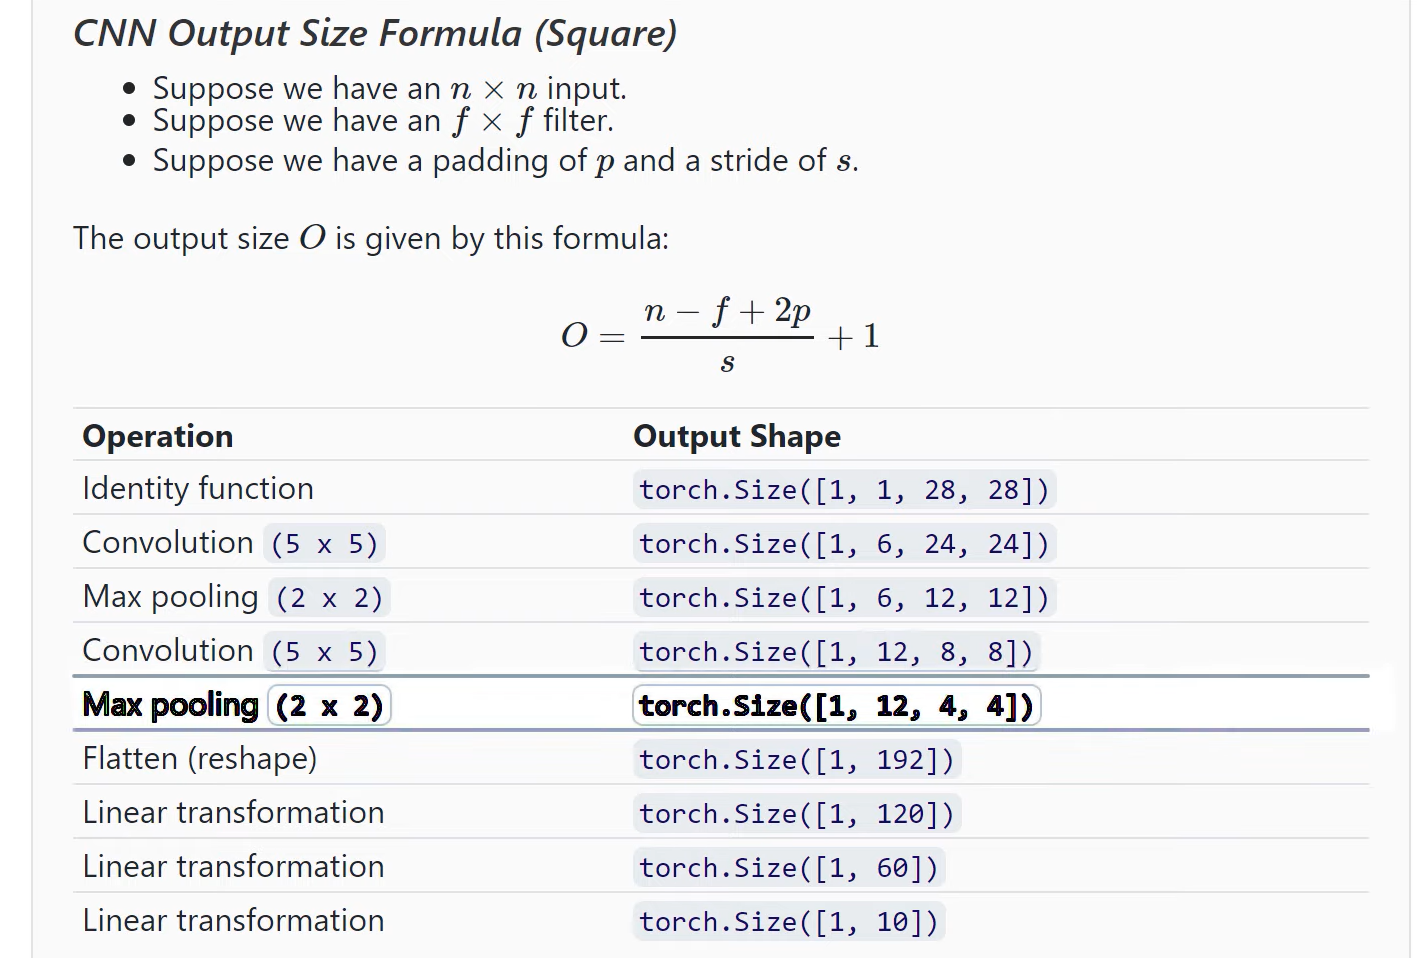
26. CNN Training with Code Example - Neural Network Programming Course
- Training Using a Single Batch
- Calculate Loss
- Calculate Gradients
- Update Weight
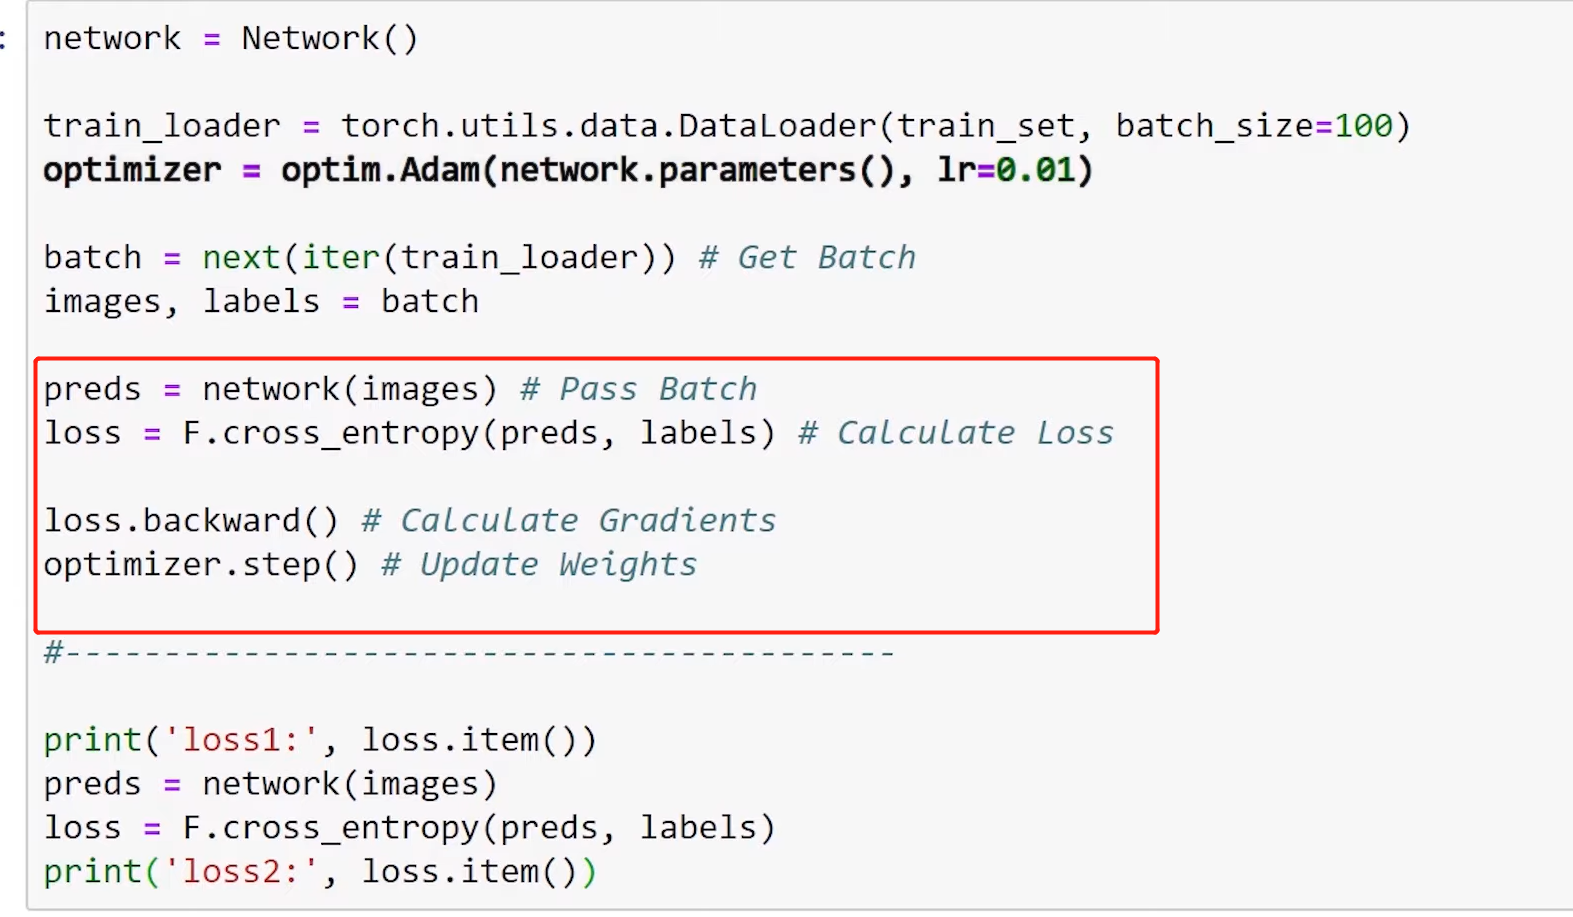
27. CNN Training Loop Explained - Neural Network Code Project
well explained what happened with each loop.
import torch
import torch.nn as nn
import torch.nn.functional as F
import torch.optim as optim

import torchvision
import torchvision.transforms as transforms

torch.set_printoptions(linewidth=120)
torch.set_grad_enabled(True)

def get_num_correct(preds,labels):
    return preds.argmax(dim=1).eq(labels).sum().item()

class Network(nn.Module):
    def __init__(self):
        super(Network, self).__init__()

        # 维度计算公式:output=(n-filter+2padding)/stride+1。因此:
        # 原始图片大小:28*28
        # conv1后,28-5+1=24。当前图片大小:24*24
        # max_pool2d后,(24-2)/2+1=12。当前图片大小:12*12
        # conv2后,12-5+1=8。当前图片大小:8*8
        # max_pool2后,(8-2)/2+1=4。当前图片大小:4*4。当前这张图片有12g个channels
        # 此时,这张图片的维度为1*12*4*4(batch*channel*heigtht*width)。在进fc1时,把这张图片转为(1行,12*4*4列)维度

        self.conv1=nn.Conv2d(in_channels=1,out_channels=6,kernel_size=5)
        self.conv2=nn.Conv2d(in_channels=6,out_channels=12,kernel_size=5)

        self.fc1=nn.Linear(in_features=12*4*4,out_features=120)
        self.fc2=nn.Linear(in_features=120,out_features=60)
        self.out=nn.Linear(in_features=60,out_features=10) # 有10种输出类型

    def forward(self,t):
        t=F.relu(self.conv1(t));
        t=F.max_pool2d(t,kernel_size=2,stride=2)
        t=F.relu(self.conv2(t))
        t=F.max_pool2d(t,kernel_size=2,stride=2)

        t=t.reshape(-1,12*4*4)
        t=F.relu(self.fc1(t))
        t=F.relu(self.fc2(t))
        t=self.out(t)
        return t

train_set=torchvision.datasets.FashionMNIST(
    root='./data',
    train=True,
    download=True,
    transform=transforms.Compose([
        transforms.ToTensor()
    ])
)

network=Network()
train_loader=torch.utils.data.DataLoader(train_set,batch_size=100)
optimizer=optim.Adam(network.parameters(),lr=0.01)

for epoch in range(5): # epoch表示完整的一批数据
    total_loss = 0
    total_correct = 0
    for batch in train_loader: # batch表示某epoch中的一部分数据
        images,labels=batch
        preds=network(images)
        loss=F.cross_entropy(preds,labels)

        optimizer.zero_grad()
        loss.backward()
        optimizer.step()

        total_loss+=loss.item()
        total_correct+=get_num_correct(preds,labels)
    print("epoch: ",epoch,
          "total_loss: ",total_loss,
          "total_correct: ",total_correct)
print(total_correct/len(train_set))

# epoch:  0 total_loss:  358.2741909921169 total_correct:  46523
# epoch:  1 total_loss:  237.37768299877644 total_correct:  51164
# epoch:  2 total_loss:  216.7216858714819 total_correct:  51954
# epoch:  3 total_loss:  206.57599268853664 total_correct:  52318
# epoch:  4 total_loss:  200.8457220196724 total_correct:  52480
# 0.8746666666666667
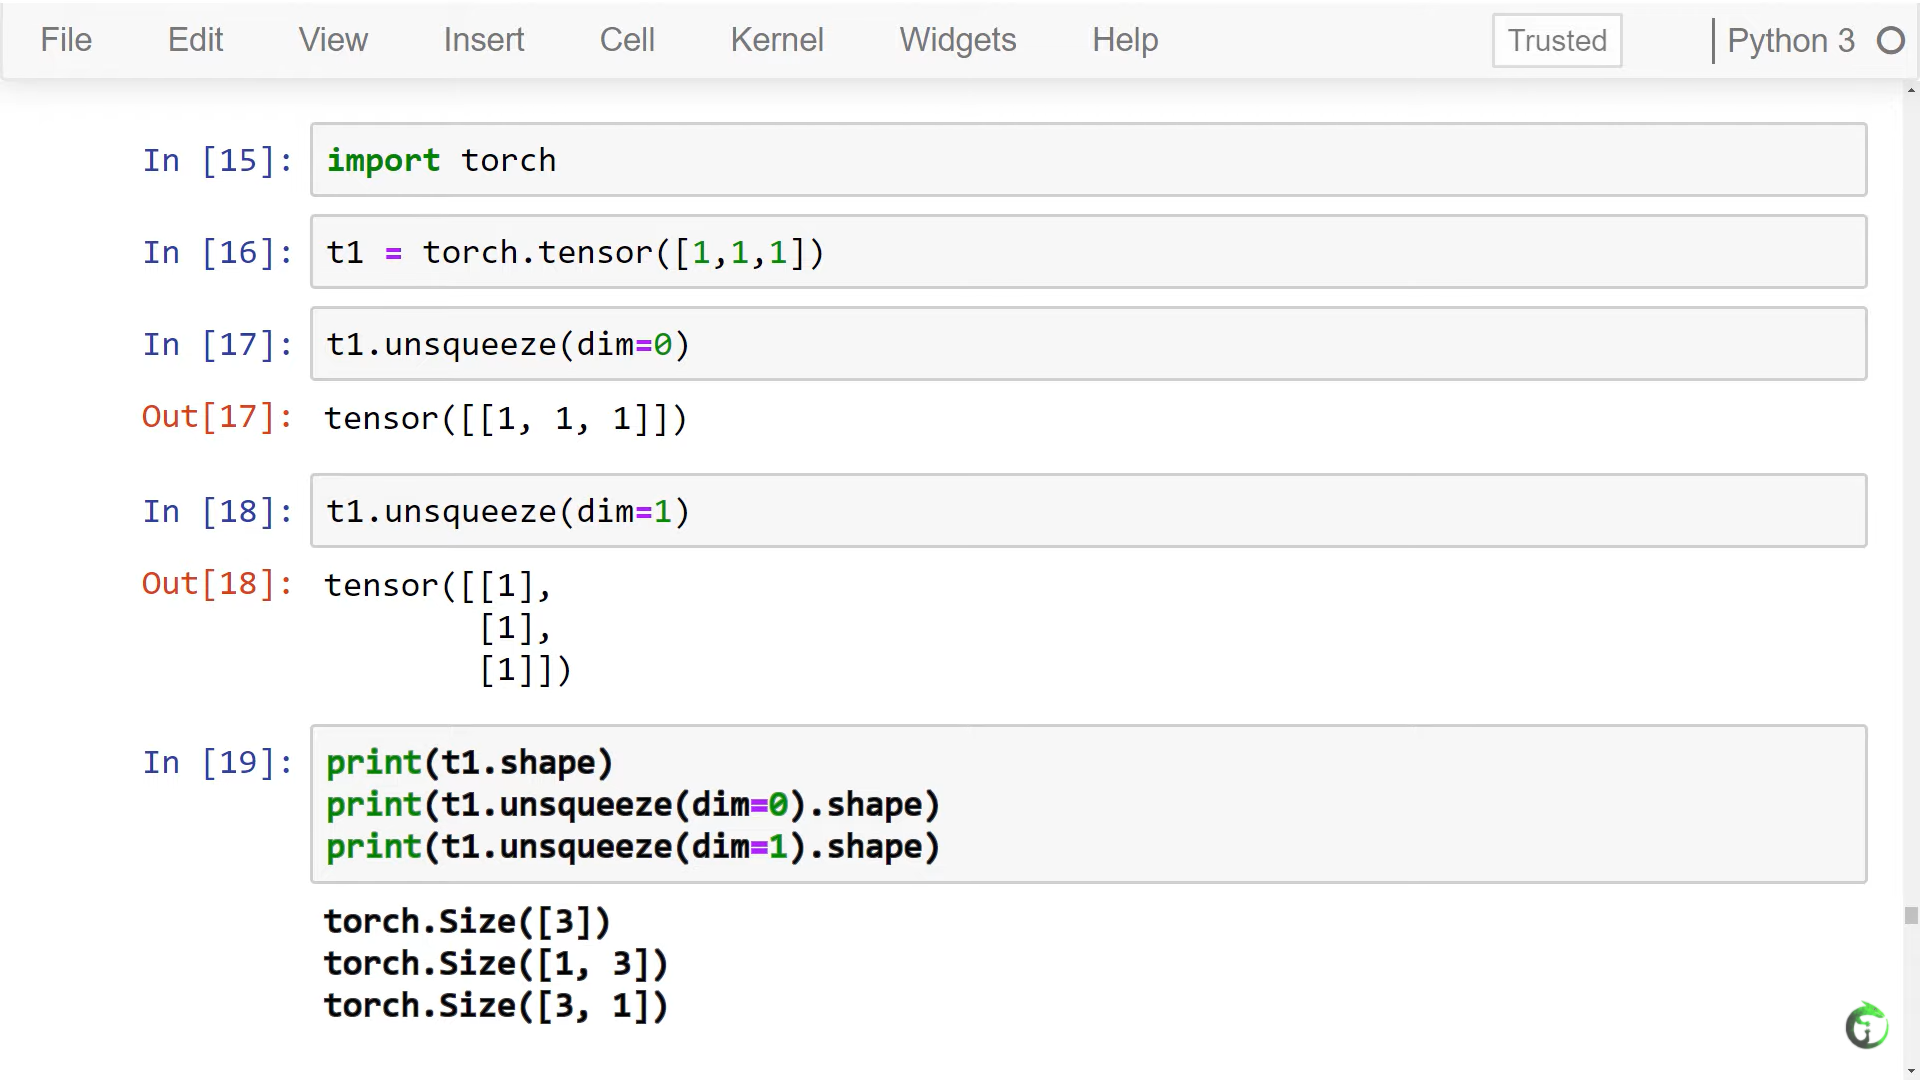
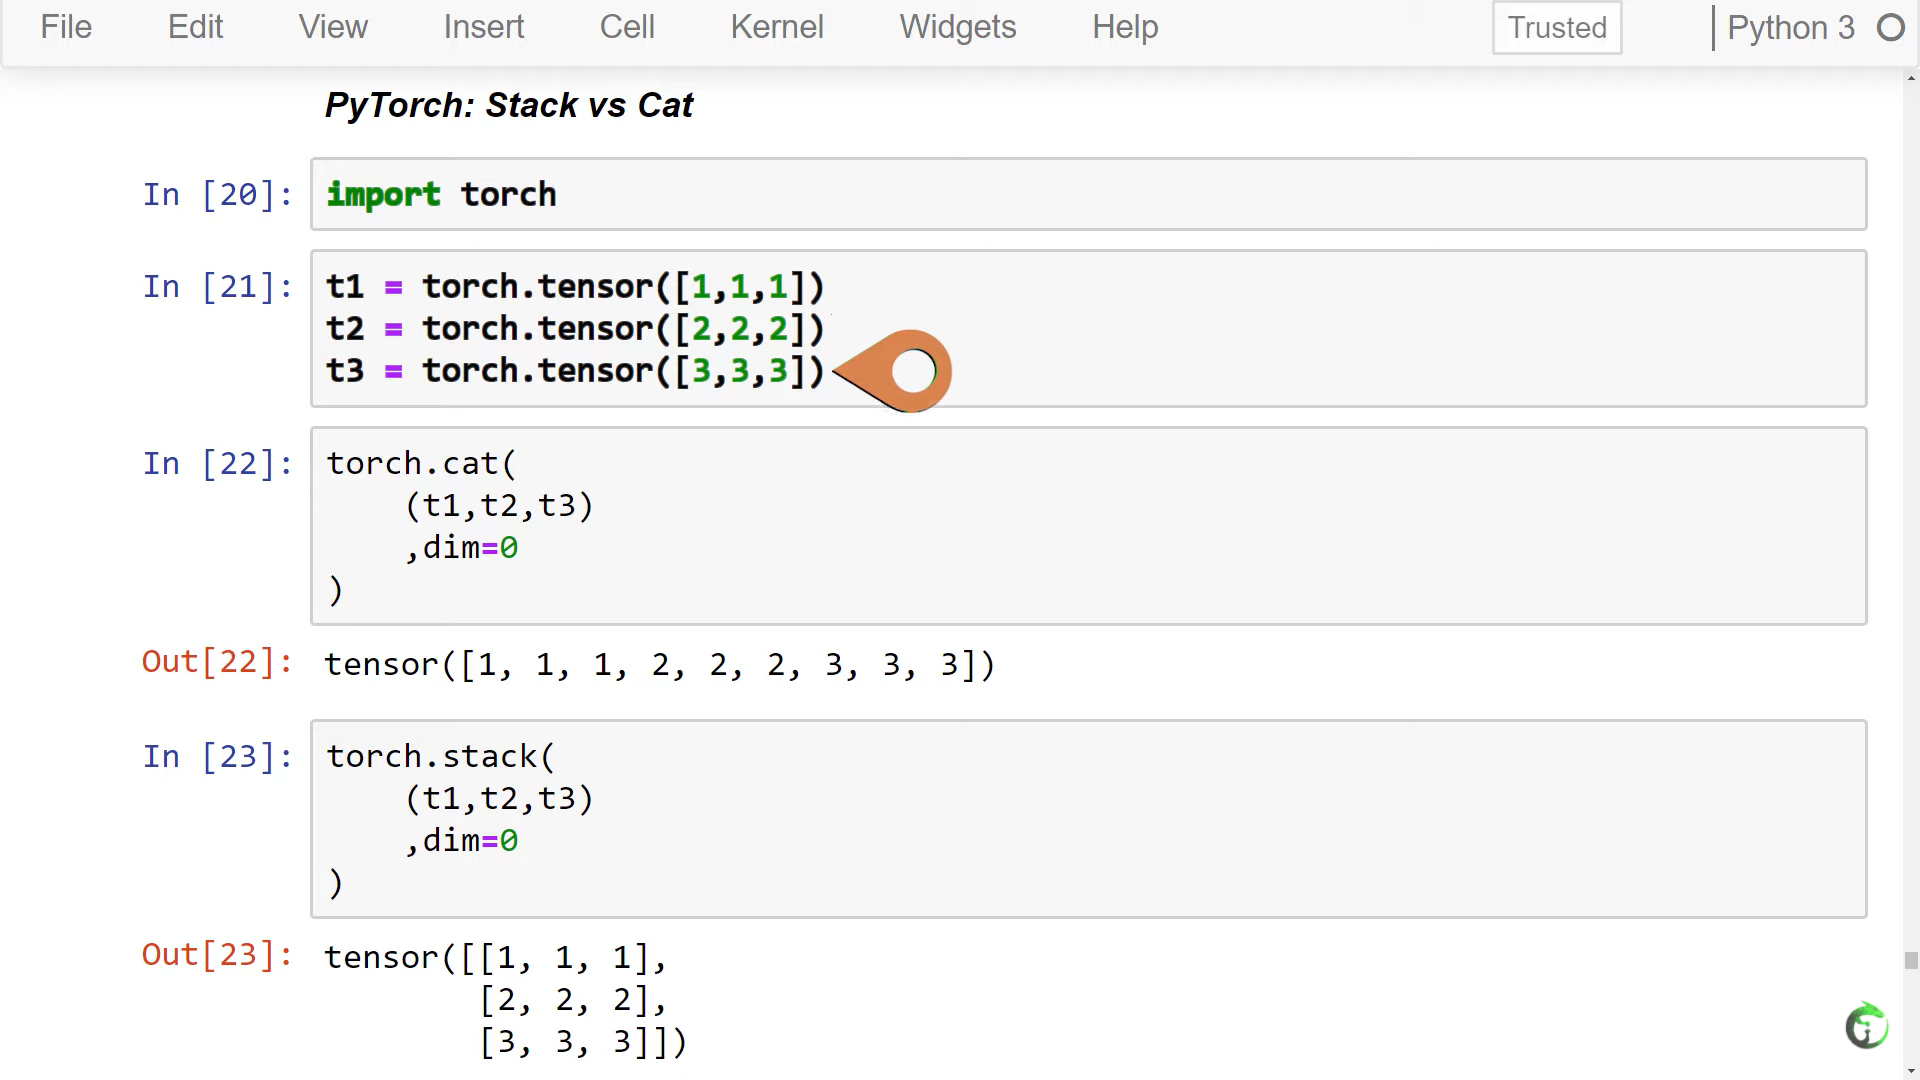
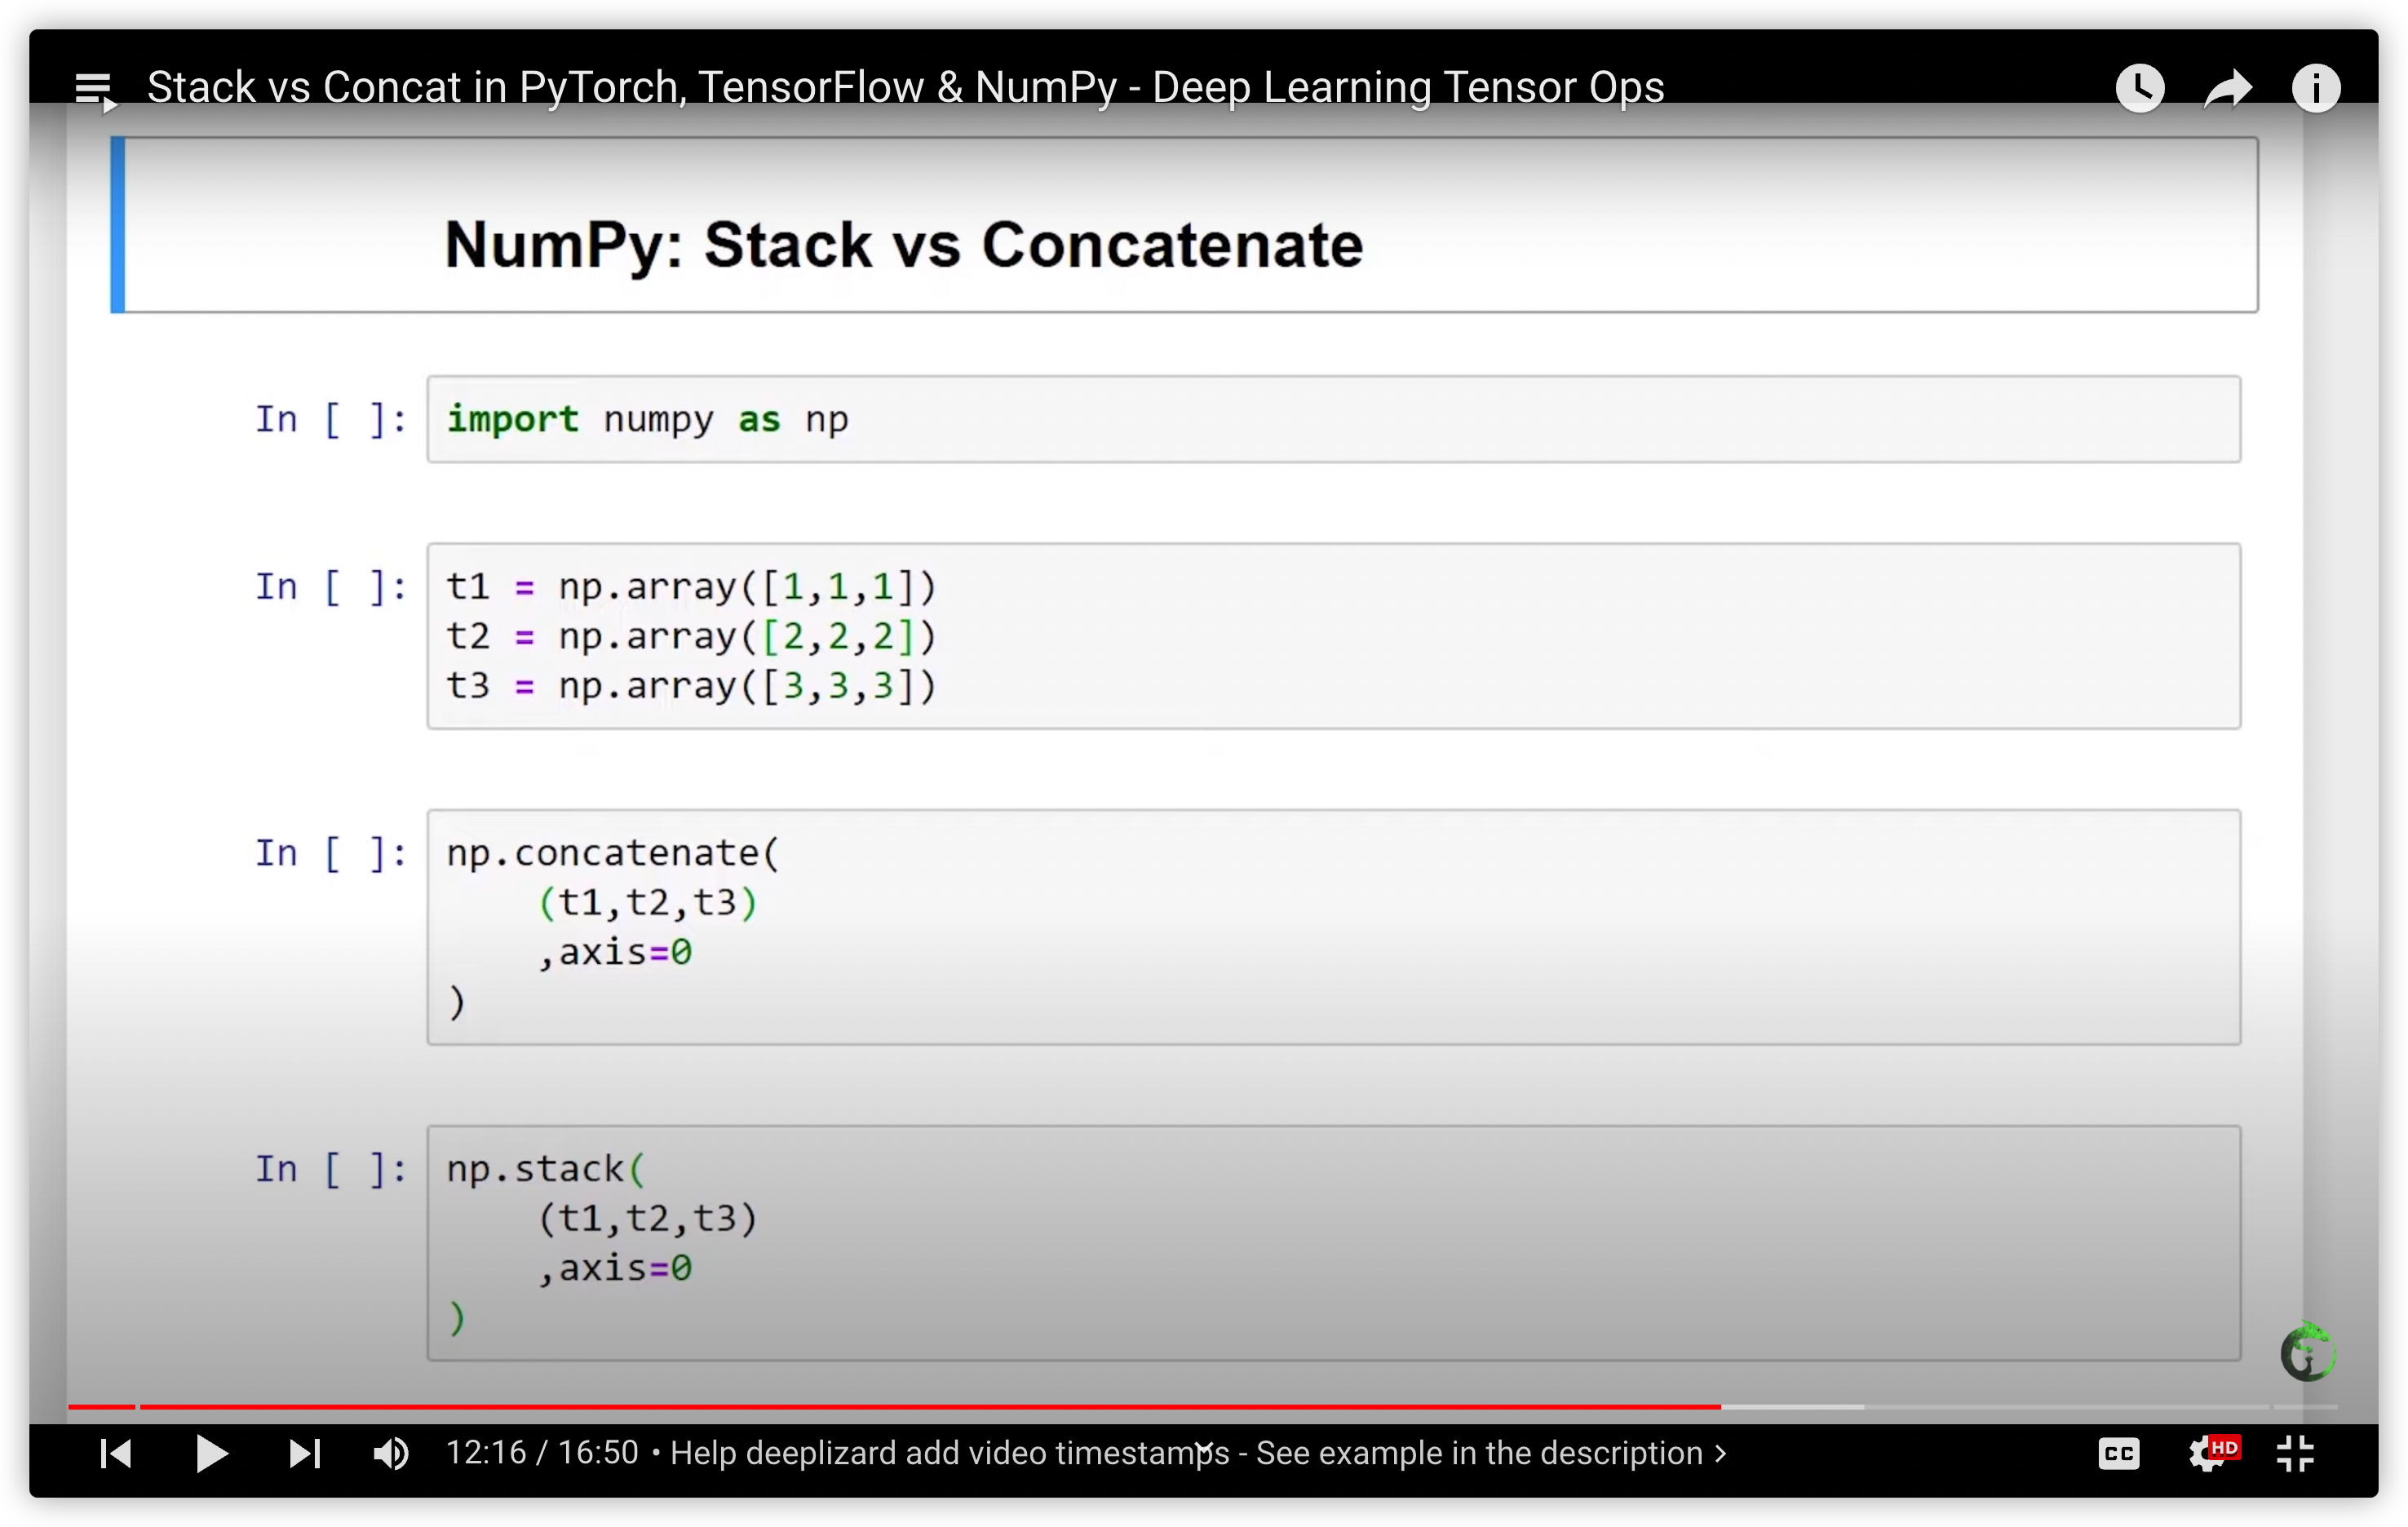
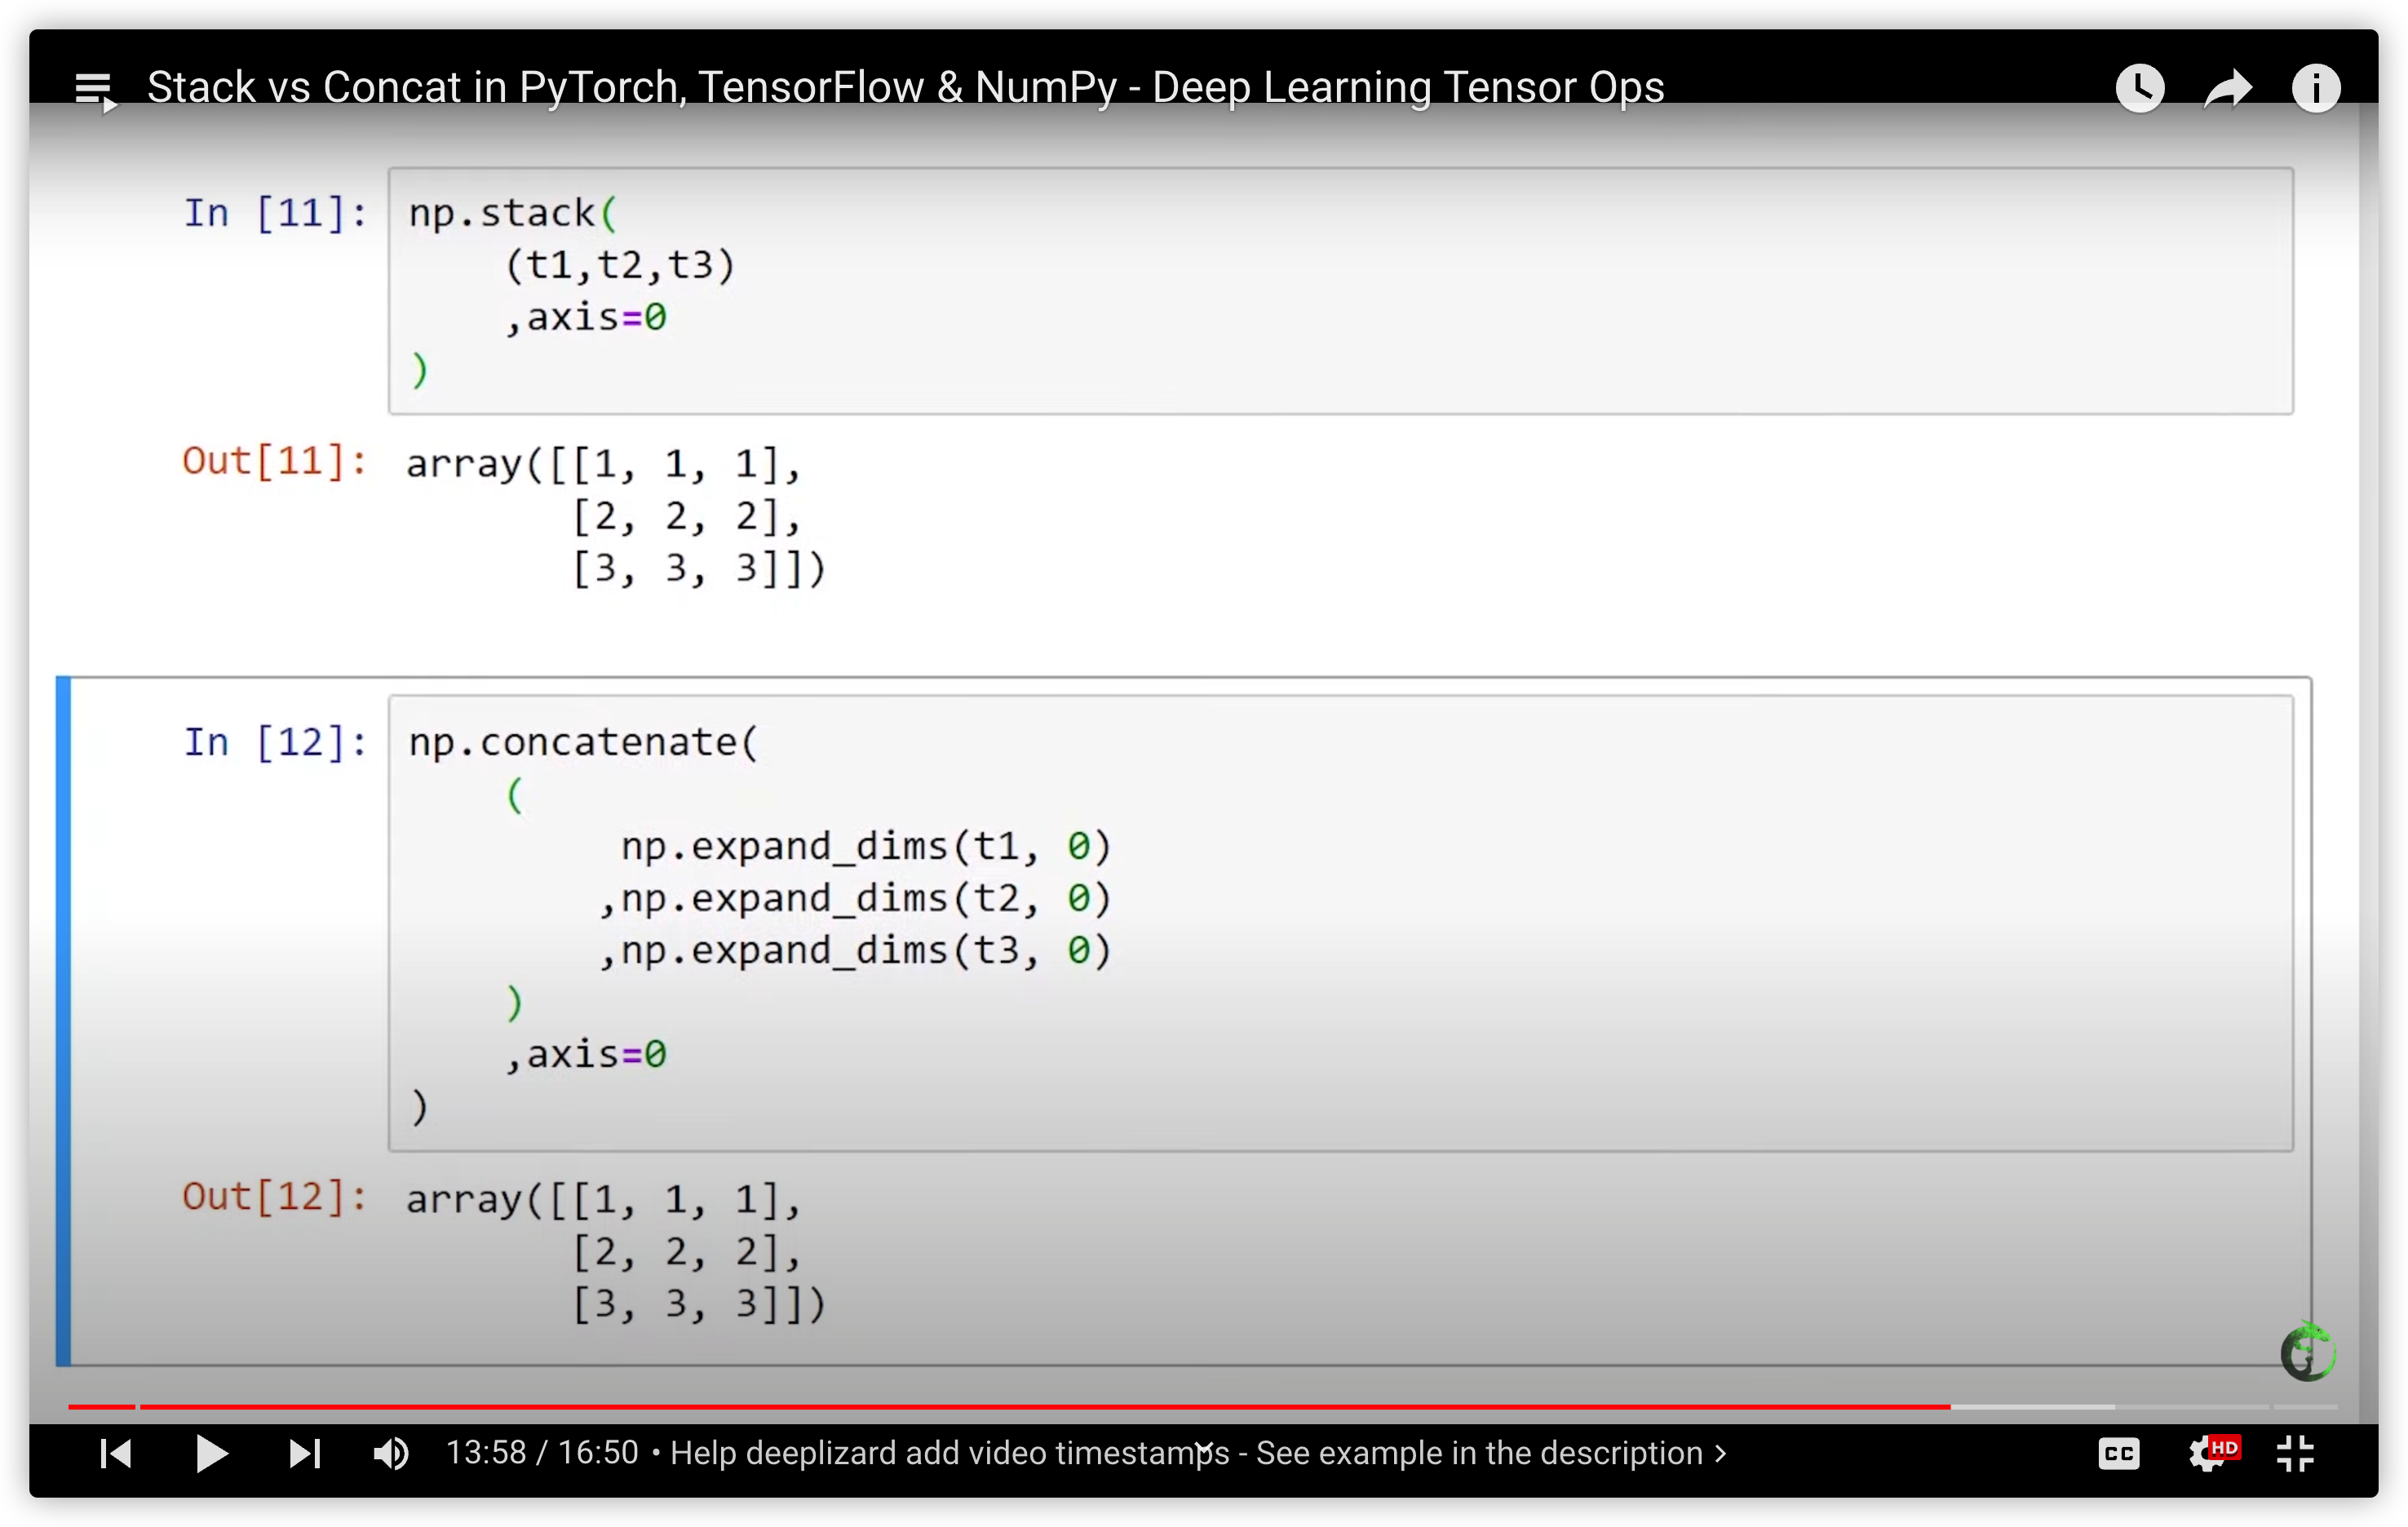
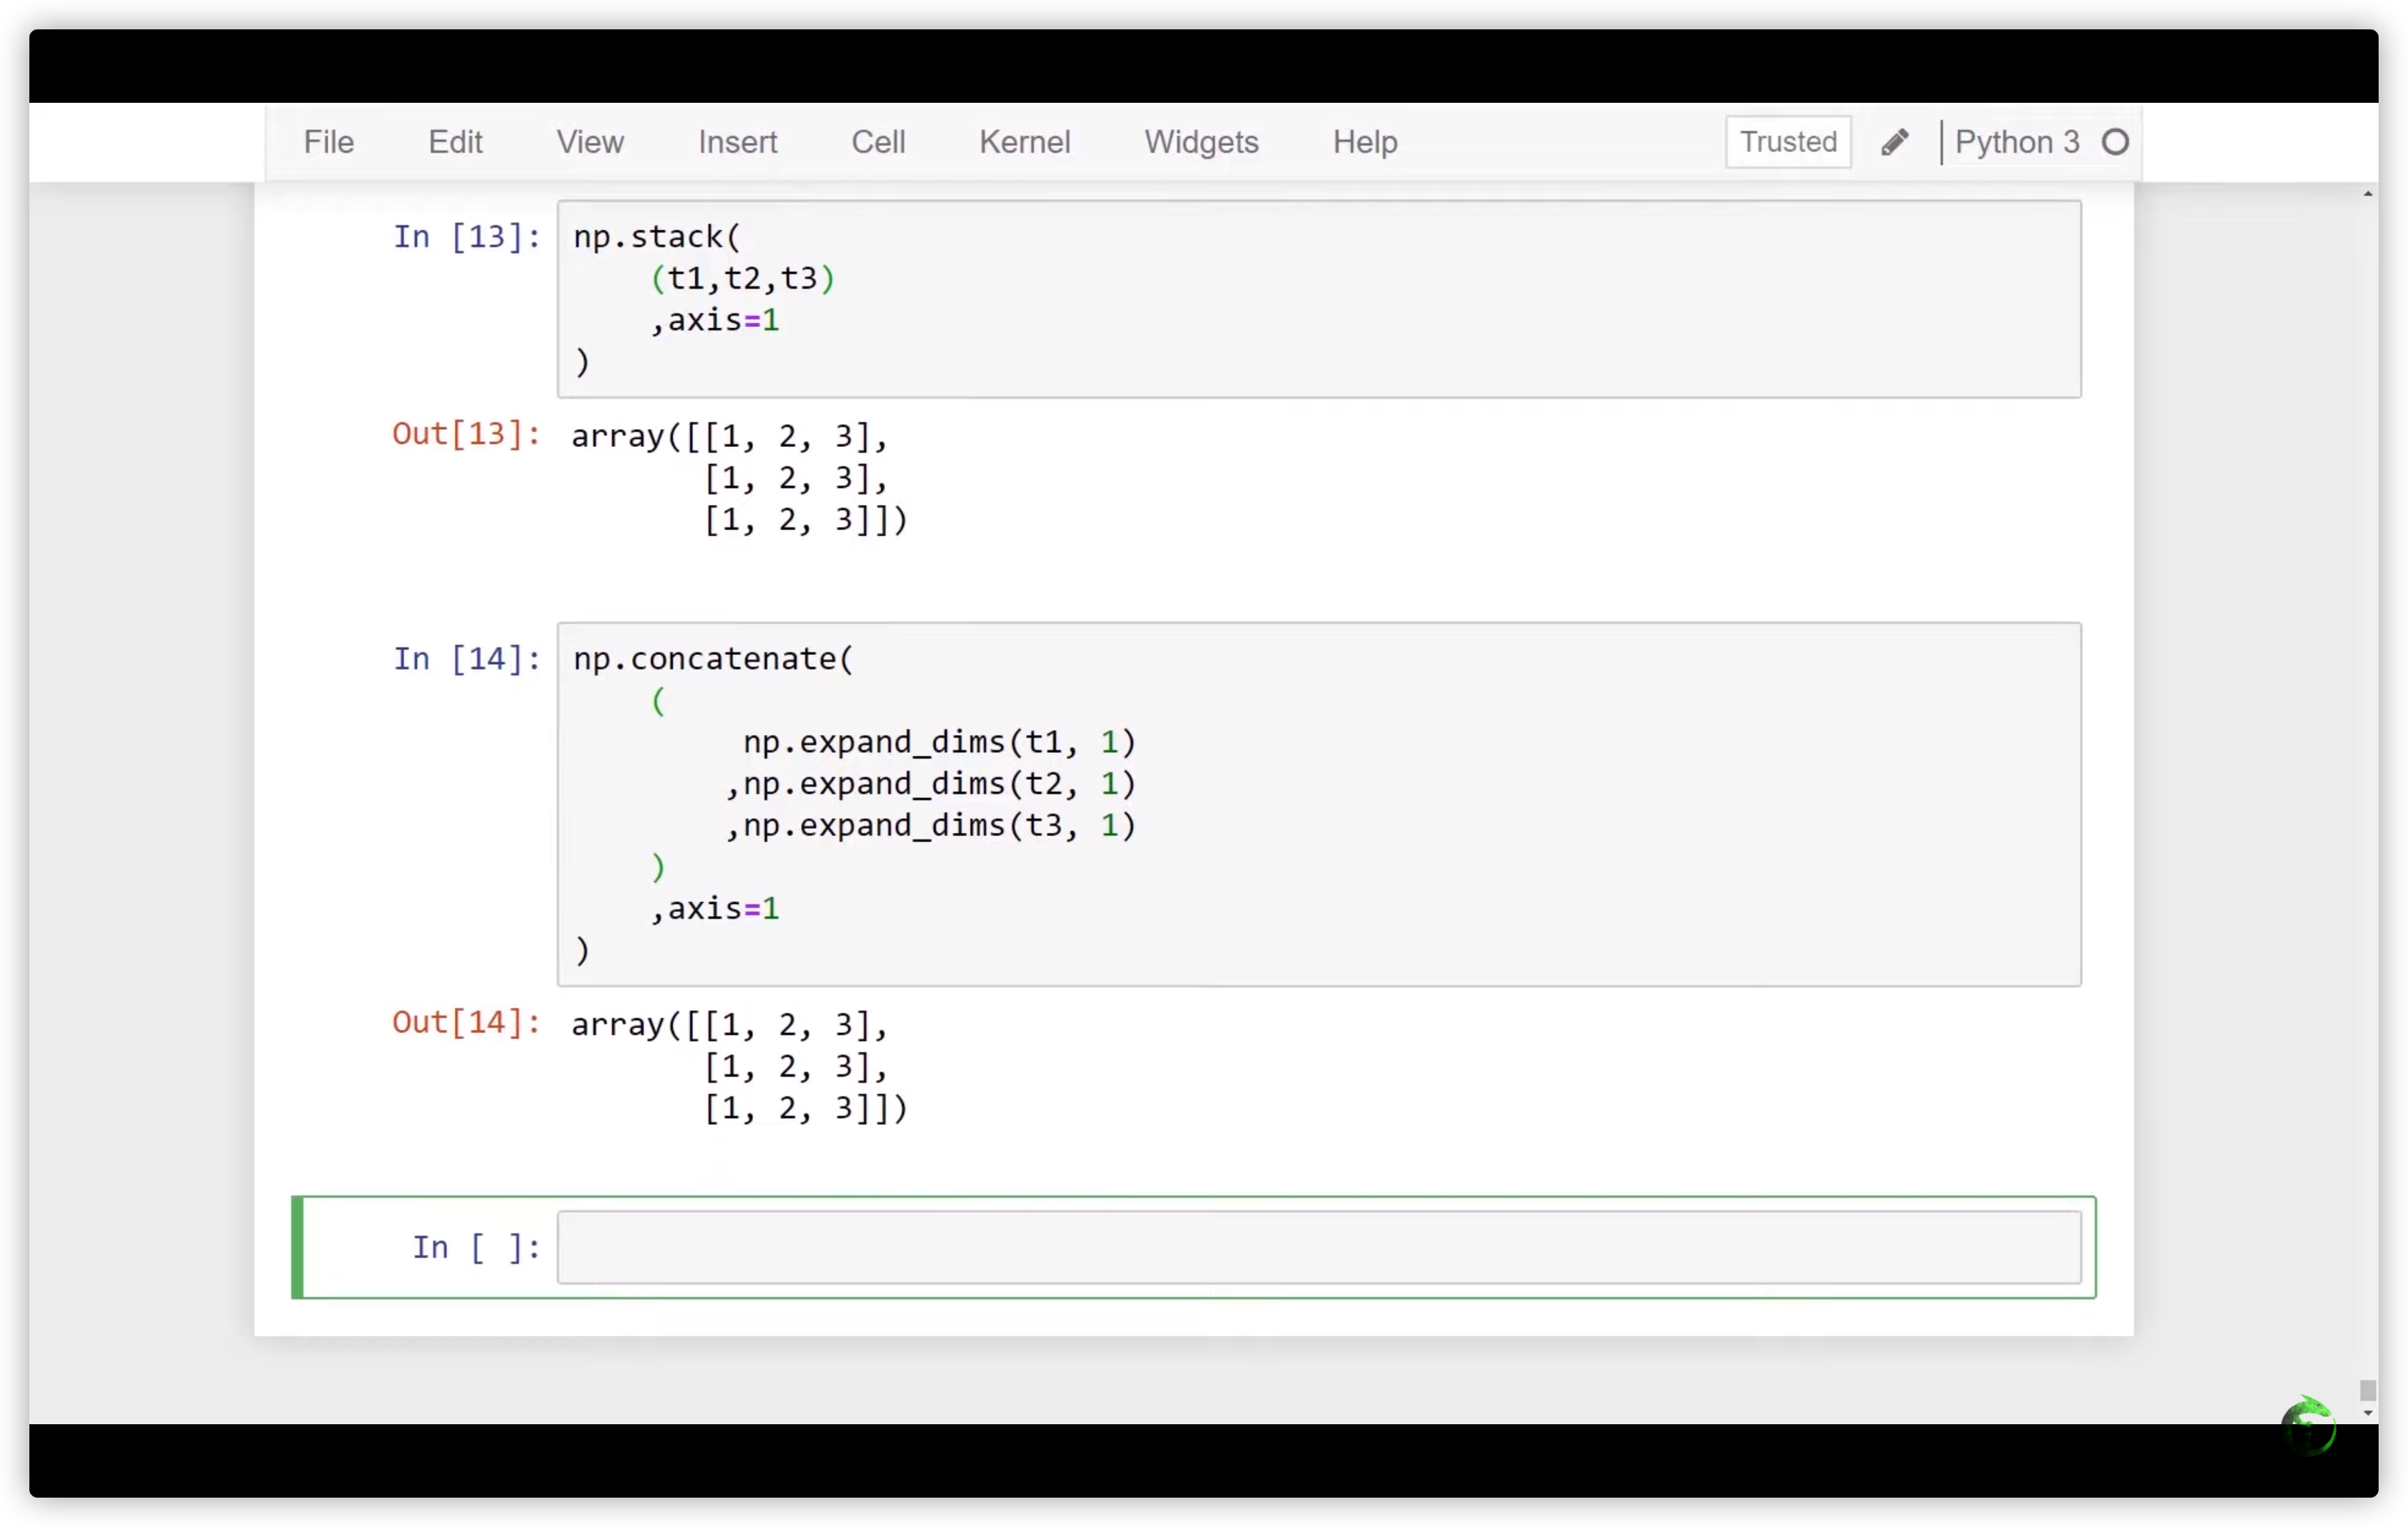
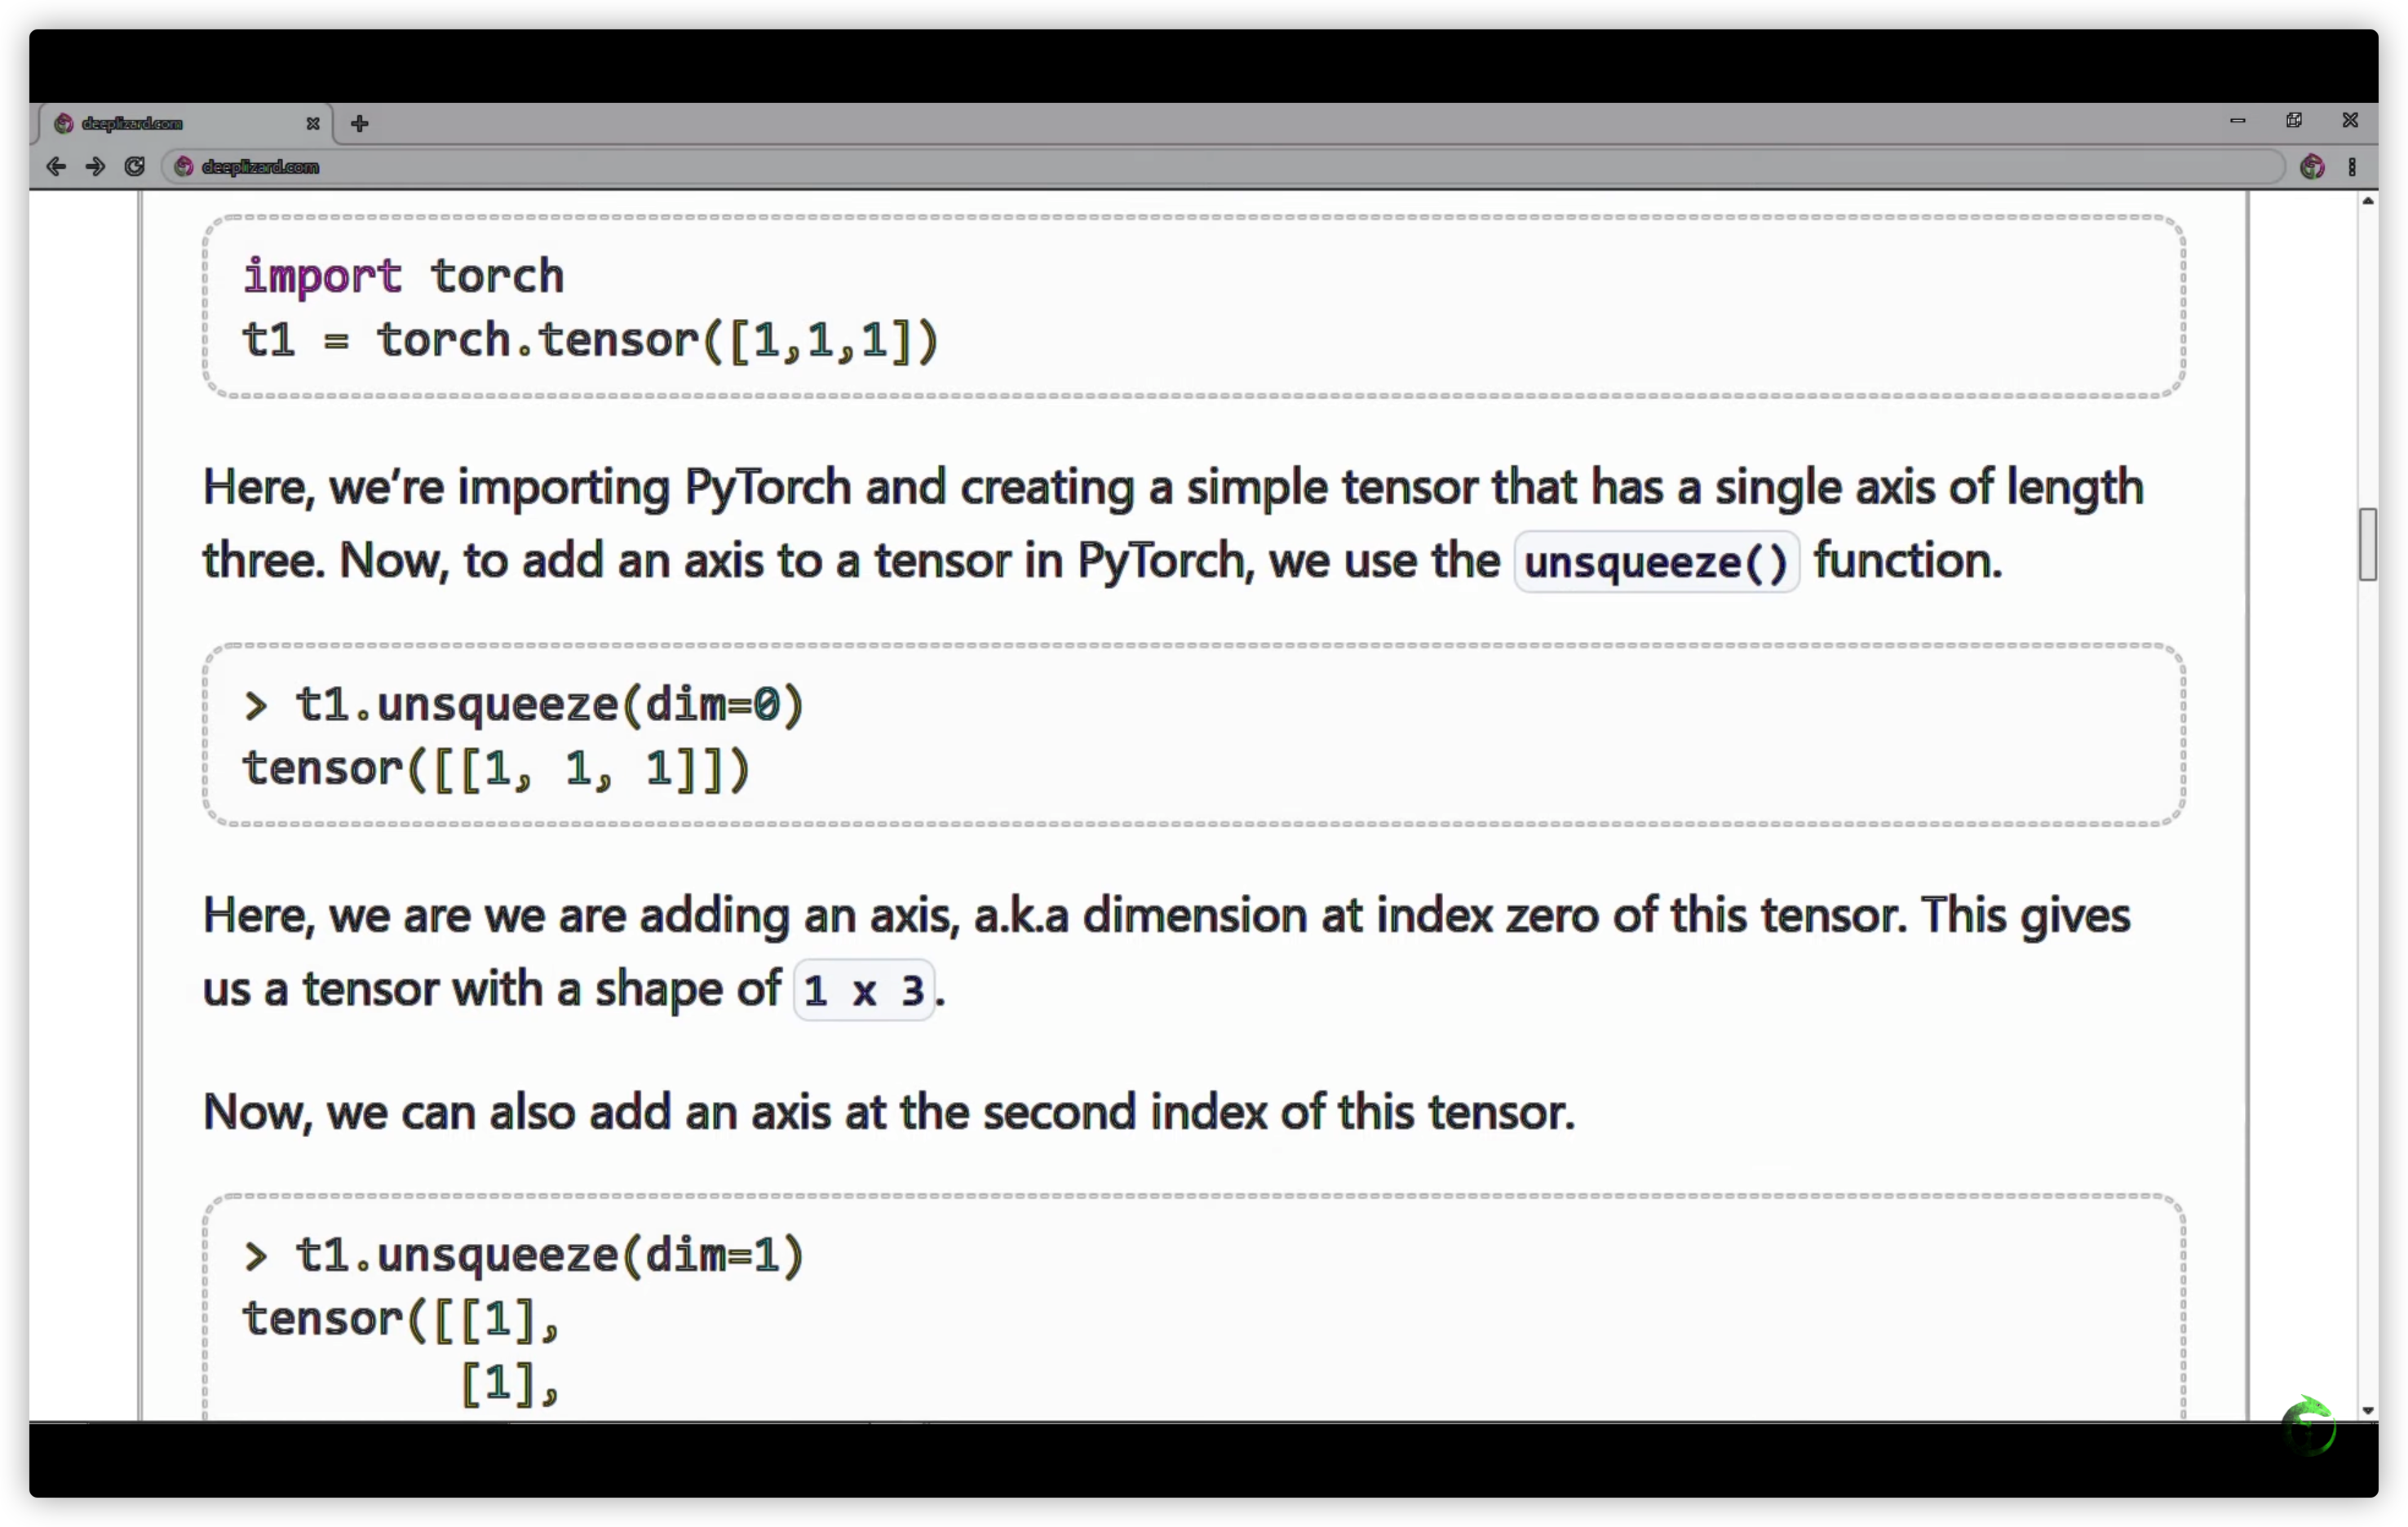
29. Stack vs Concat in PyTorch, TensorFlow & NumPy - Deep Learning Tensor Ops

30. TensorBoard with PyTorch - Visualize Deep Learning Metrics
完整代码:
import torch
import torch.nn as nn
import torch.nn.functional as F
import torch.optim as optim
from torch.utils.tensorboard import SummaryWriter
import torchvision
import torchvision.transforms as transforms


torch.set_printoptions(linewidth=120)
torch.set_grad_enabled(True)

def get_num_correct(preds,labels):
    return preds.argmax(dim=1).eq(labels).sum().item()

class Network(nn.Module):
    def __init__(self):
        super(Network, self).__init__()

        # 维度计算公式:output=(n-filter+2padding)/stride+1。因此:
        # 原始图片大小:28*28
        # conv1后,28-5+1=24。当前图片大小:24*24
        # max_pool2d后,(24-2)/2+1=12。当前图片大小:12*12
        # conv2后,12-5+1=8。当前图片大小:8*8
        # max_pool2后,(8-2)/2+1=4。当前图片大小:4*4。当前这张图片有12g个channels
        # 此时,这张图片的维度为1*12*4*4(batch*channel*heigtht*width)。在进fc1时,把这张图片转为(1行,12*4*4列)维度

        self.conv1=nn.Conv2d(in_channels=1,out_channels=6,kernel_size=5)
        self.conv2=nn.Conv2d(in_channels=6,out_channels=12,kernel_size=5)

        self.fc1=nn.Linear(in_features=12*4*4,out_features=120)
        self.fc2=nn.Linear(in_features=120,out_features=60)
        self.out=nn.Linear(in_features=60,out_features=10) # 有10种输出类型

    def forward(self,t):
        t=F.relu(self.conv1(t));
        t=F.max_pool2d(t,kernel_size=2,stride=2)
        t=F.relu(self.conv2(t))
        t=F.max_pool2d(t,kernel_size=2,stride=2)

        t=t.reshape(-1,12*4*4)
        t=F.relu(self.fc1(t))
        t=F.relu(self.fc2(t))
        t=self.out(t)
        return t

train_set=torchvision.datasets.FashionMNIST(
    root='./data',
    train=True,
    download=True,
    transform=transforms.Compose([
        transforms.ToTensor()
    ])
)

network=Network()
train_loader=torch.utils.data.DataLoader(train_set,batch_size=100,shuffle=True)
optimizer=optim.Adam(network.parameters(),lr=0.01)

images,labels=next(iter(train_loader))
grid=torchvision.utils.make_grid(images)

tb = SummaryWriter()
tb.add_image('images',grid)
tb.add_graph(network,images)

for epoch in range(1): # epoch表示完整的一批数据
    total_loss = 0
    total_correct = 0
    for batch in train_loader: # batch表示某epoch中的一部分数据
        images,labels=batch
        preds=network(images)
        loss=F.cross_entropy(preds,labels)

        optimizer.zero_grad()
        loss.backward() # calculate gradients
        optimizer.step() # update weights

        total_loss+=loss.item()
        total_correct+=get_num_correct(preds,labels)

    tb.add_scalar('Loss',total_loss,epoch)
    tb.add_scalar('Number Correct',total_correct,epoch)
    tb.add_scalar('Accuracy',total_correct/len(train_set),epoch)

    tb.add_histogram('conv1.bias',network.conv1.bias,epoch)
    tb.add_histogram('conv1.weight',network.conv1.weight,epoch)
    tb.add_histogram('conv1.weight.grad',network.conv1.weight.grad,epoch)
    # print(network.conv1.weight.size())
    # print(network.conv1.weight.grad.size())
    # print(network.fc1.weight.grad.size())


    print("epoch: ",epoch,
          "total_loss: ",total_loss,
          "total_correct: ",total_correct)

tb.close()
权重说明:
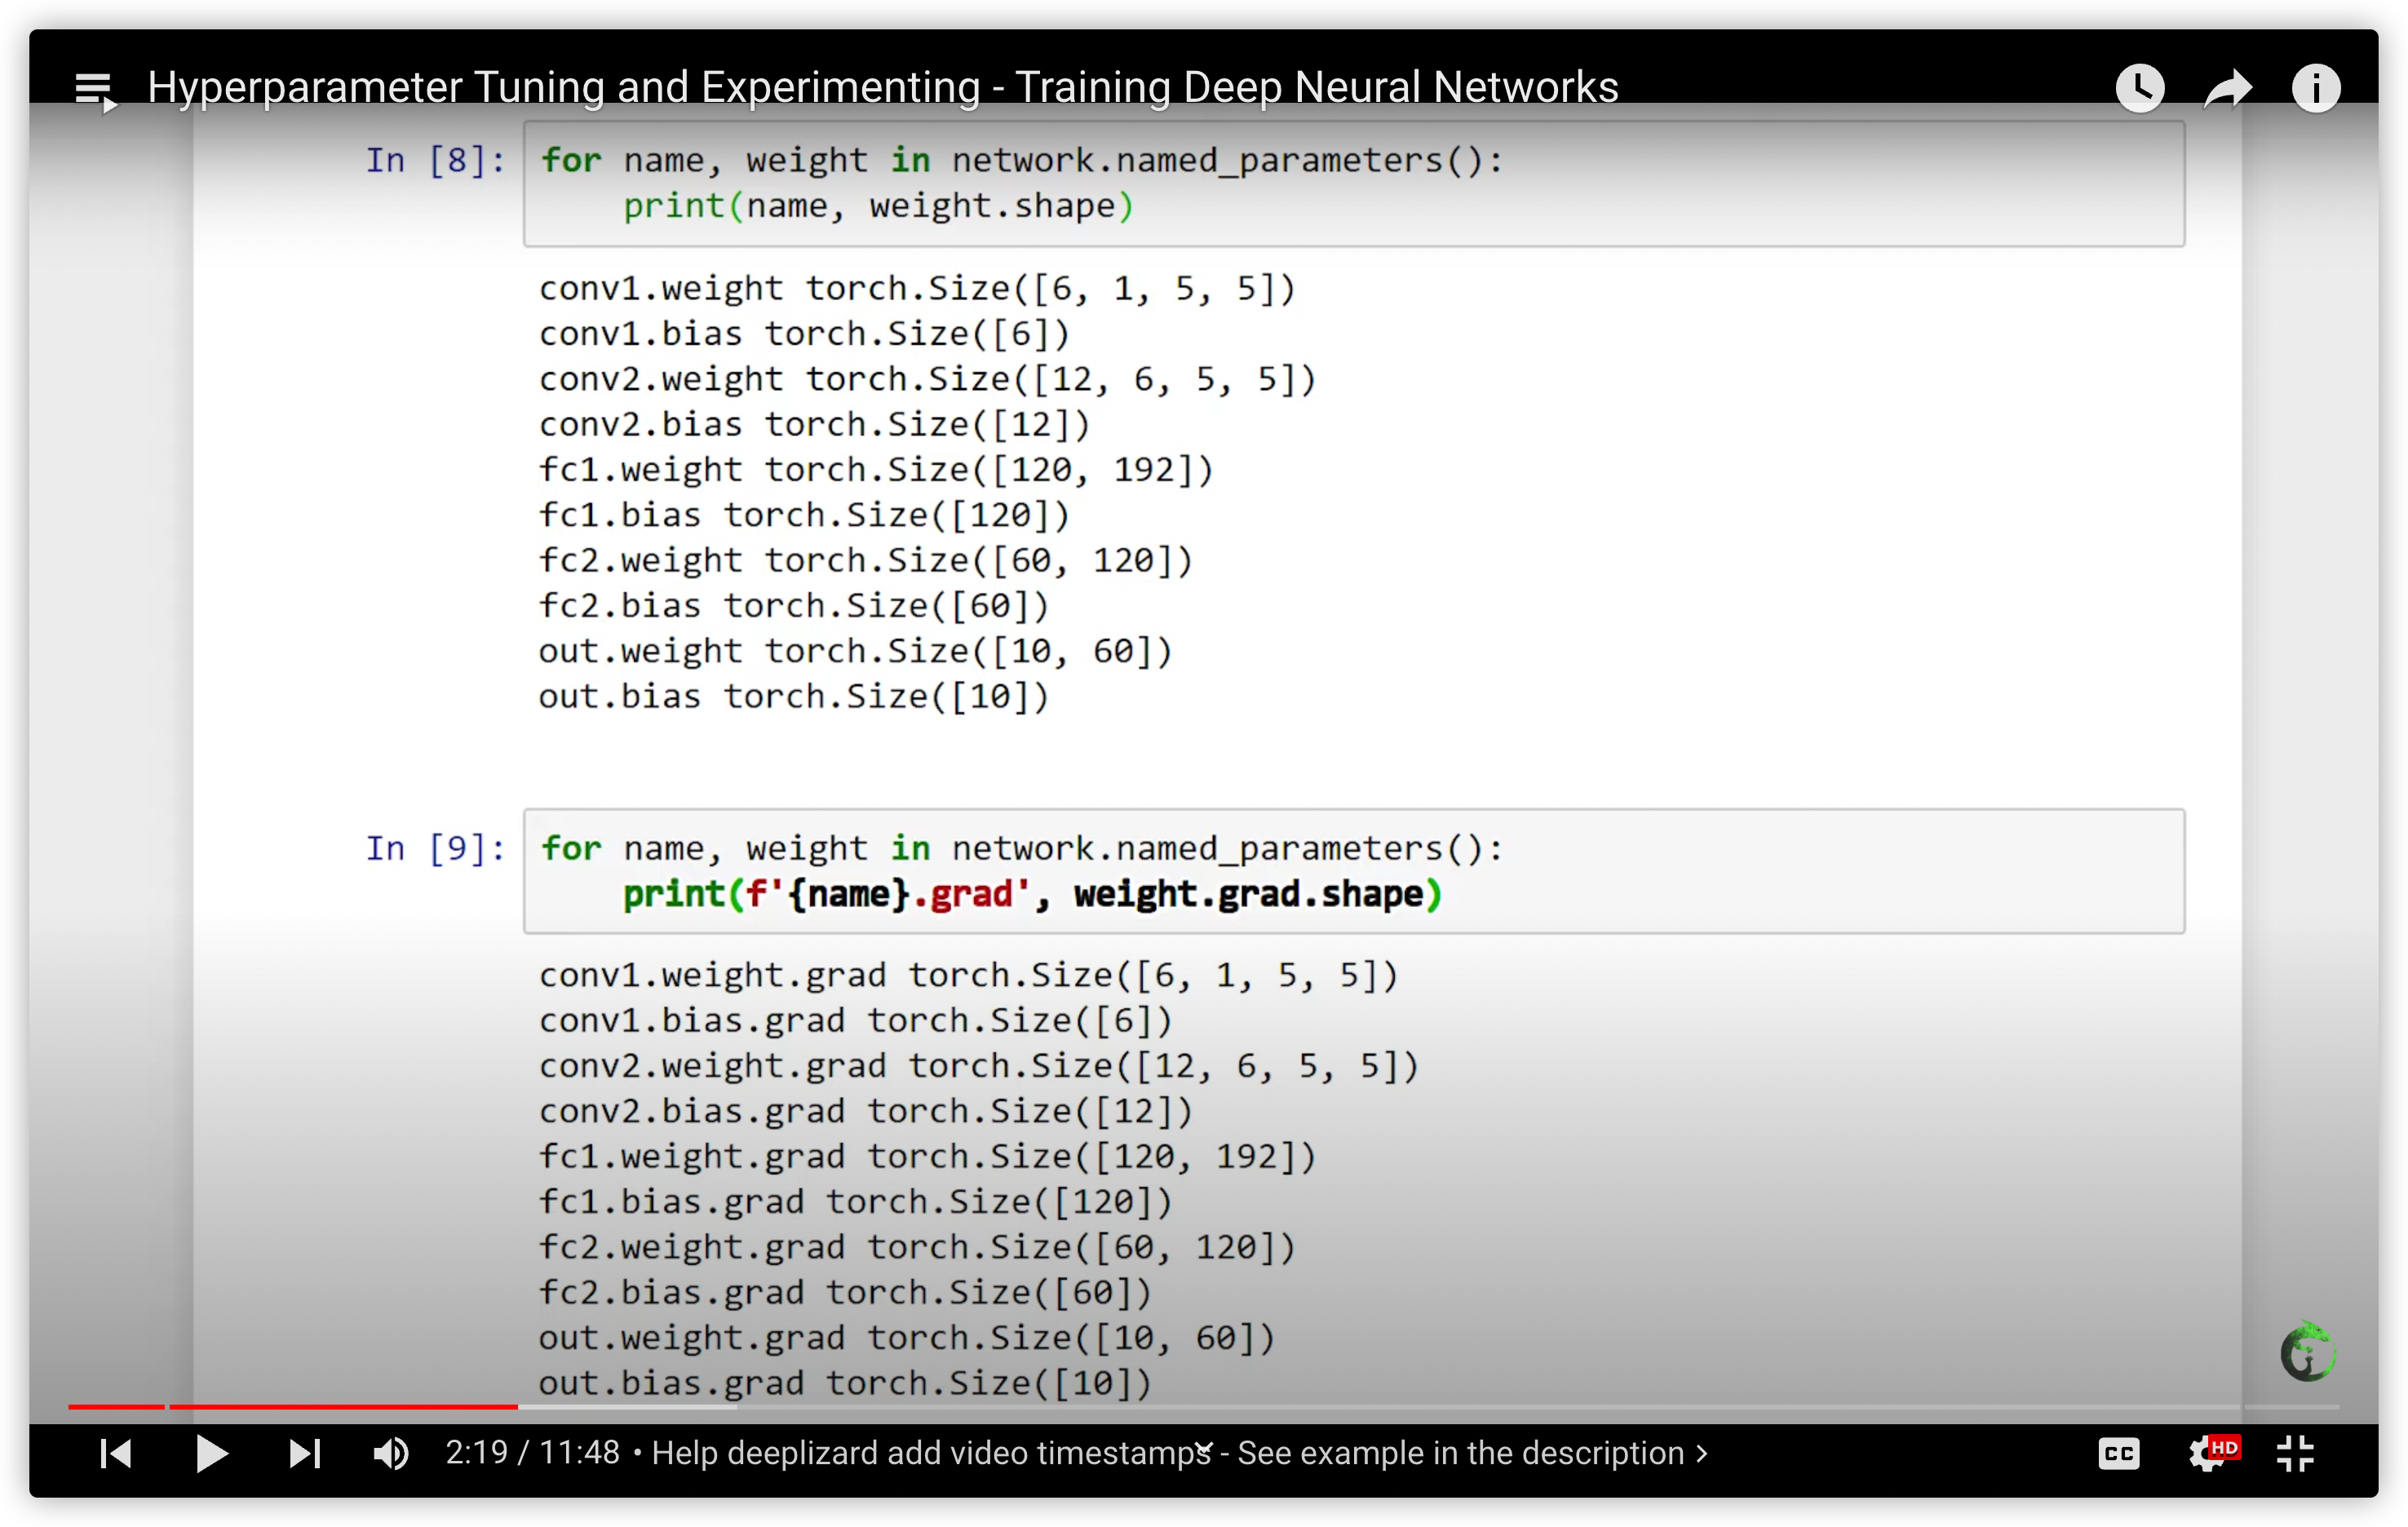
network.conv1.weight.size()为(6*1*5*5),输入为1channel,输出为6channels, 所以为6*1,kernel大小为5,所以为5*5. 相应地,network.conv1.weight.grad.size()也为(6*1*5*5)
31. Hyperparameter Tuning and Experimenting - Training Deep Neural Networks
32. Training Loop Run Builder - Neural Network Experimentation Code
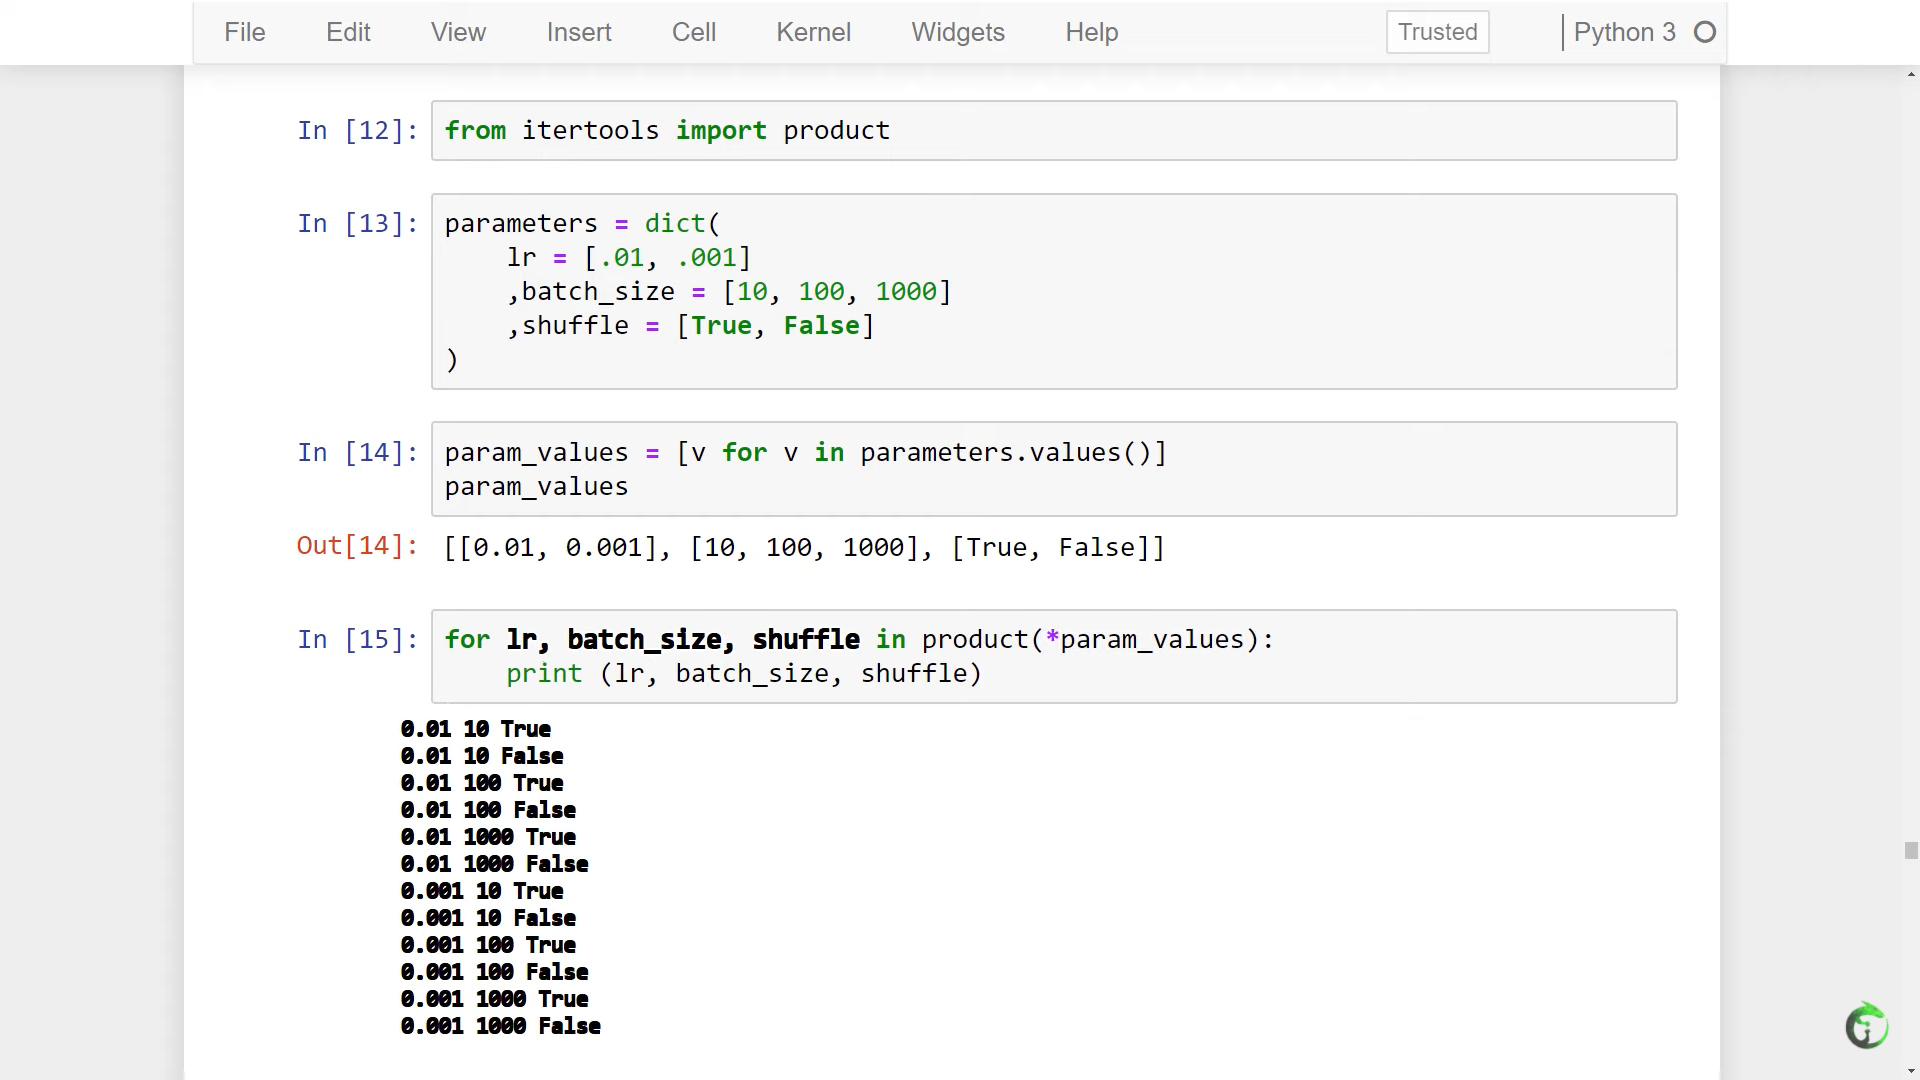
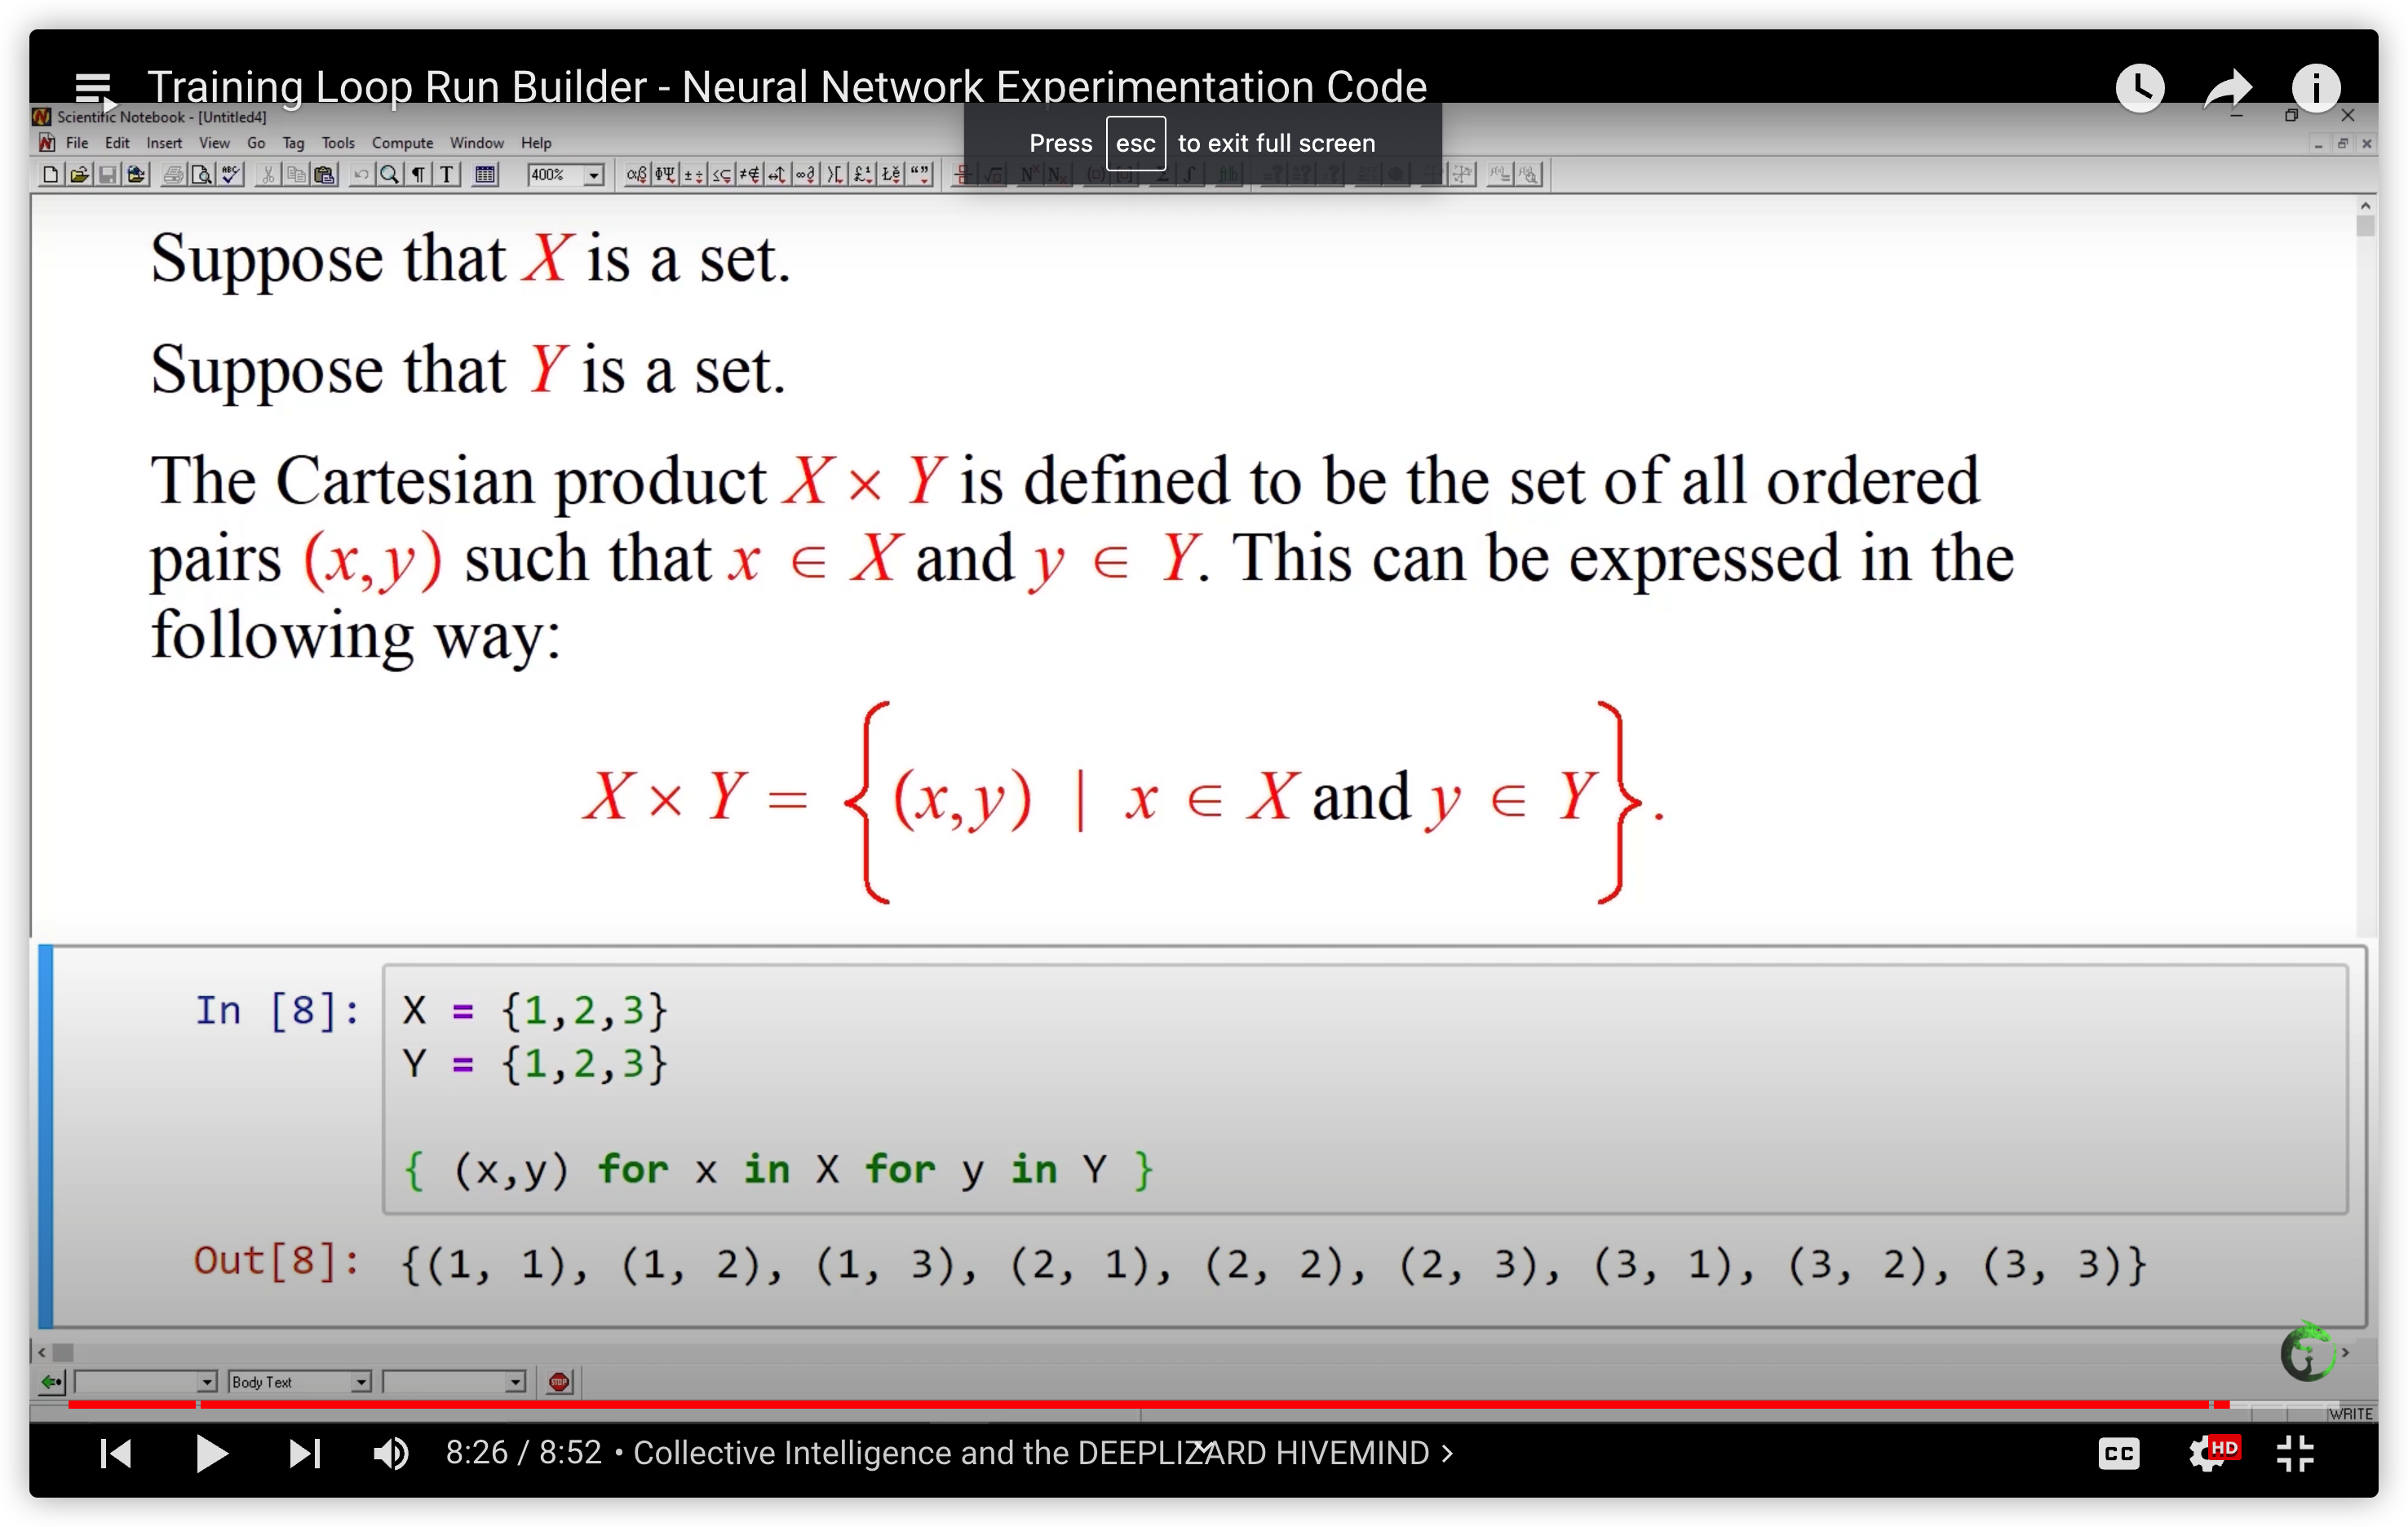
- build sets of parameters that define our runs.
All we have to do to add additional values is to add them to the original parameter list, and if we want to add an additional type of parameter, all we have to do is add it. The new parameter and its values will automatically become available to be consumed inside the run. The string output for the run also updates as well.
This functionality will allow us to have greater control as we experiment with different values during training.
from collections import OrderedDict
from collections import namedtuple
from itertools import product

class RunBuilder():
    @staticmethod
    def get_runs(params):

        Run = namedtuple('Run', params.keys())

        runs = []
        for v in product(*params.values()):
            runs.append(Run(*v))

        return runs

# Two parameters:
params = OrderedDict(
    lr = [.01, .001]
    ,batch_size = [1000, 10000]
)

# Three parameters:
params = OrderedDict(
    lr = [.01, .001]
    ,batch_size = [1000, 10000]
    ,device = ["cuda", "cpu"]
)
runs = RunBuilder.get_runs(params)
print(runs)

# output of two parameters
#
# [
#     Run(lr=0.01, batch_size=1000),
#     Run(lr=0.01, batch_size=10000),
#     Run(lr=0.001, batch_size=1000),
#     Run(lr=0.001, batch_size=10000)
# ]

# output of three parameters
#
# [
#     Run(lr=0.01, batch_size=1000, device='cuda'),
#     Run(lr=0.01, batch_size=1000, device='cpu'),
#     Run(lr=0.01, batch_size=10000, device='cuda'),
#     Run(lr=0.01, batch_size=10000, device='cpu'),
#     Run(lr=0.001, batch_size=1000, device='cuda'),
#     Run(lr=0.001, batch_size=1000, device='cpu'),
#     Run(lr=0.001, batch_size=10000, device='cuda'),
#     Run(lr=0.001, batch_size=10000, device='cpu')
# ]
33. CNN Training Loop Refactoring - Simultaneous Hyperparameter Testing
34. PyTorch DataLoader num_workers - Deep Learning Speed Limit Increase
num_workers 并非越大越好。随着num_workers增加,时间先减小后增大。可以在parameters中尝试,从而确定num_workers的具体值
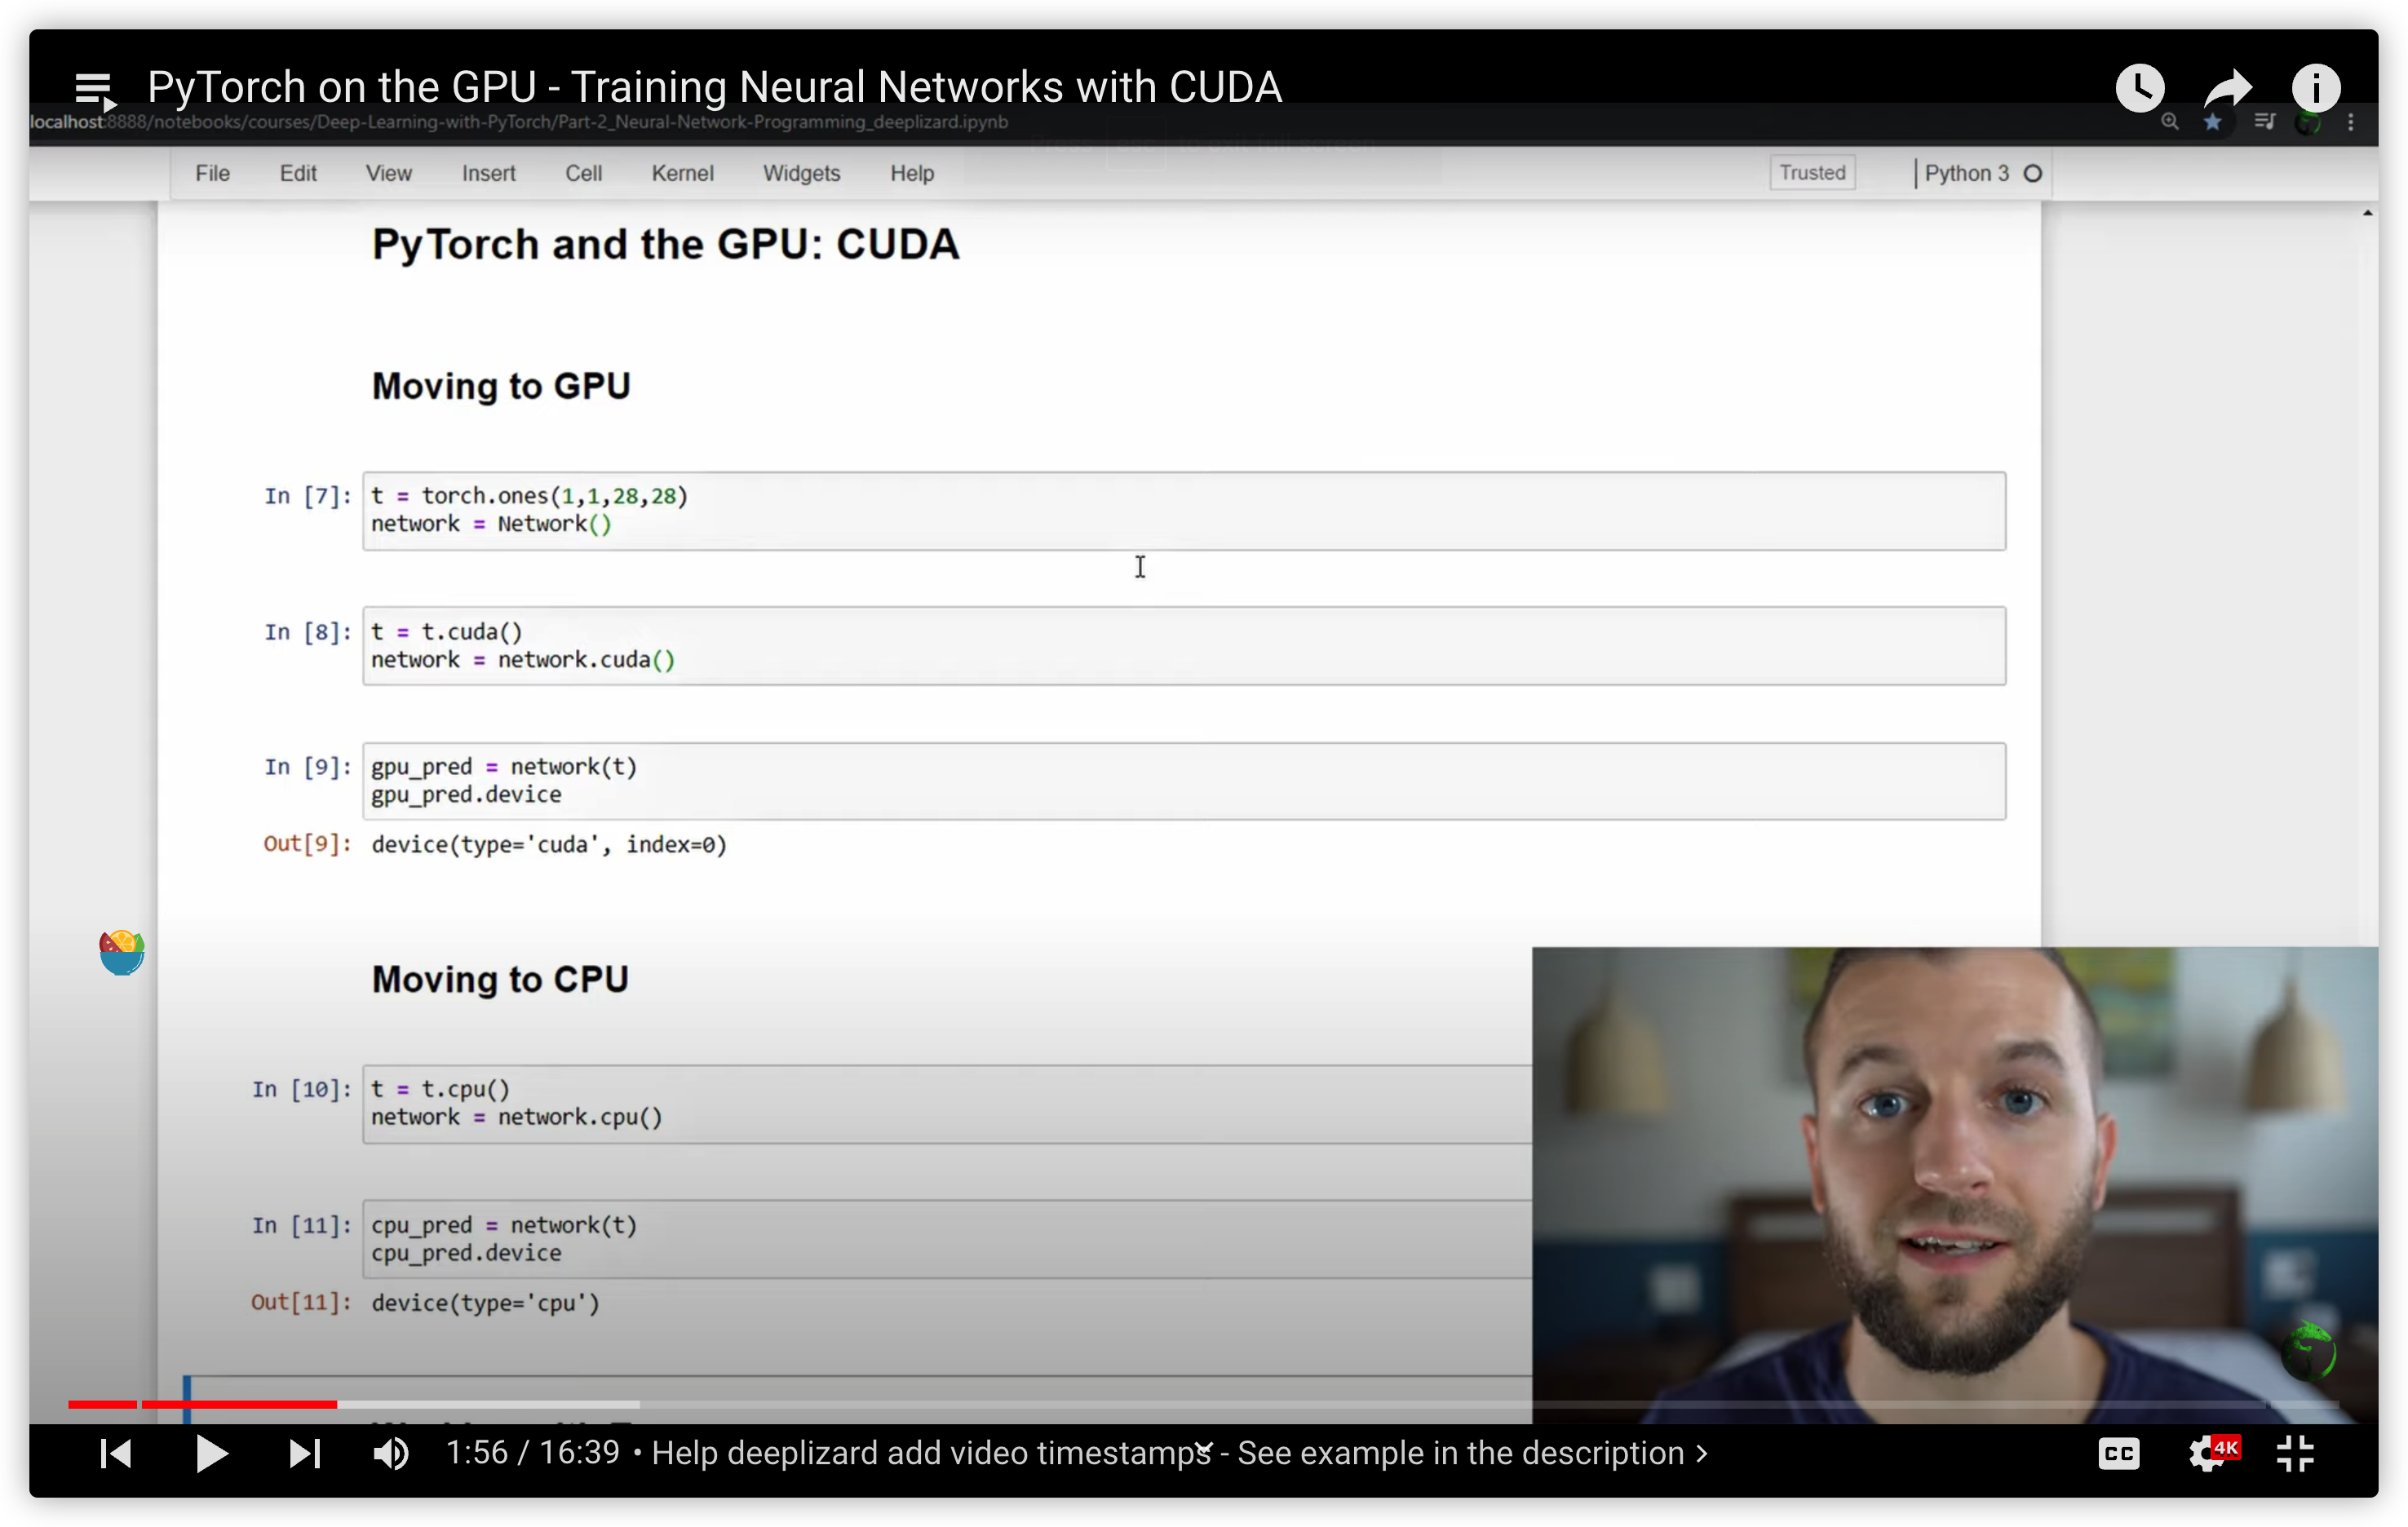
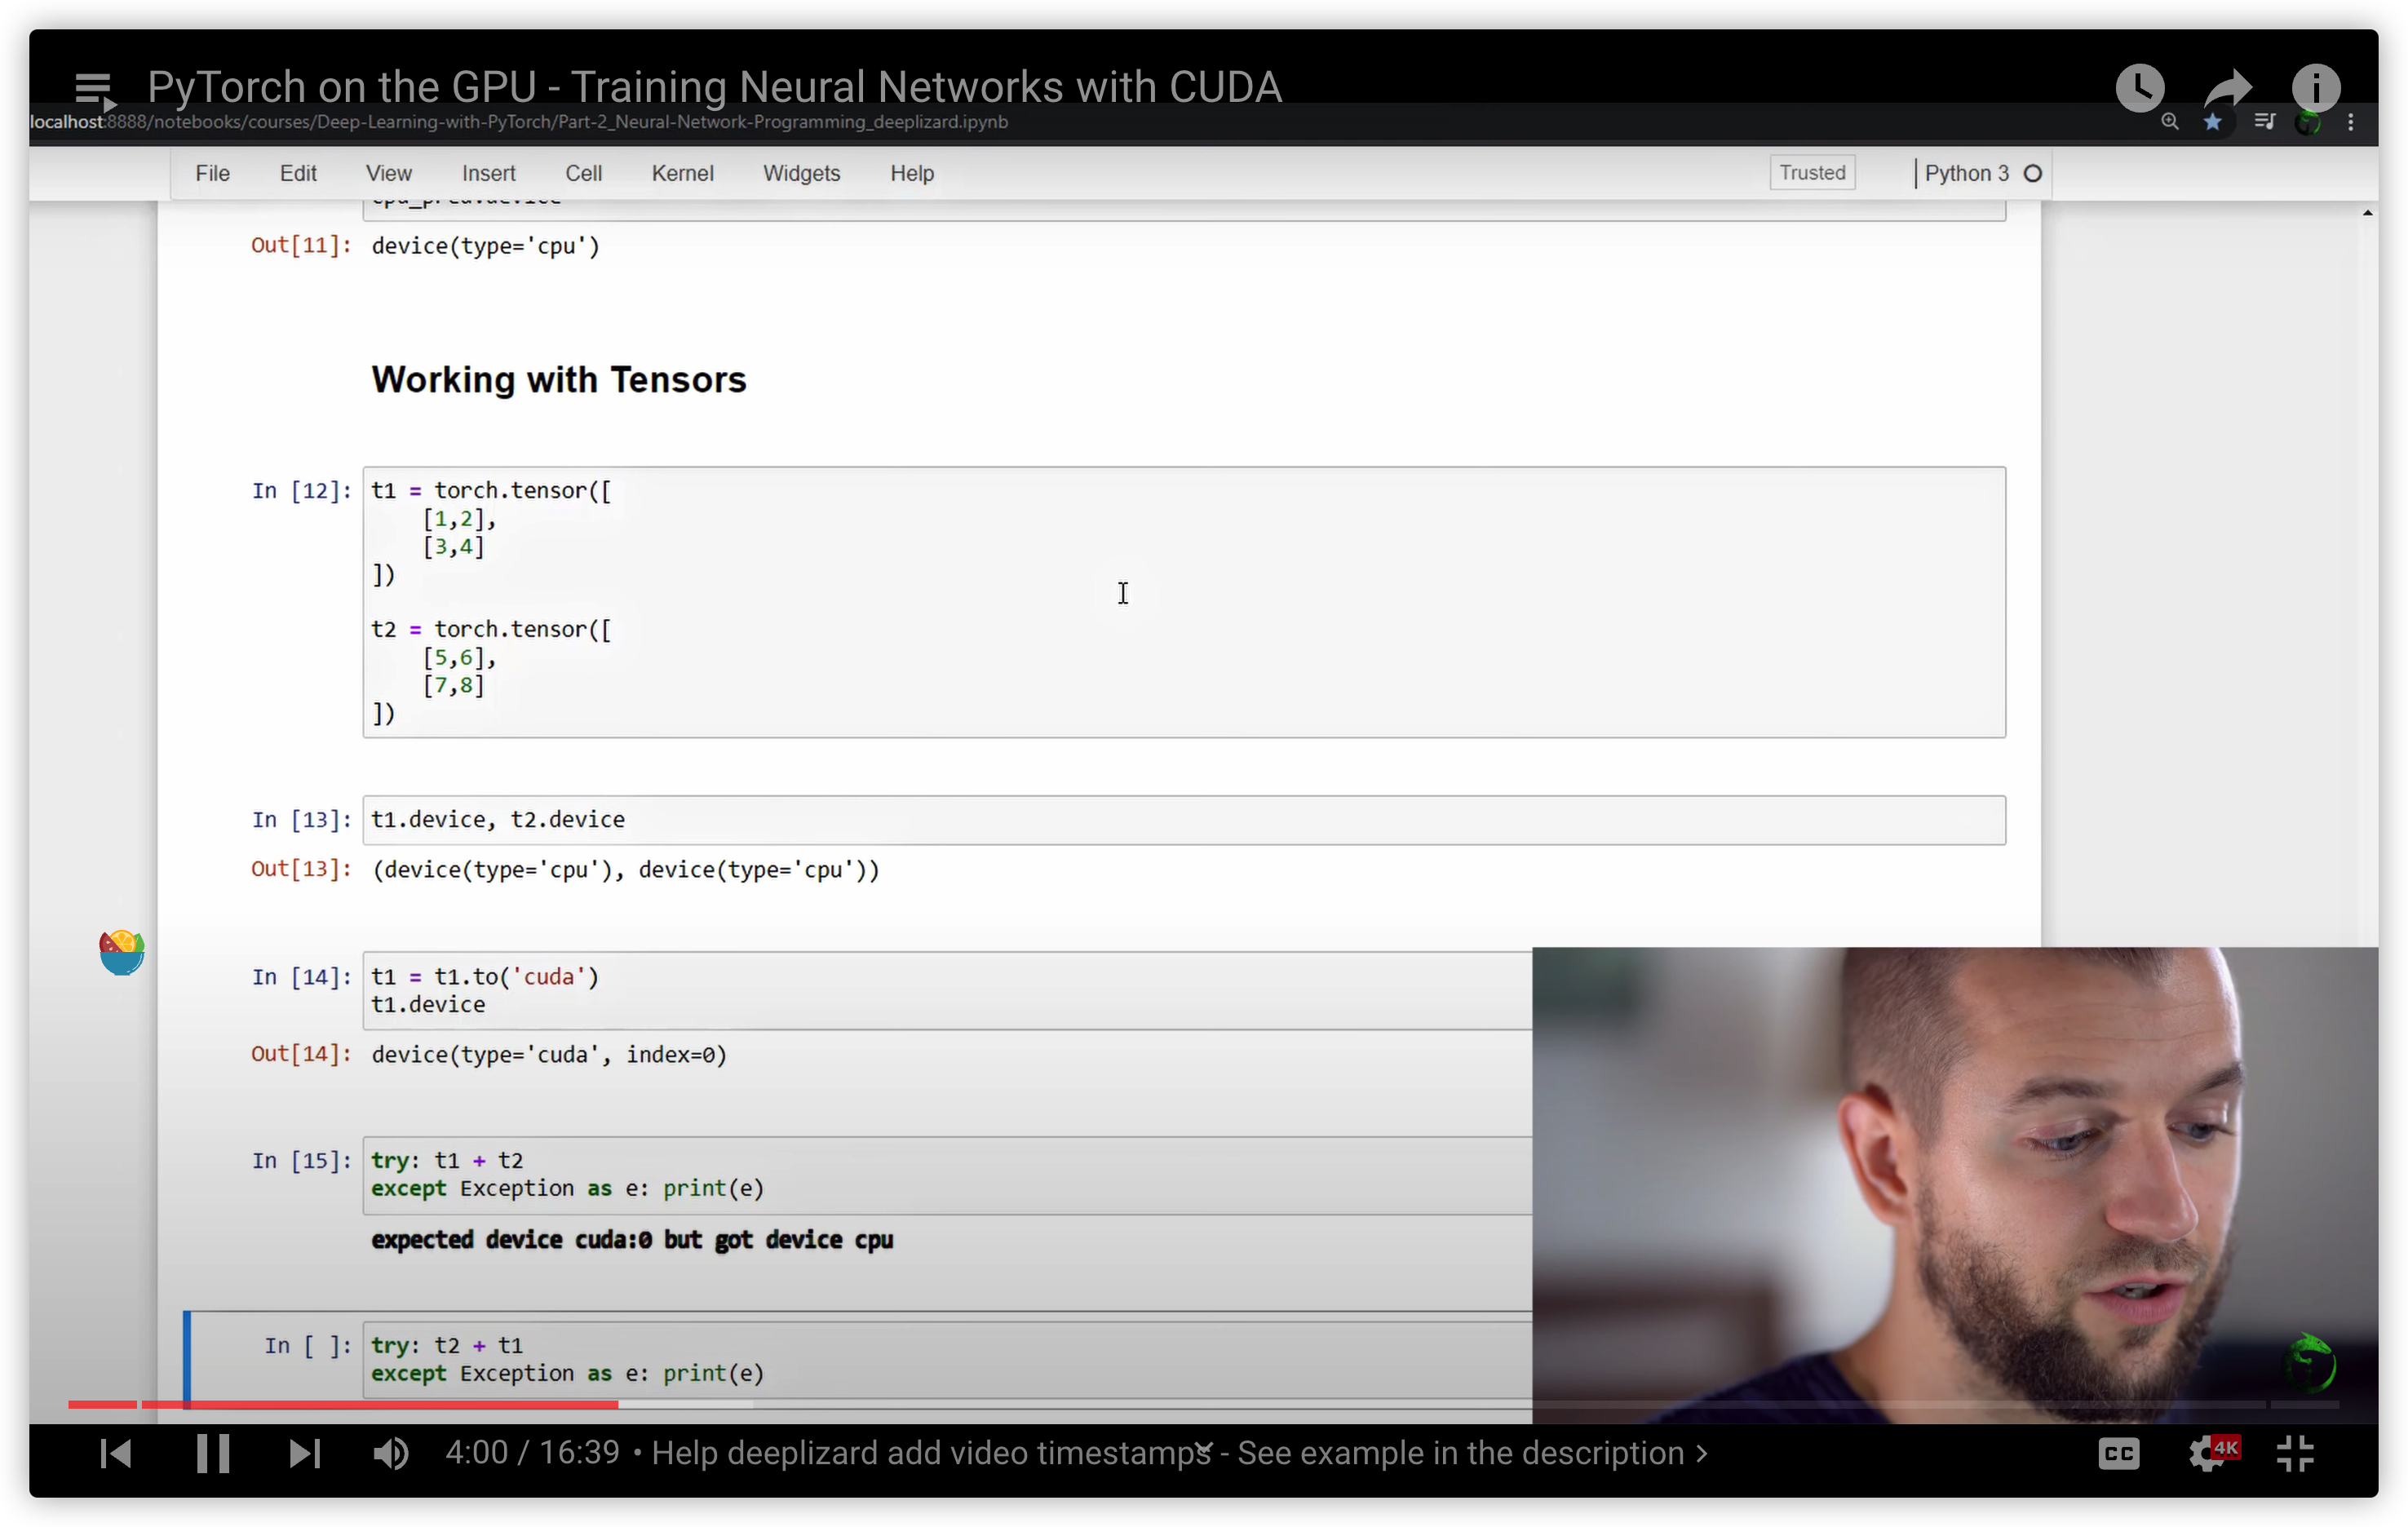
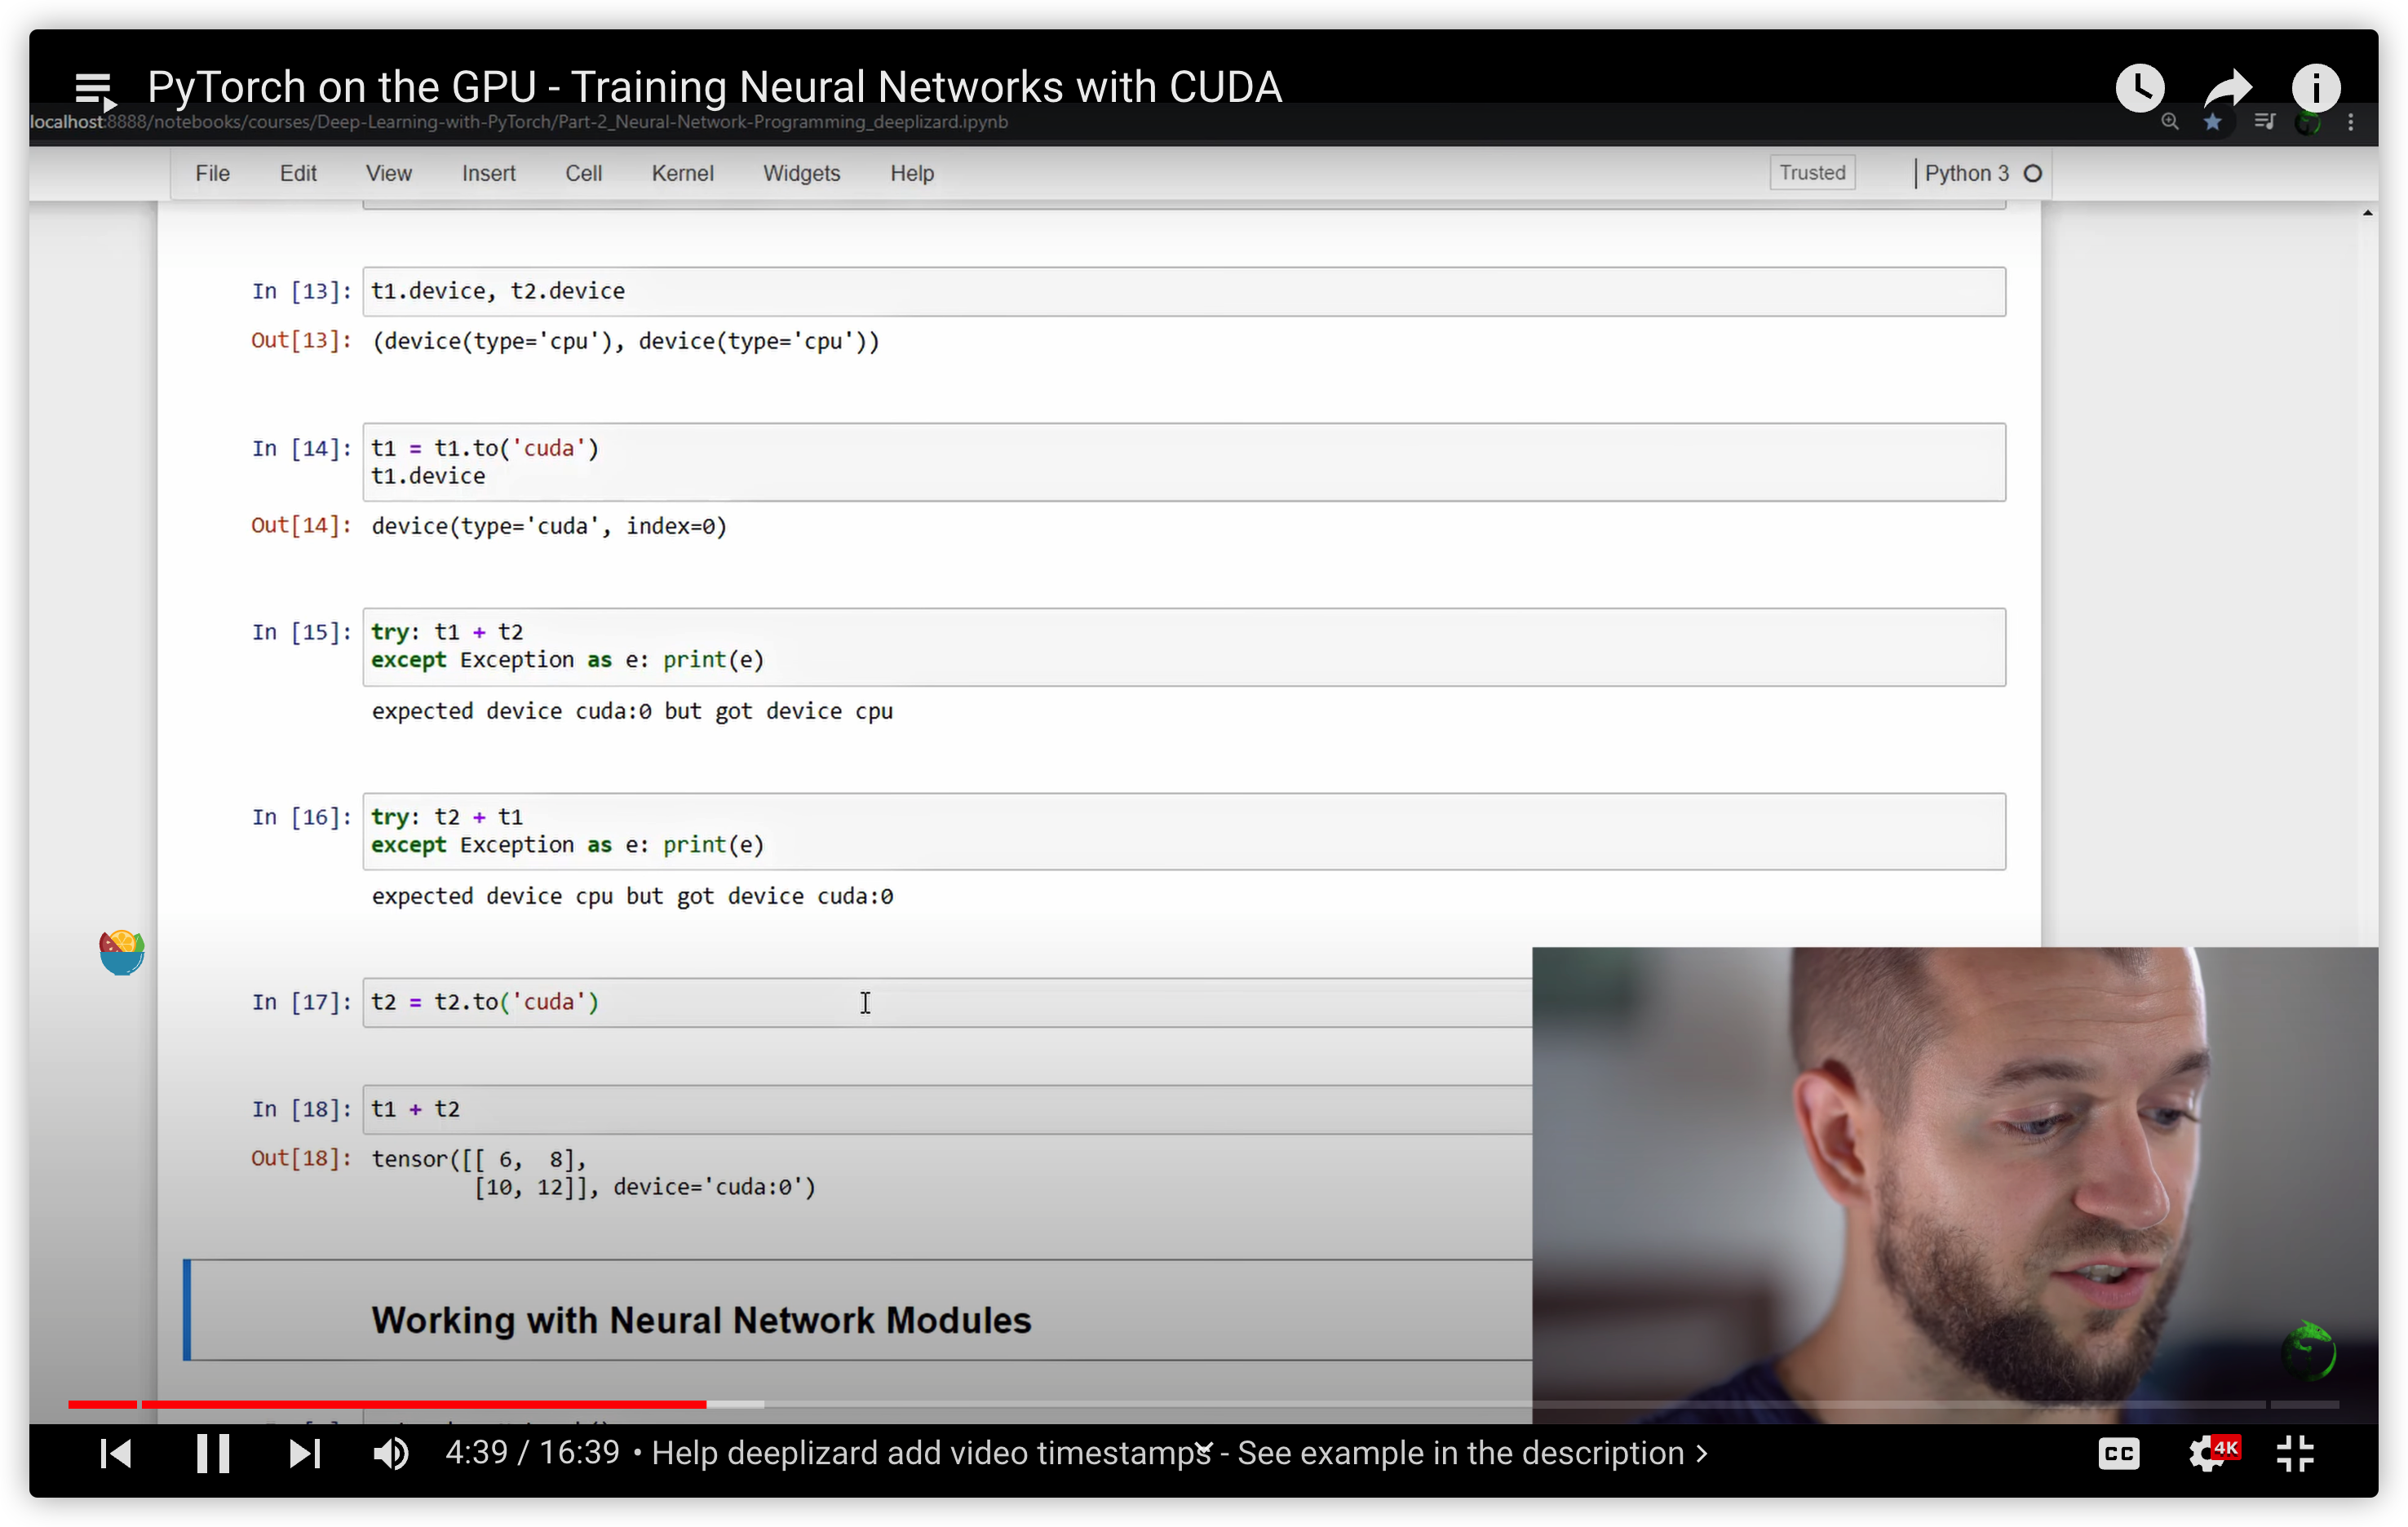
35. PyTorch on the GPU - Training Neural Networks with CUDA
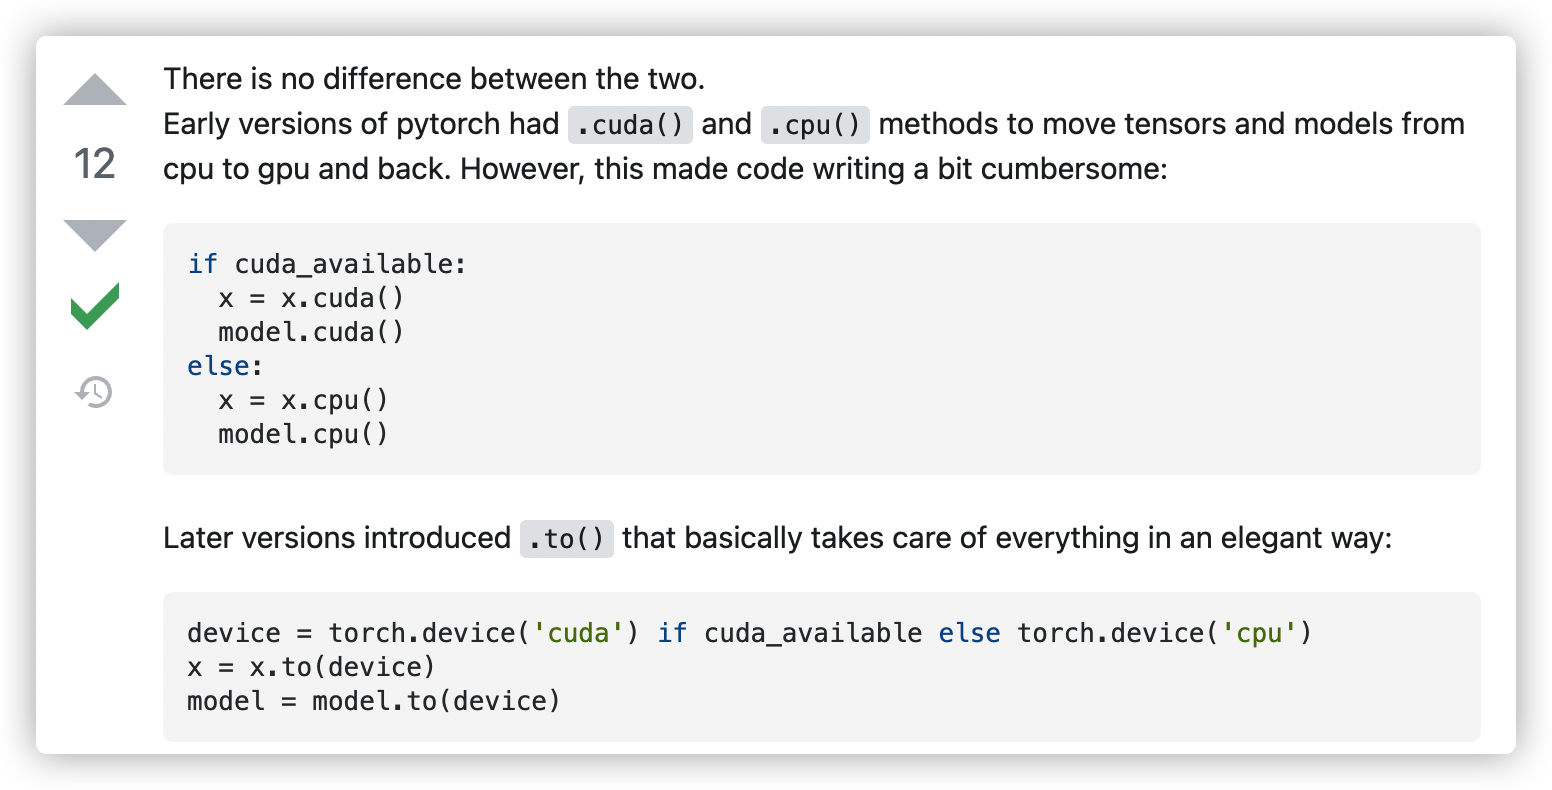
PyTorch: What is the difference between tensor.cuda() and tensor.to(torch.device(“cuda:0”))?
.cuda()/.cpu() is the old, pre-0.4 way. As of 0.4, it is recommended to use .to(device) because it is more flexible
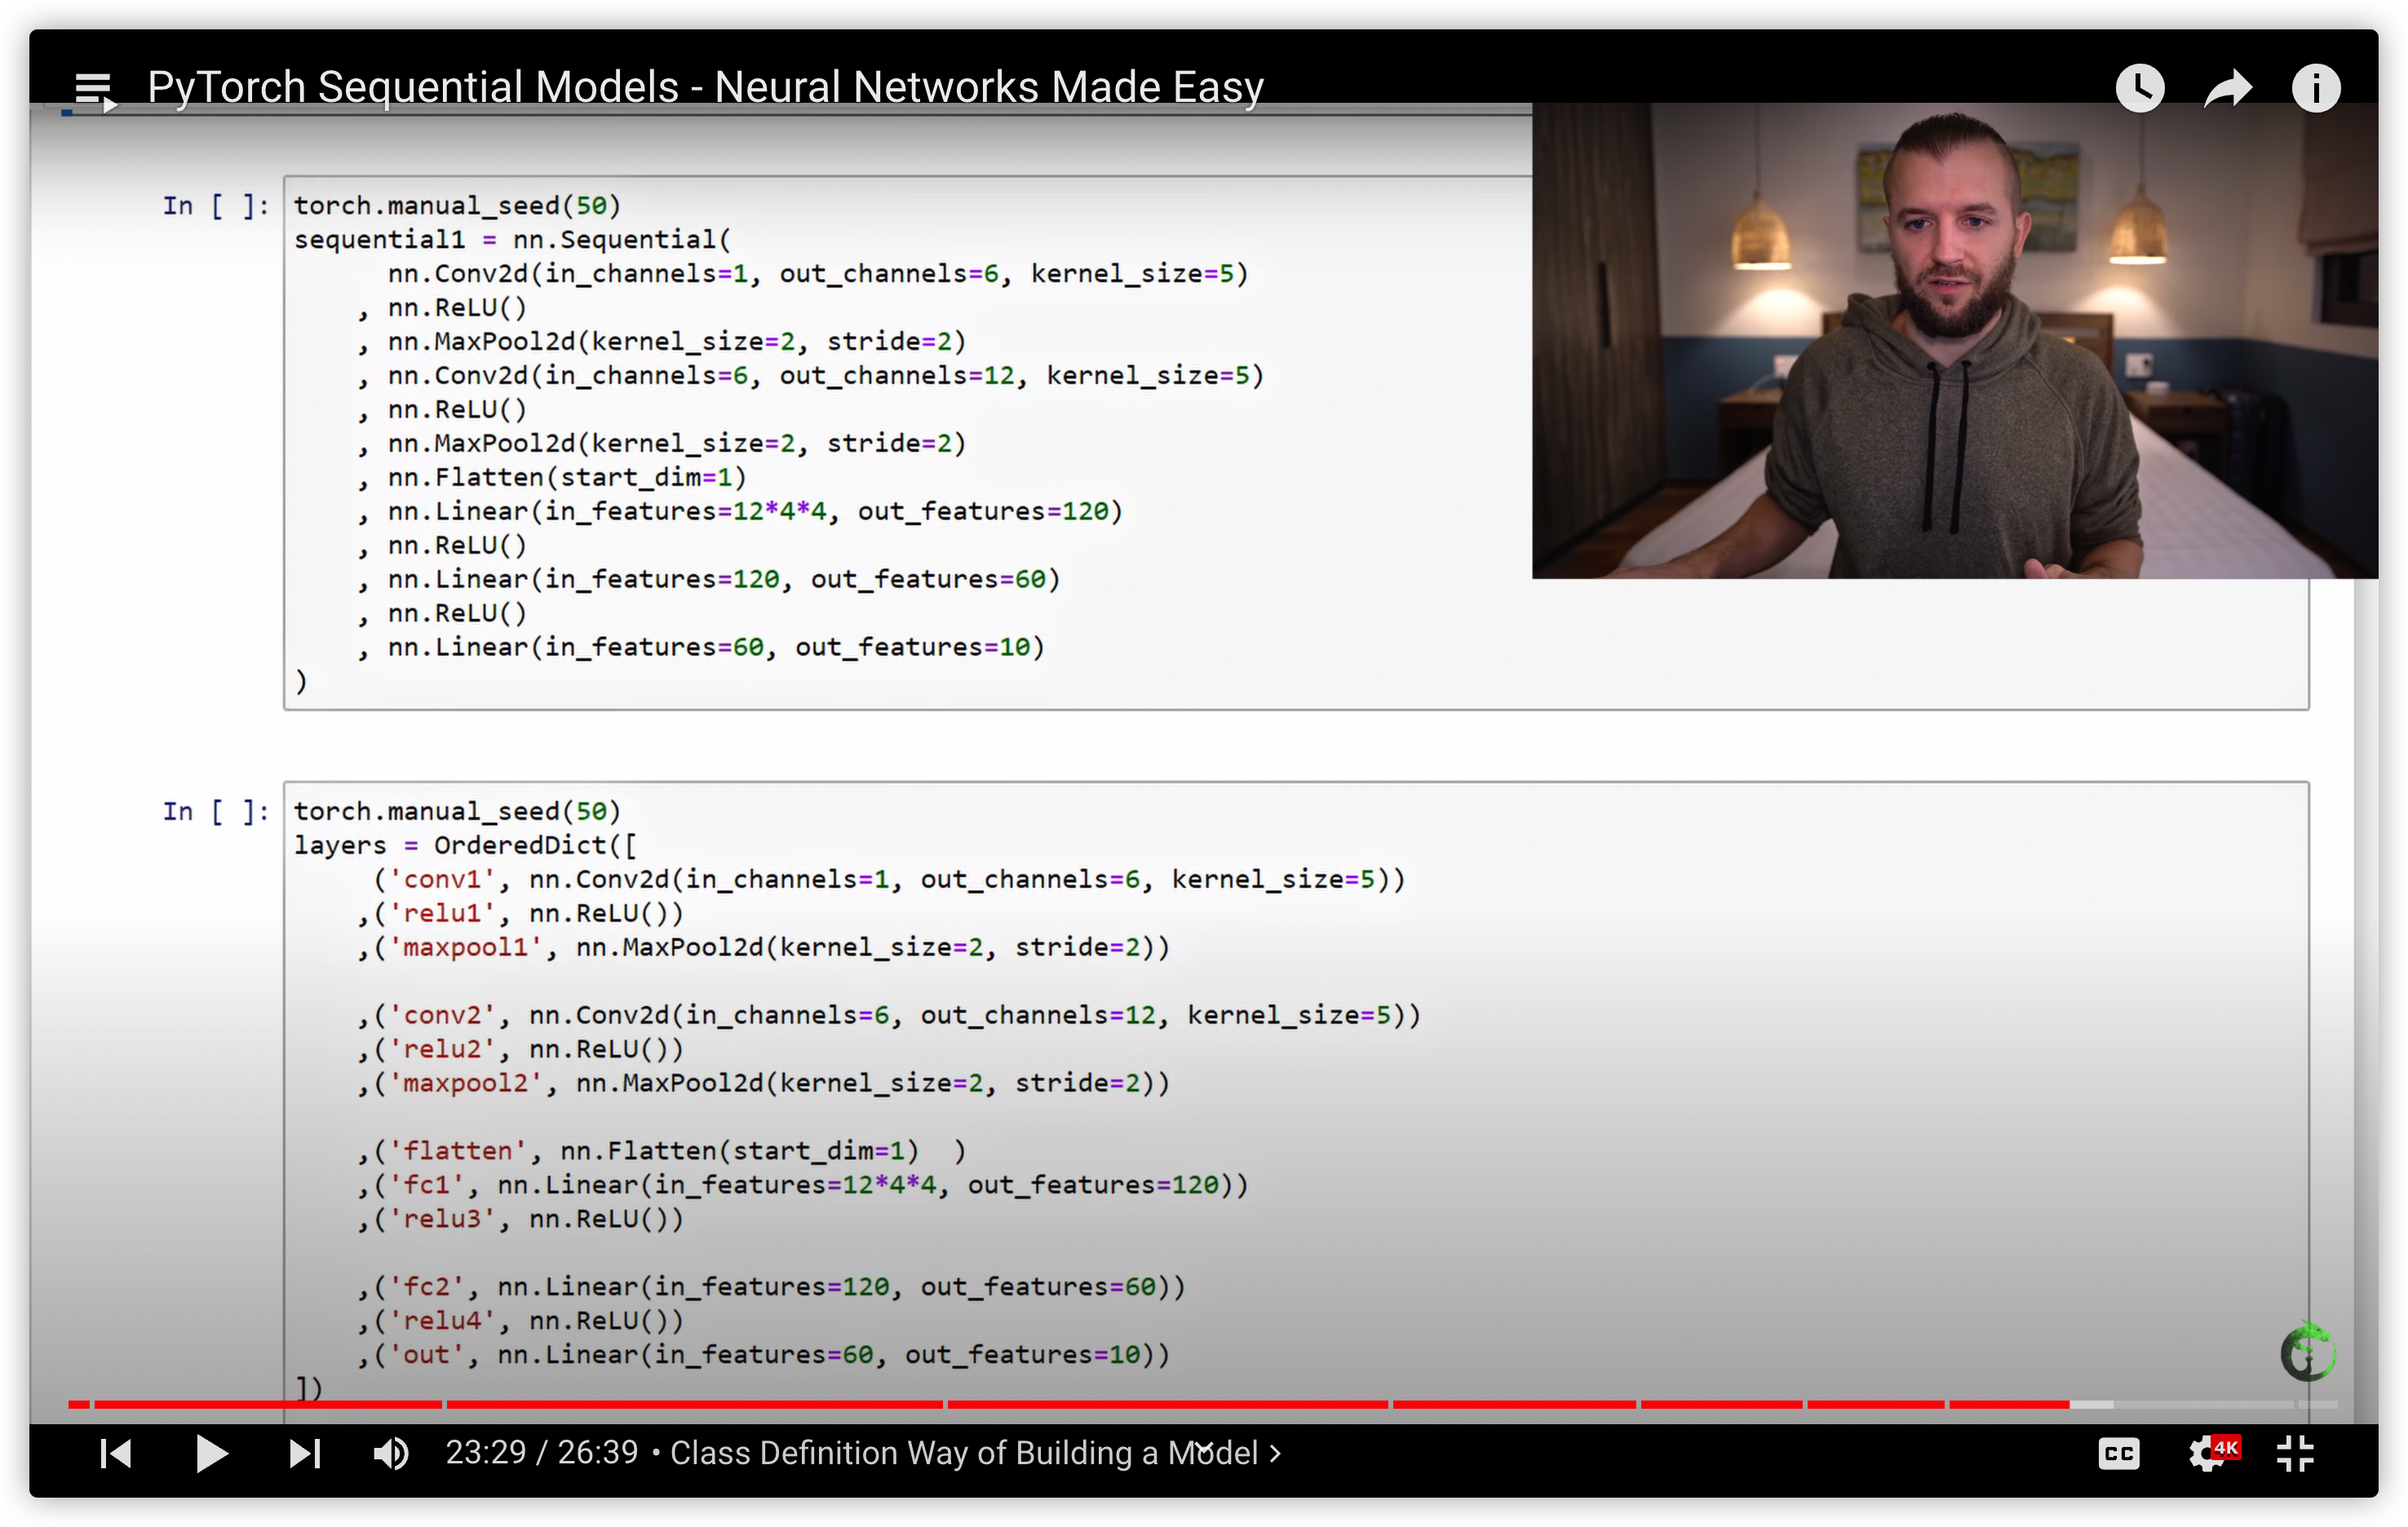
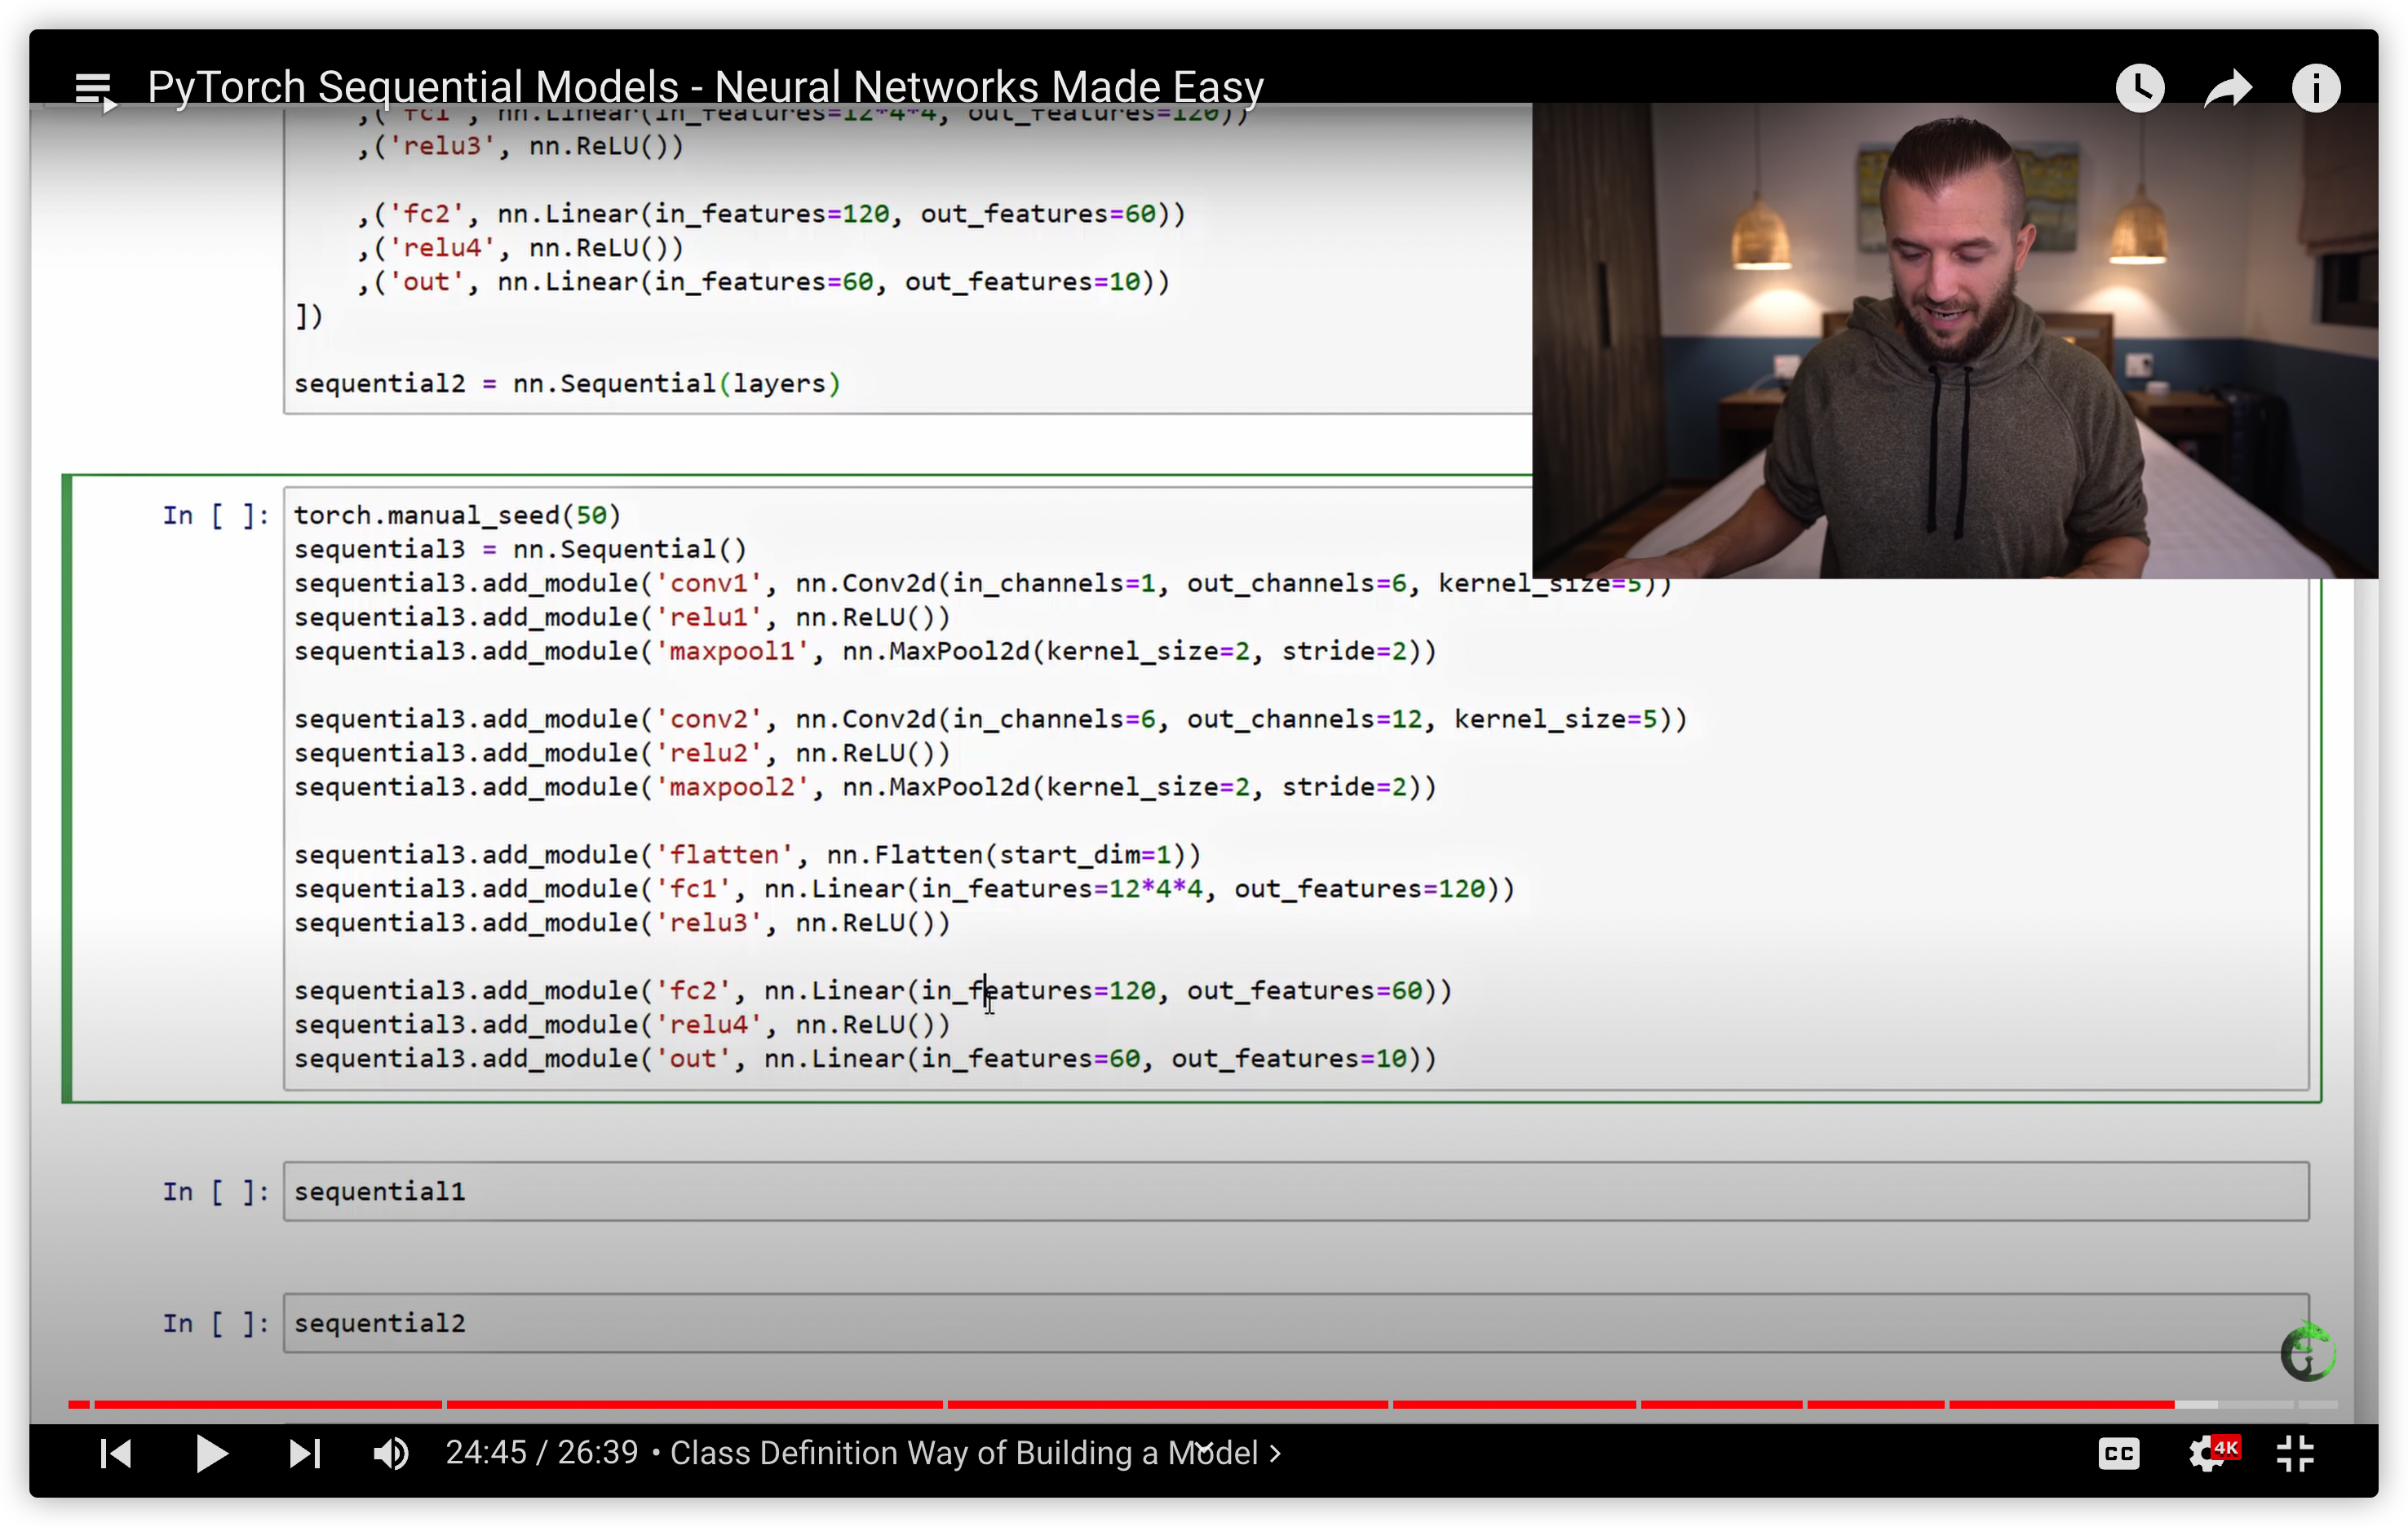
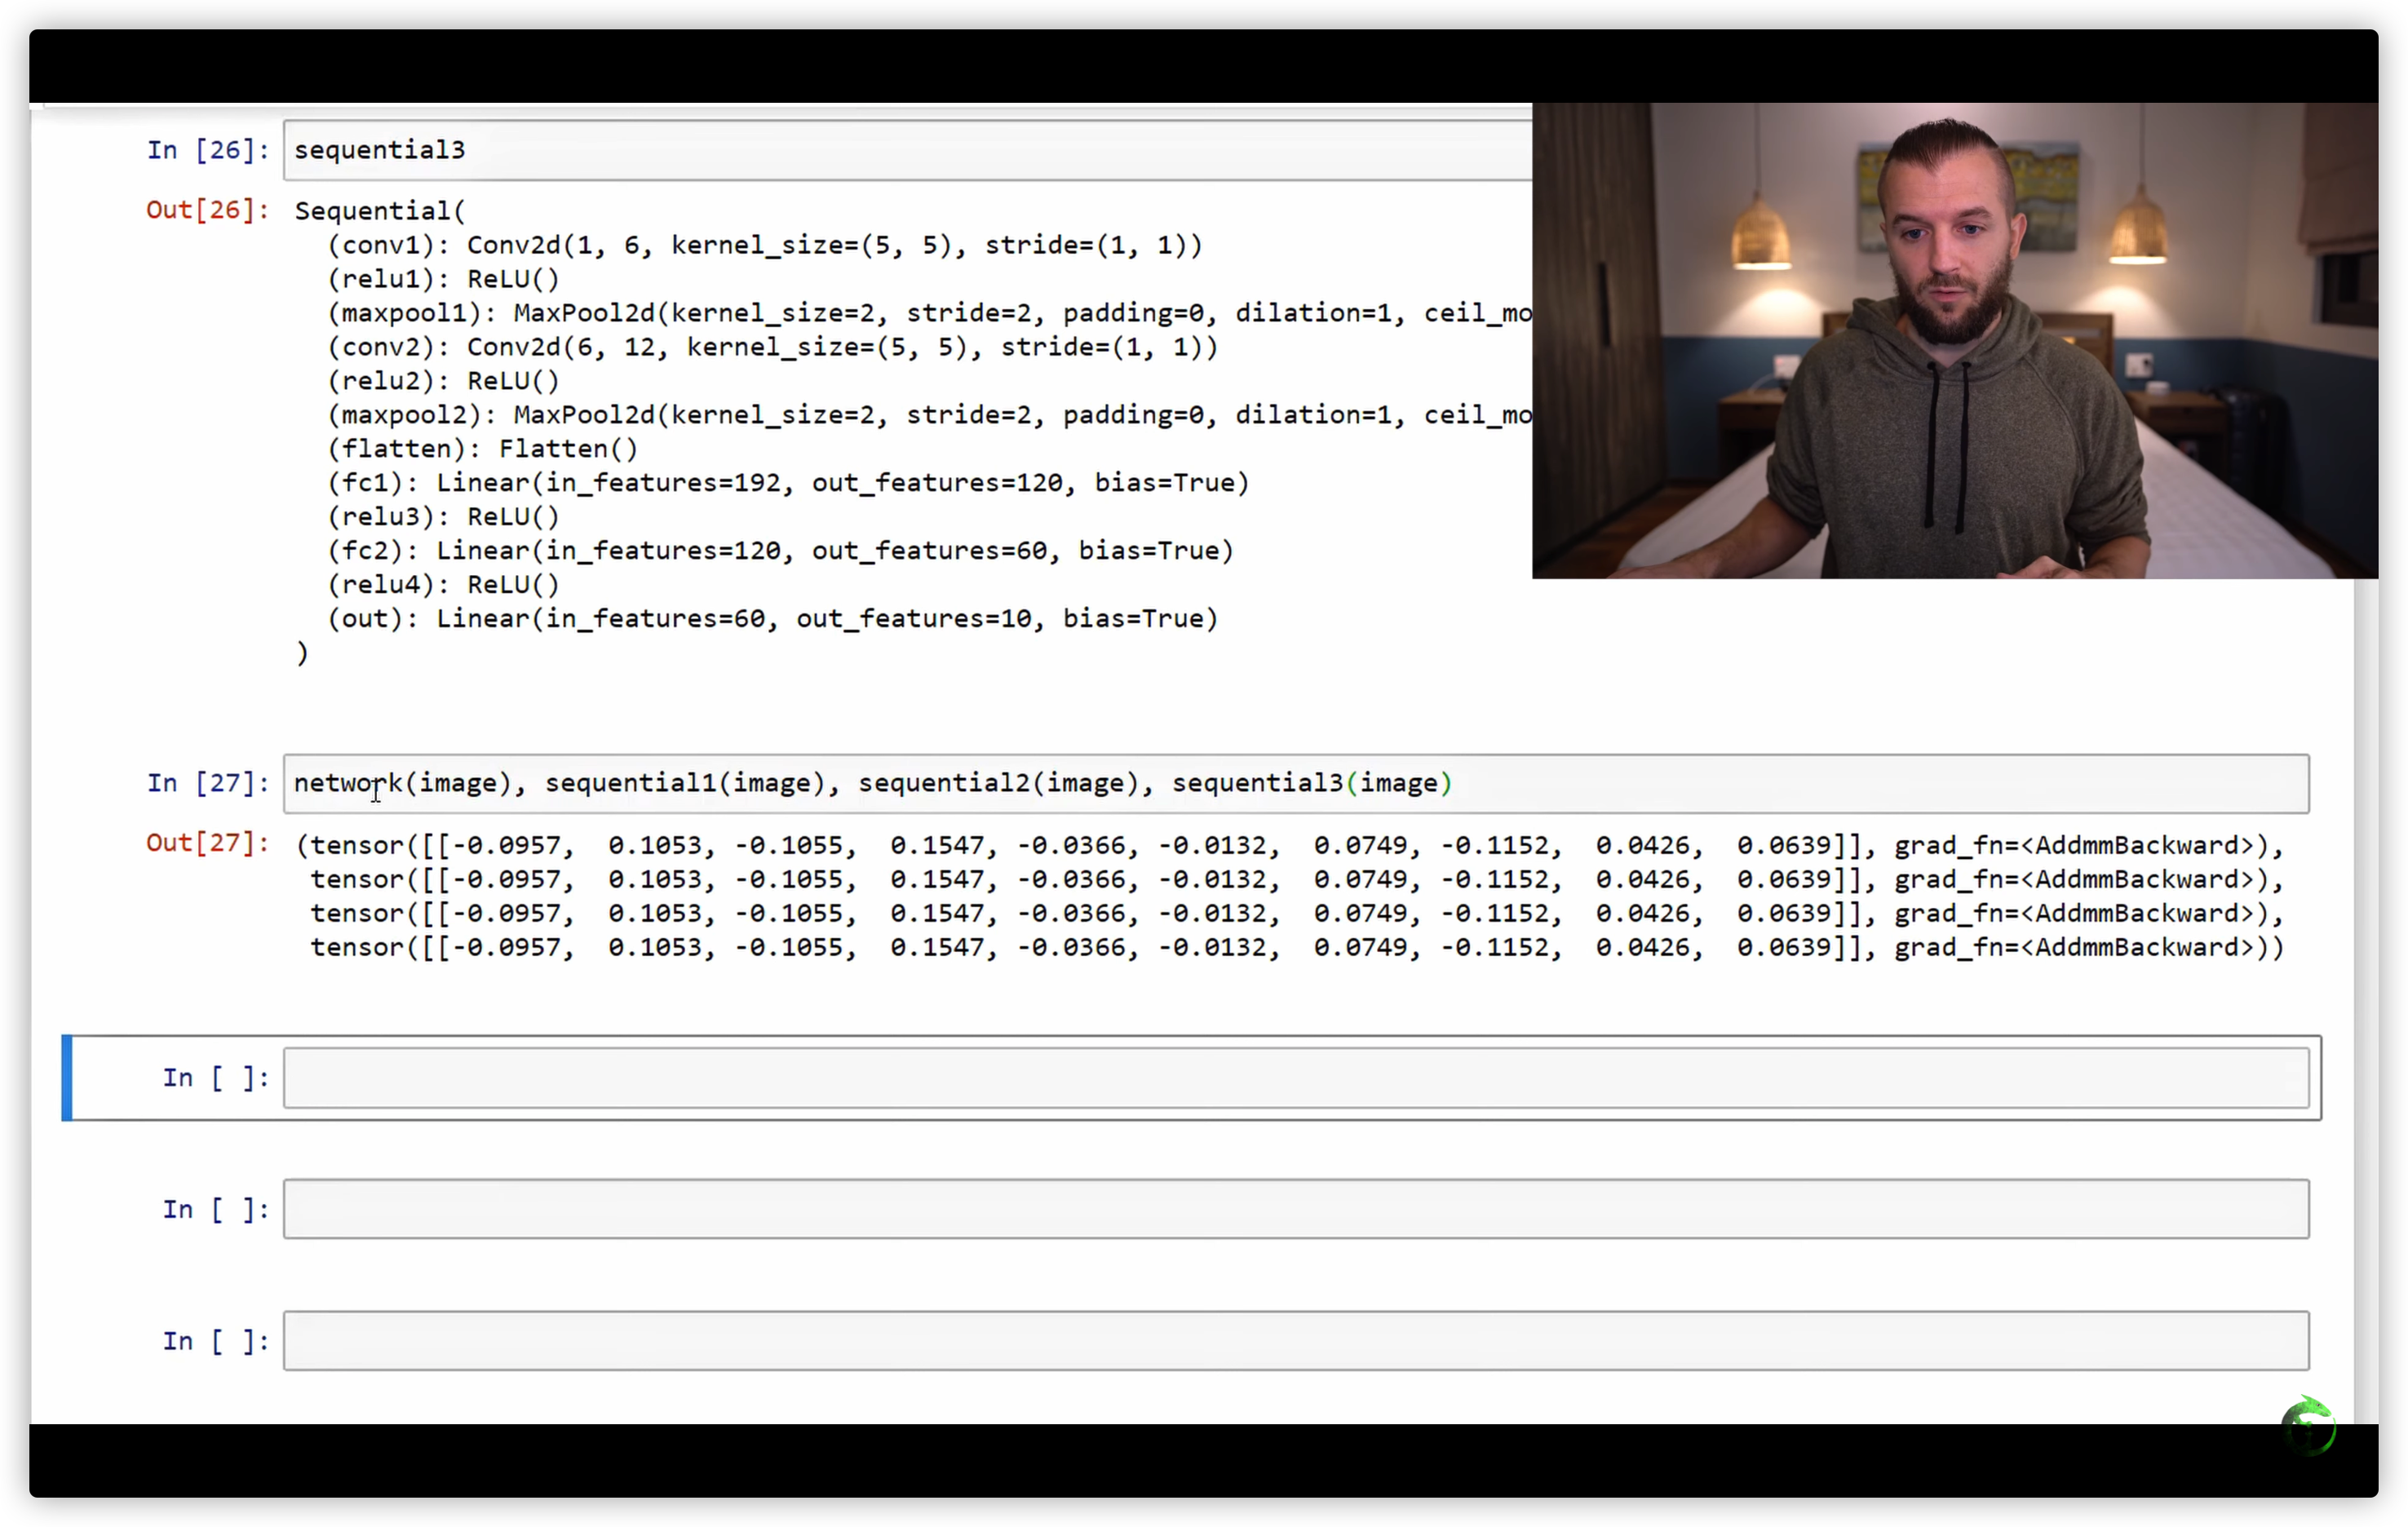
38. PyTorch Sequential Models - Neural Networks Made Easy
用nn.Sequential 构建网络的三种方式
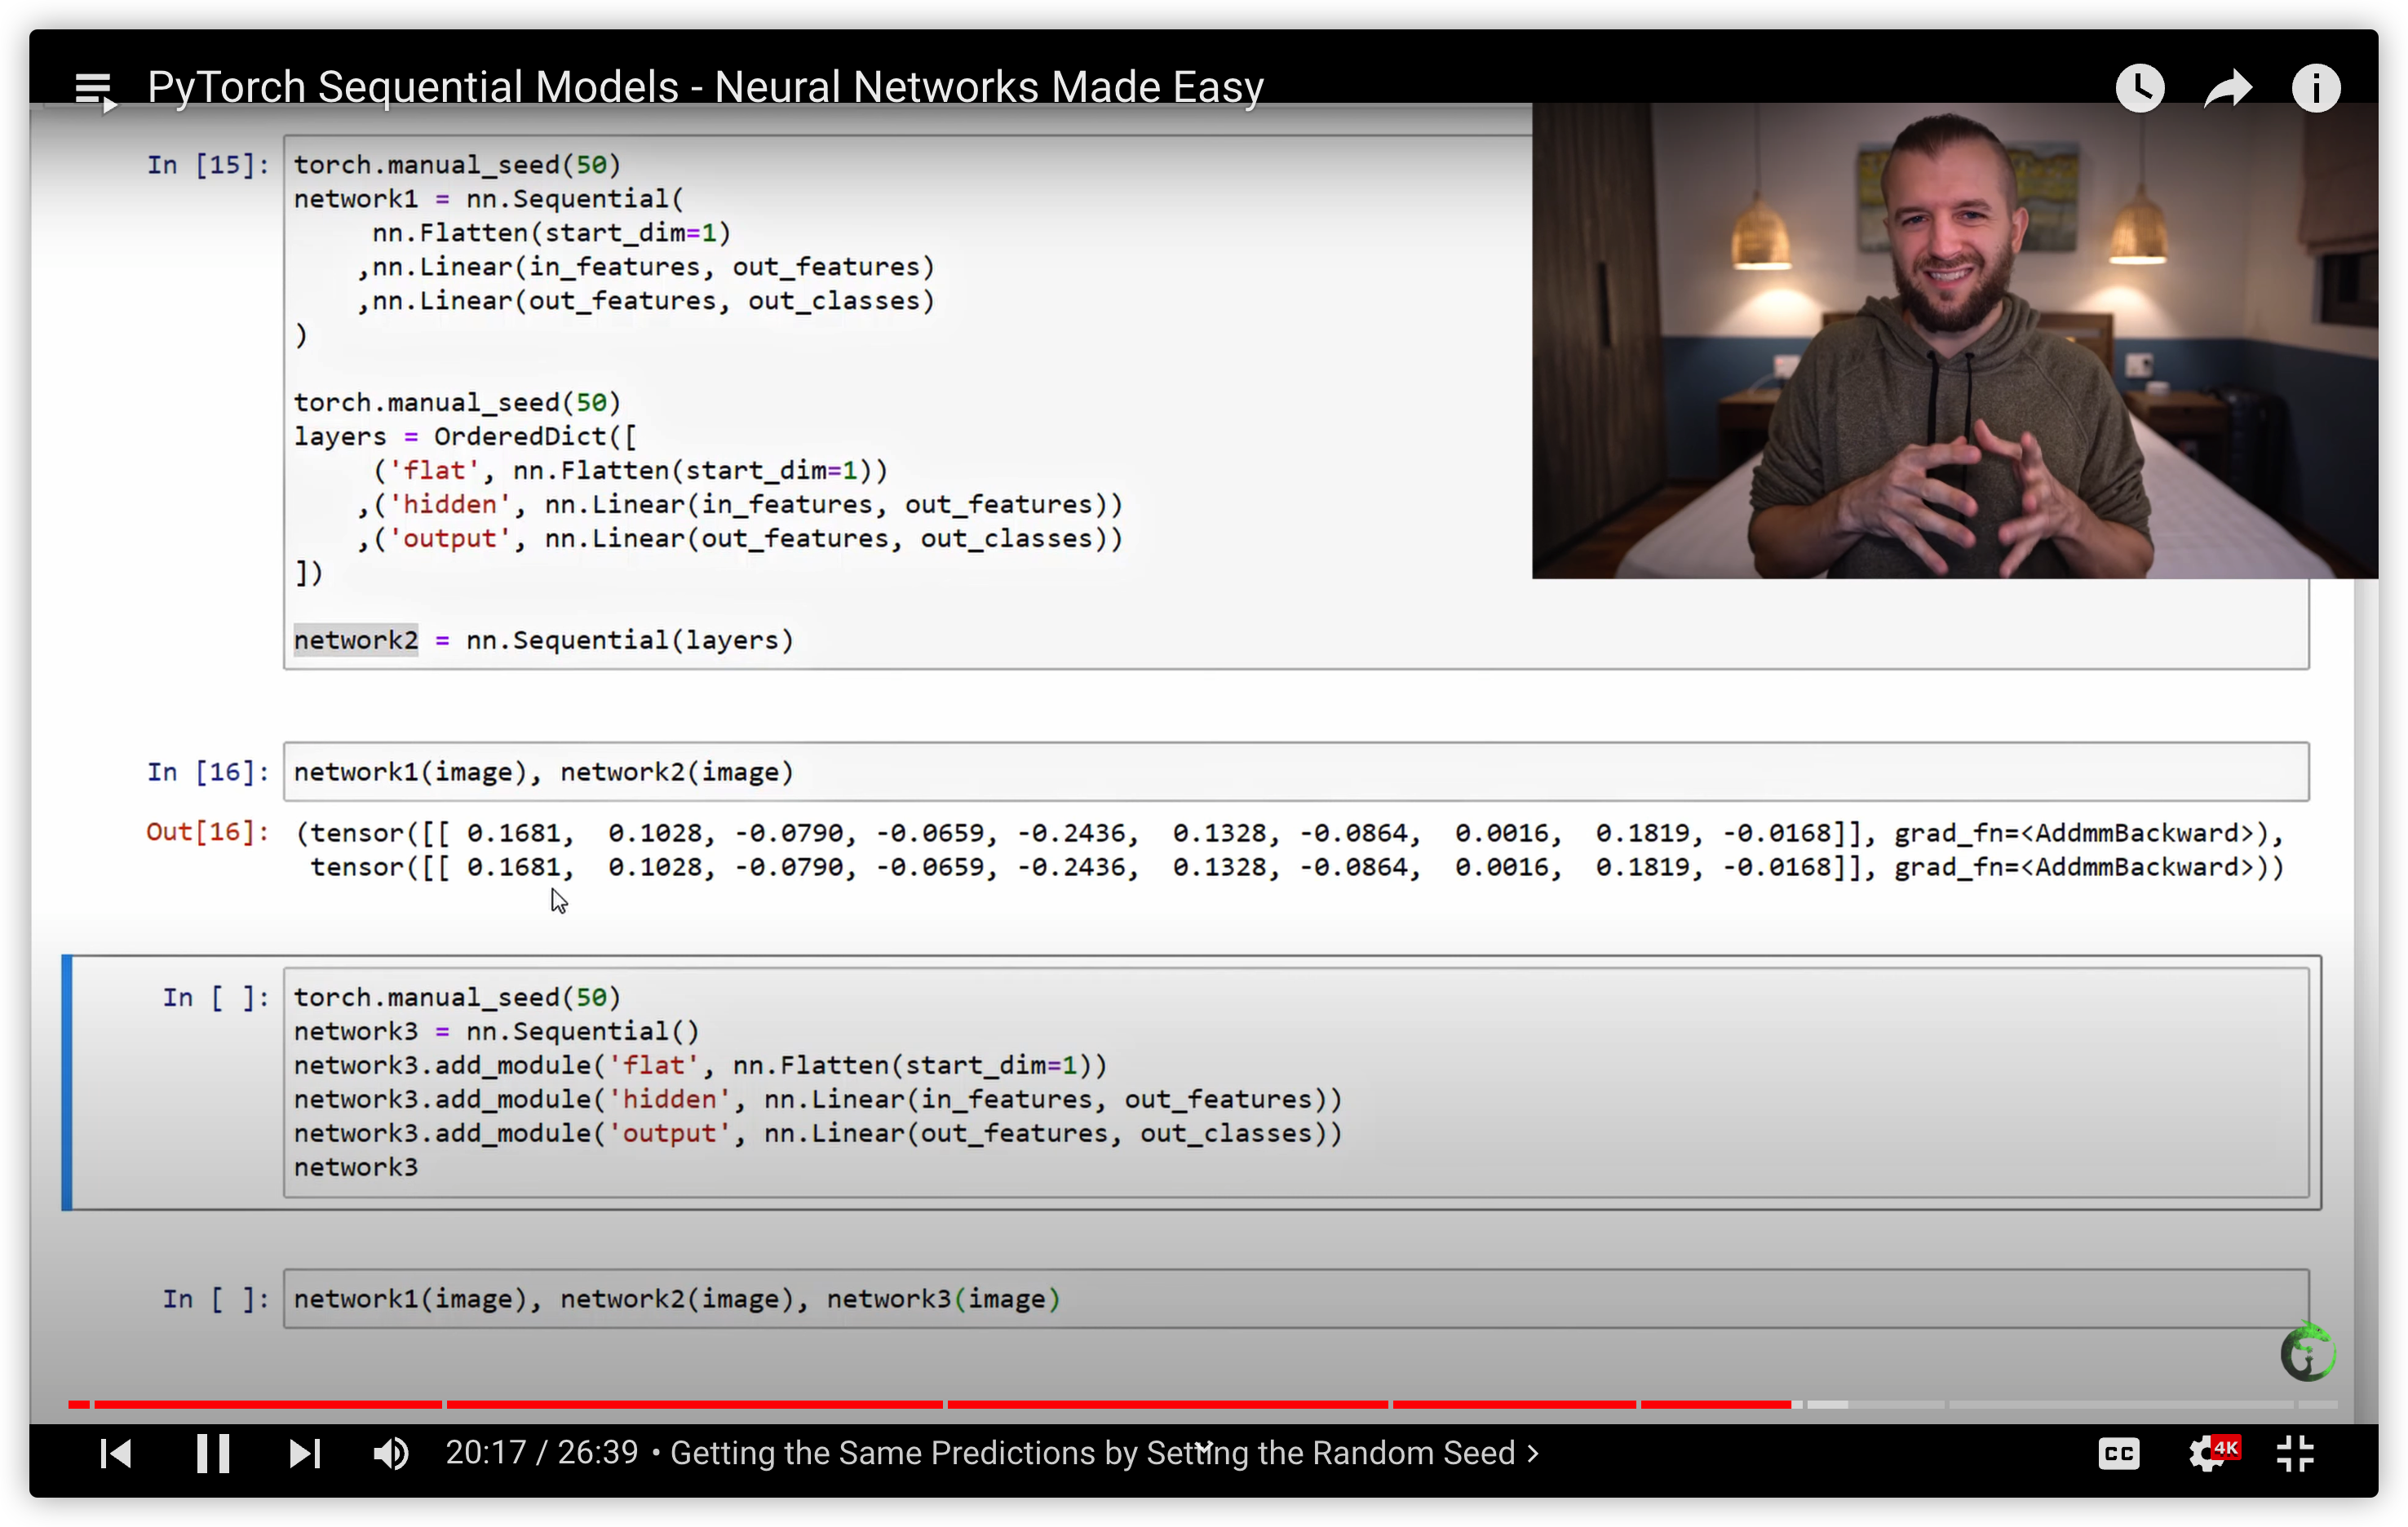
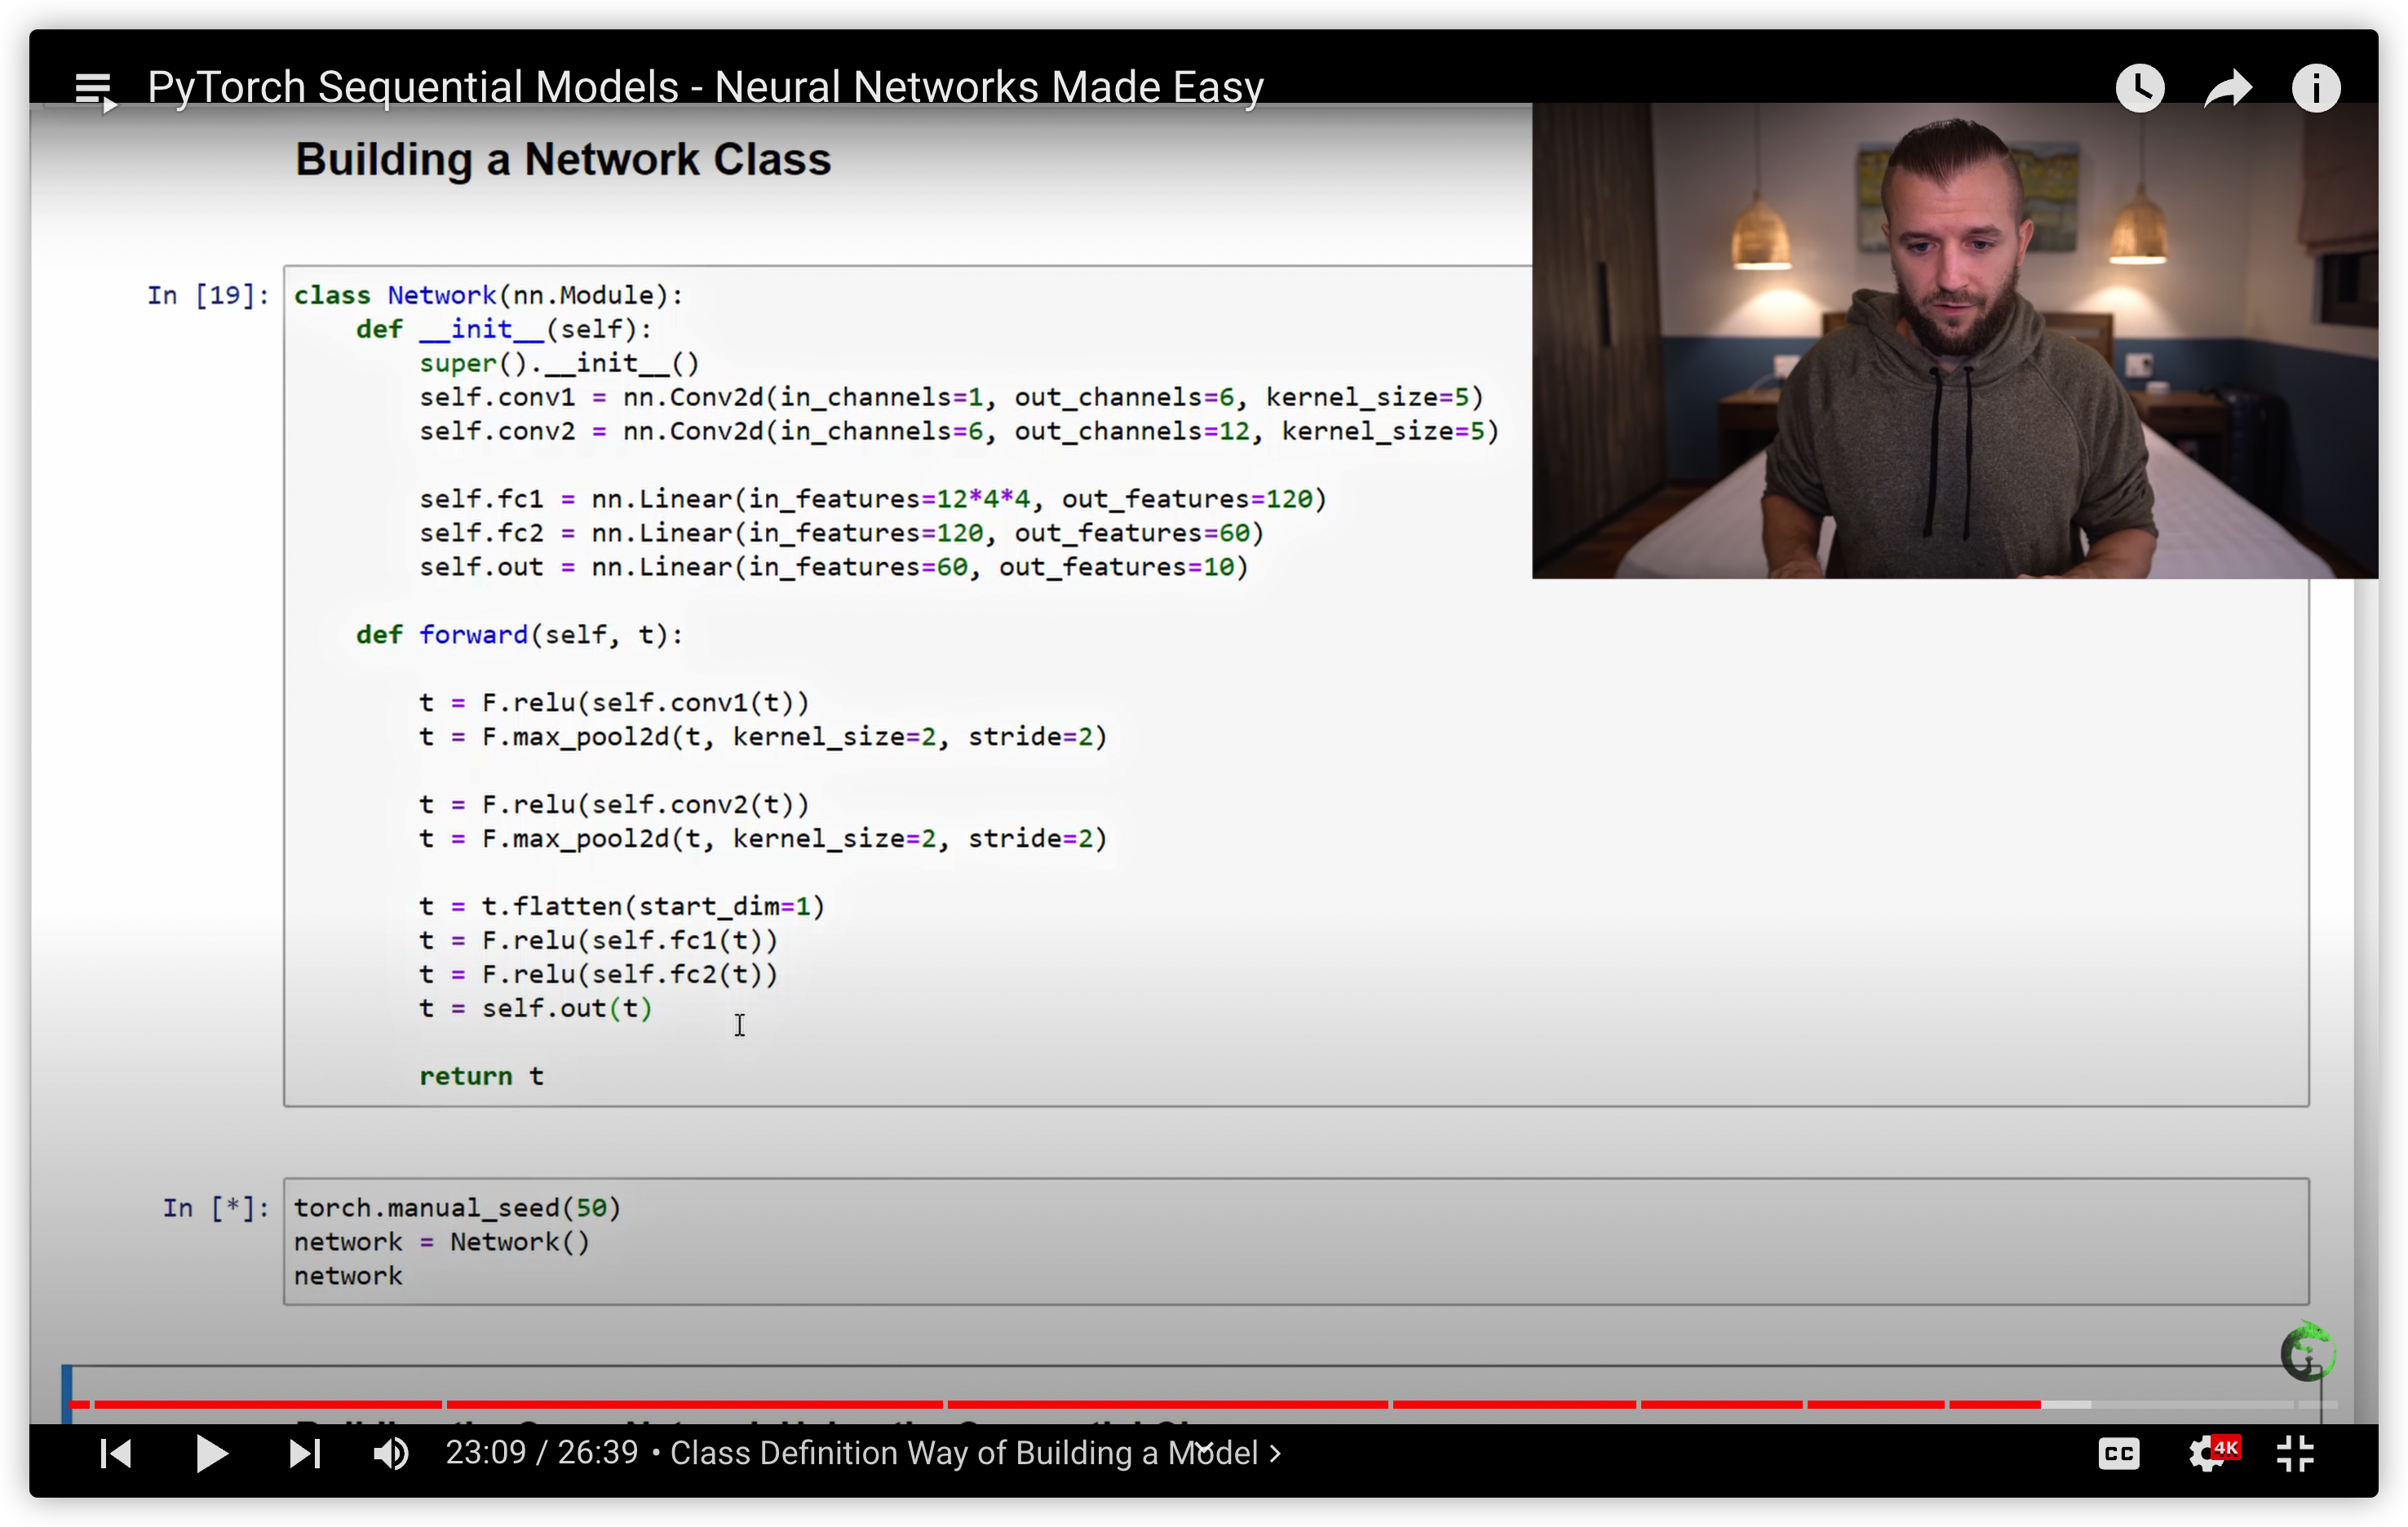
build the same network using the Sequential Class
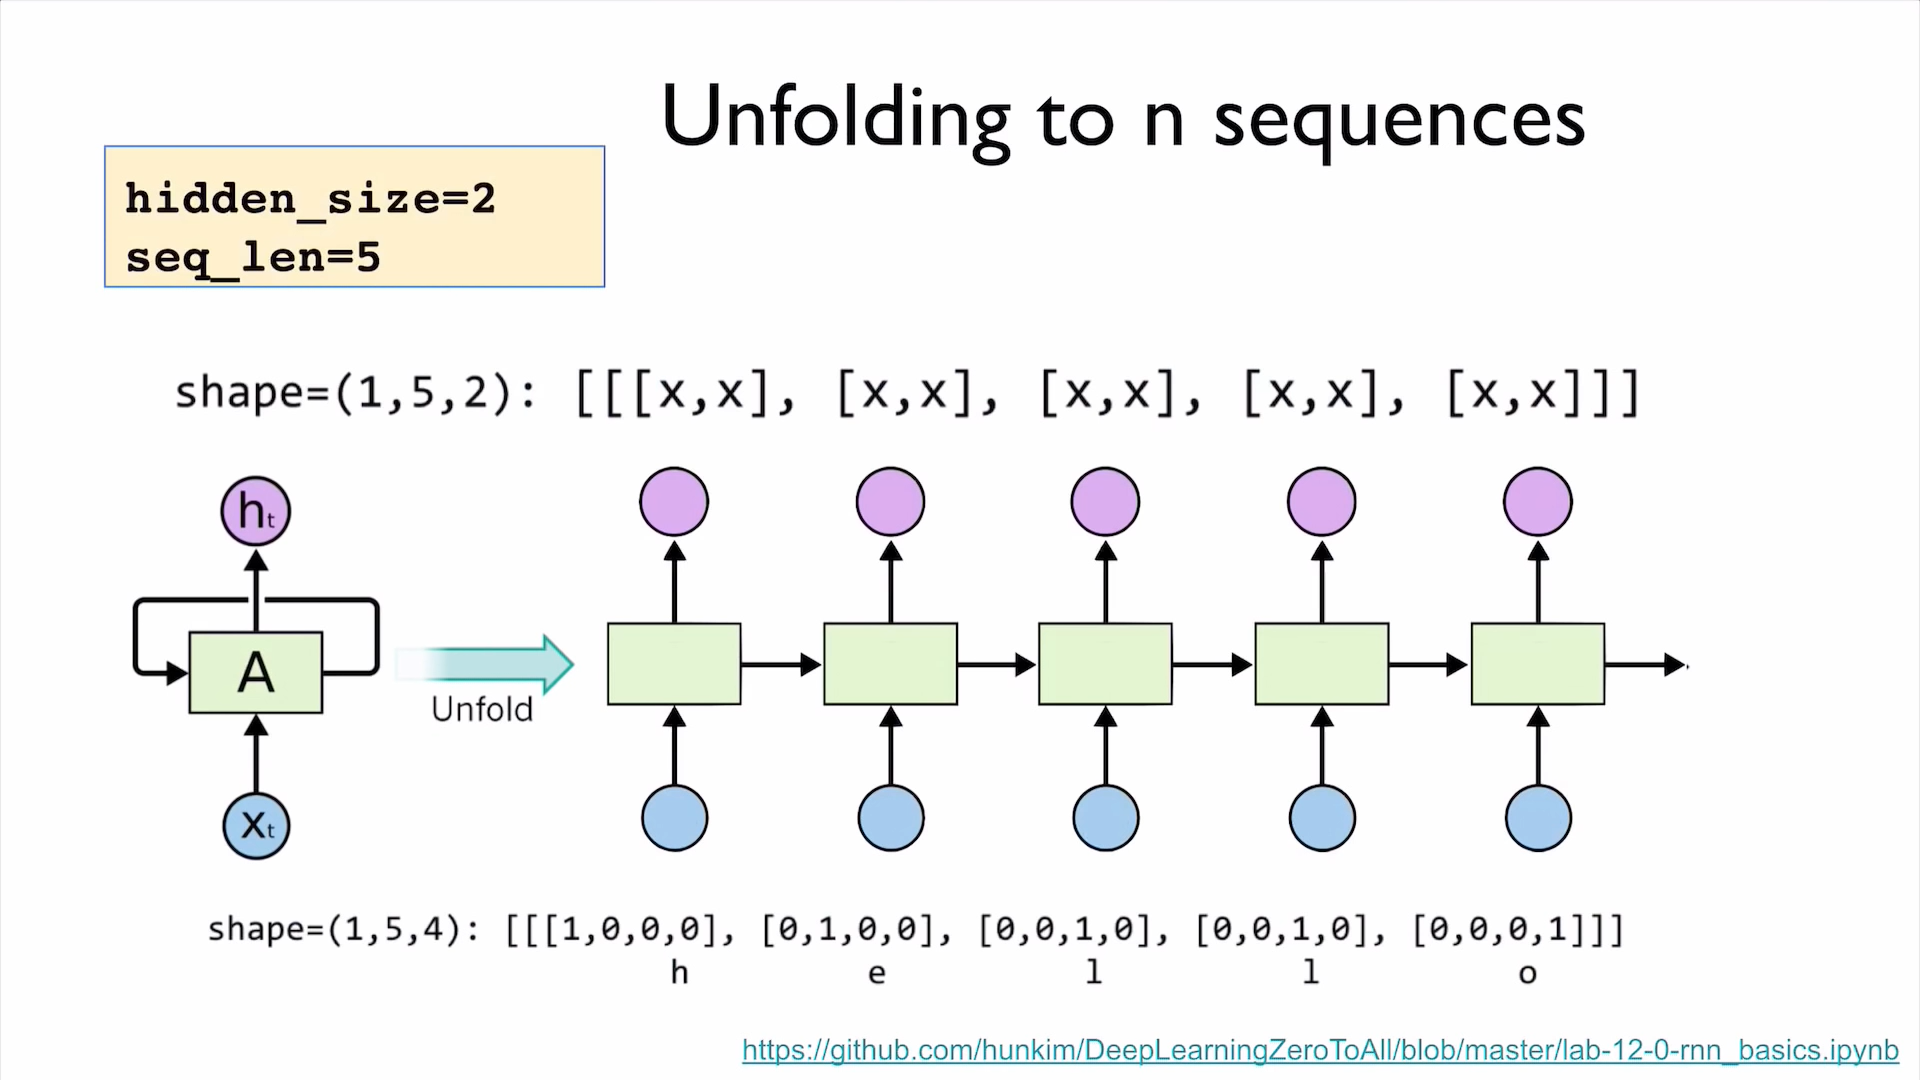
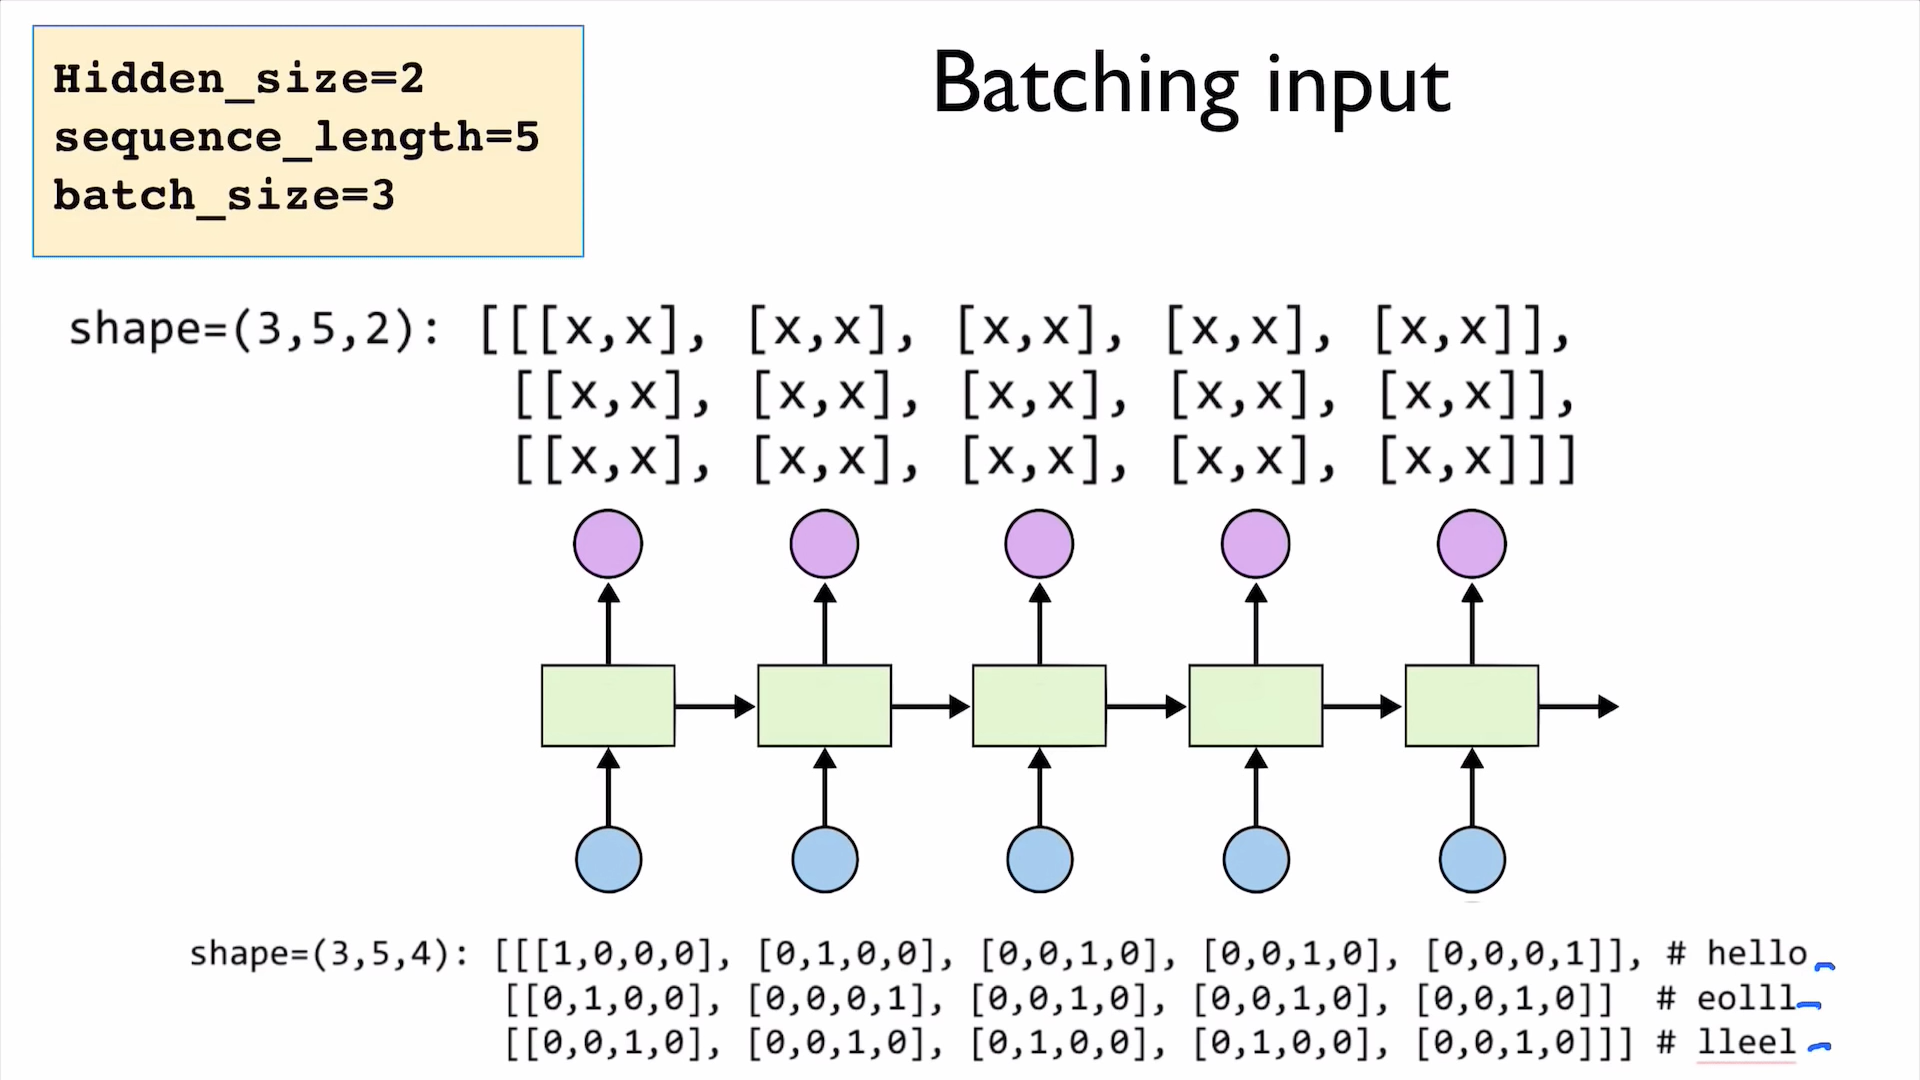
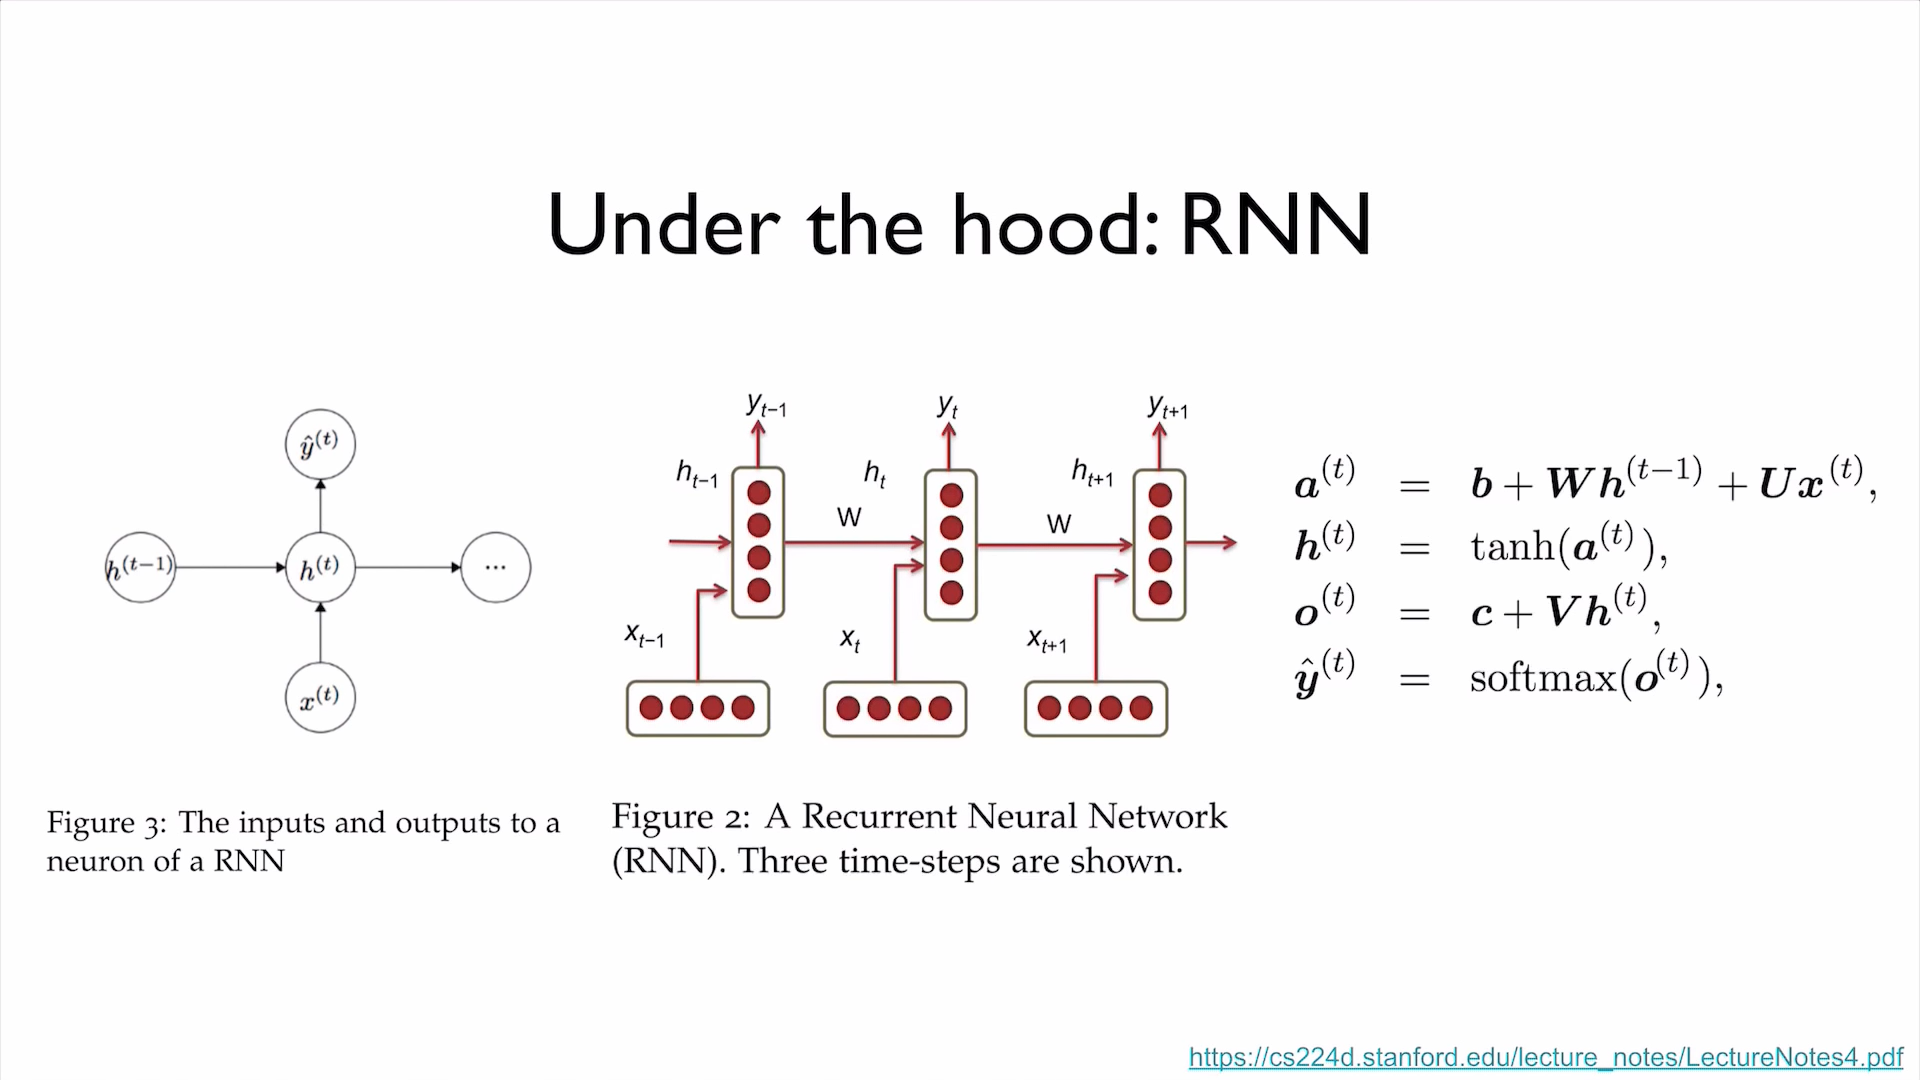
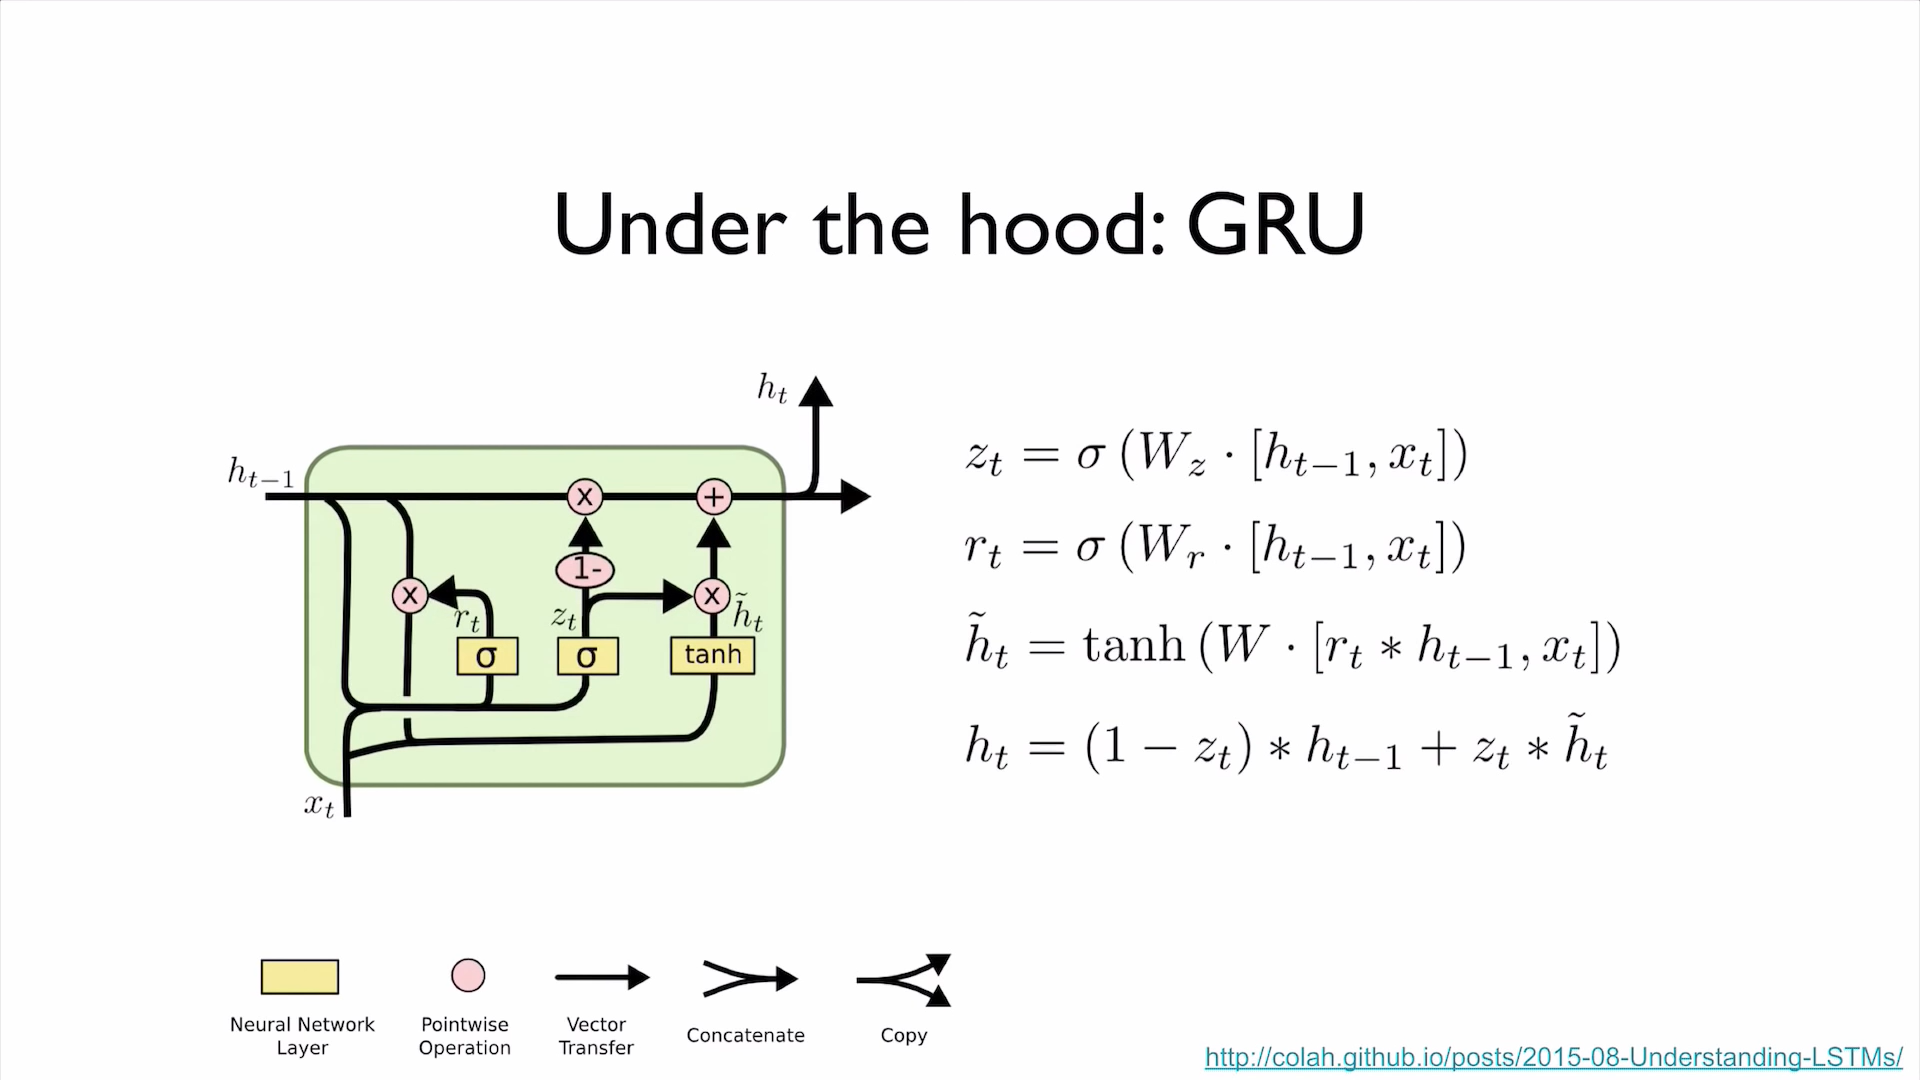
Supplement: RNN
PyTorch Zero To All Lecture:
- PyTorch Lecture 12: RNN1 - Basics
